Thrive Architect Review (2022) – The Best WordPress Page Builder?
In this day and age, professionally most people can not do without a website. However, the majority also doesn’t have the skills to create complex, well-designed and functional sites themselves. The solution: WordPress page builders and in this Thrive Architect review, we will introduce you to one of them.
For long, setting up a website meant writing thousands lines of code, but that’s not the case anymore. While you can still take the coding path, it takes a lot more time to learn or money to hire a developer.
WordPress page builders offer you a simple way to design a site via drag-and-drop tools and get things up and running quickly. While there are various options, this piece will look into Thrive Architect and help you decide whether it is the right fit for you.
Let’s get to it!
Thrive Architect Review: What Is Thrive Architect?
Thrive Architect is one of the best WordPress landing page plugins that lets you create content and layouts for a WordPress website. It is a part of the Thrive Themes suite of WordPress tools and a WYSIWYG (What You See Is What You Get) type of editor. It allows you to customize the visual aspects of your site and also enhances the functionality of the various website elements.
It also has 276 built-in landing page templates to choose from as well as other lead generation features. This allows you to prototype your pages more quickly and also helps with your website marketing.
In a nutshell, Thrive architect merges website aesthetics, functionality and promotion in one. Through that, it makes it easy for anyone to set up a business site or blog, express their ideas to prospects and ensure that the site is working well.
To help you understand how it helps you do so, we will now take a more in-depth look into the Thrive Architect features and how to use them.
Working With Thrive Architect
Alright, here is how to get started with this WordPress page builder.
Installation
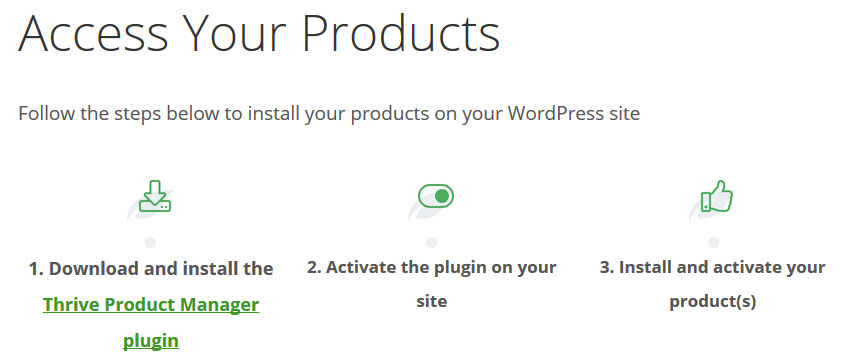
Once you have purchased Thrive Architect, the first thing you need to do is install the Thrive Product Manager plugin. You will find a link for that in your member dashboard after logging in. Click it to download the software.
After that, you can install it on your site via Plugins > Add New and the Upload Plugin button at the top. Simply use the Browse button, navigate to your downloaded file and hit Install Now afterwards.
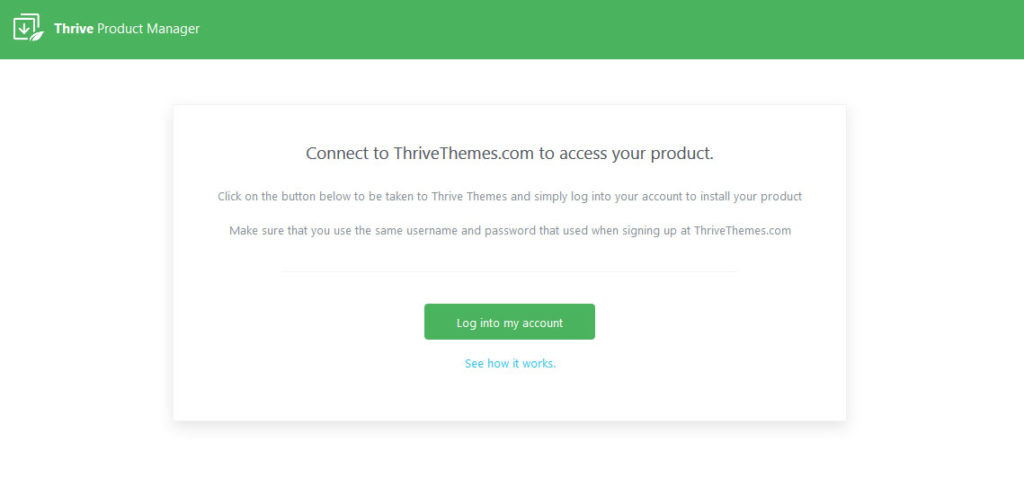
Don’t forget to activate once it’s done. This will give you a new menu item called Product Manager in the WordPress dashboard. A click on it brings you here.
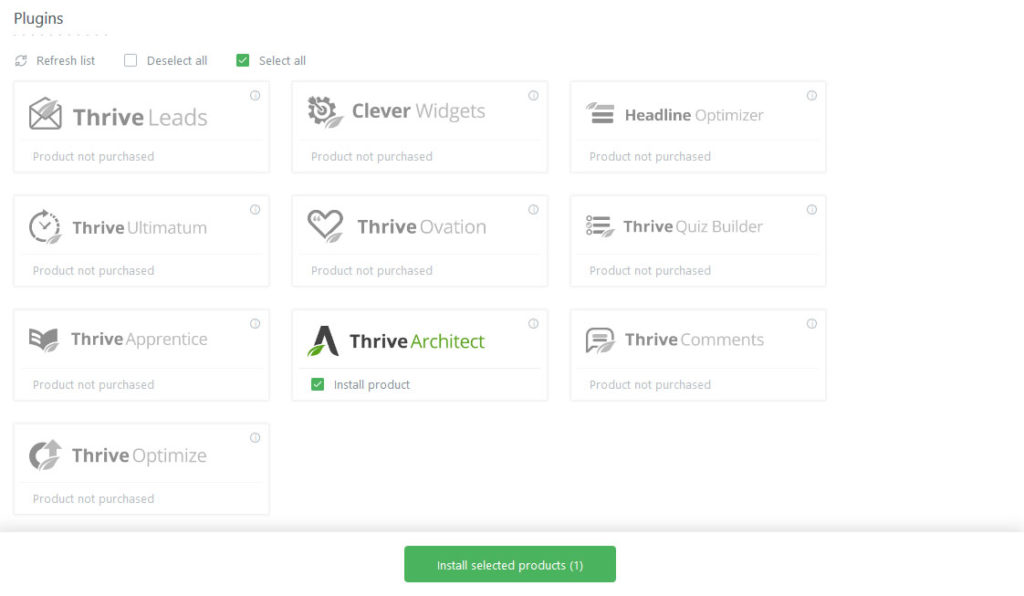
Use the big green button to log into your account (it will do so automatically if you logged into the site earlier). Then, from the list that shows up, mark the products you want to install and hit Install selected products at the bottom.
The product manager will take care of the rest for you. Once it’s done, you are ready to use Thrive Architect.
Using Page Templates
You can build a page in two different ways. The first is using a pre-designed page template, the second is starting completely from scratch. If you want to take advantage of the templates, here’s how to do so.
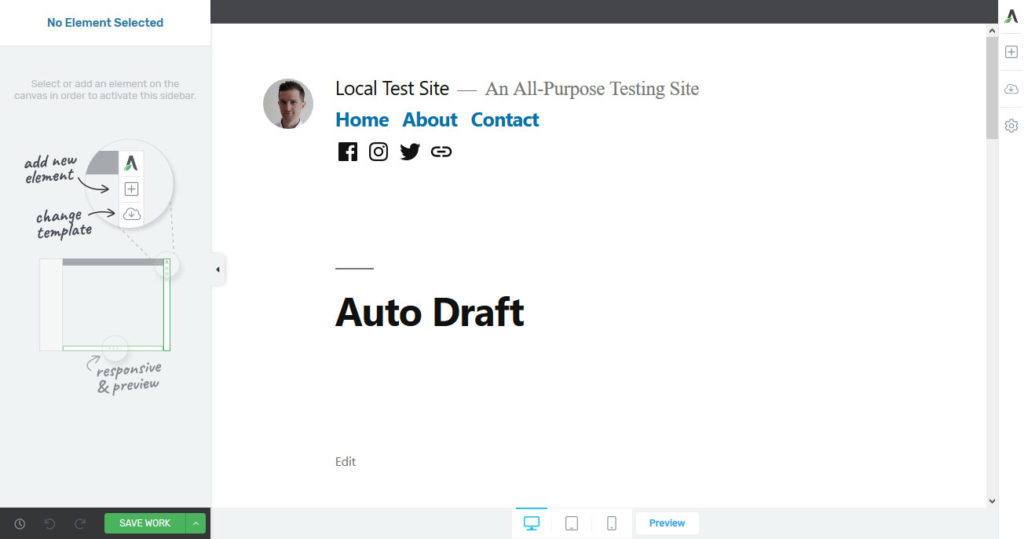
First, create a new page. You can do this in the usual way via Pages > Add New. Input a name as you usually do and then click on the new Launch Thrive Architect button at the top.
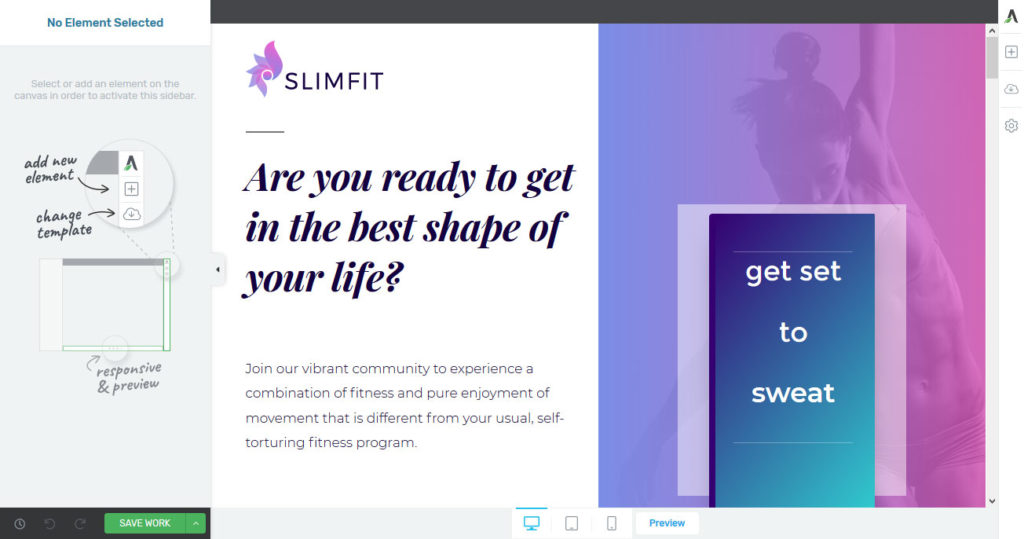
This option will open up a new window with a bunch of new editing tools.
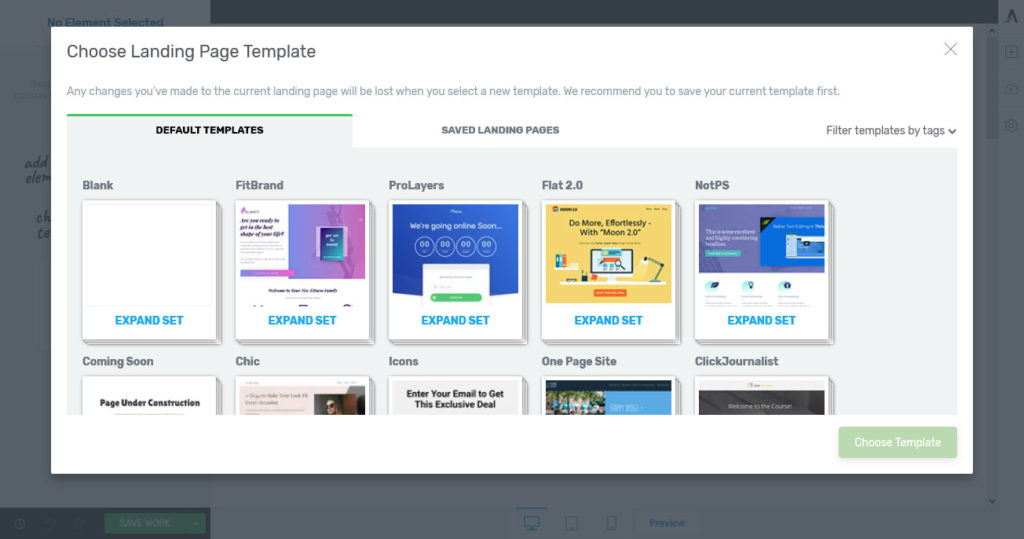
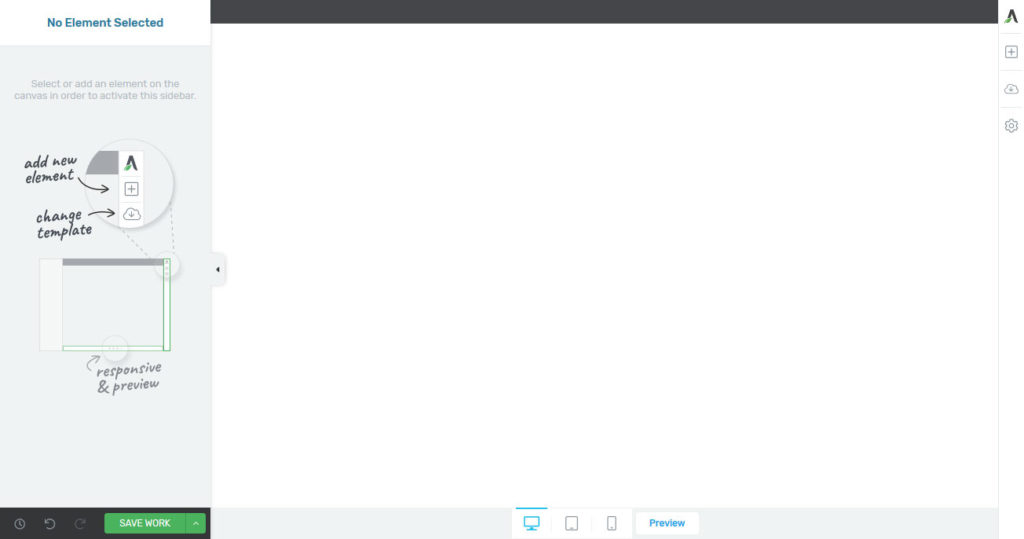
On the right side, the second menu item that looks like a cloud, is the option to change the page template. When you click it, it opens up the following menu.
Here, you find template sets for all sorts of purposes and in many different designs. Click any set to expand it and see the kind of templates it contains. This could be for a landing page, confirmation page, homepage, content area or else.
Note that the pages for each pack come with consistent design. In addition, there are also blank templates that we will be using later. Finally, you can also filter the templates by tag in the upper right corner.
Search for a while to find one most fitting to your needs. Once you decided, simply click on your choice and then hit Choose Template at the bottom. After that, Thrive Architect will make it available in the editing area where you can adjust it to your needs.
Editing The Template
As with everything in Thrive Architect, the templates are made up of different elements such as headings, text, buttons, icons, and more. If you want to make changes to any of them, simply click on the object in question.
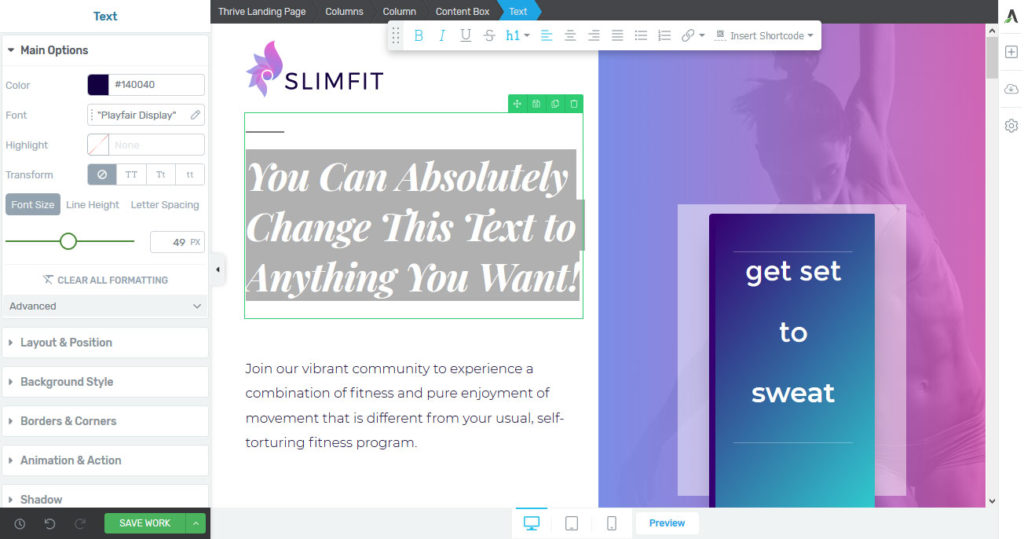
For example, you are able to click into any text field in order to change its content.
In addition, if you do so, formatting options will appear on the left. Here, you can modify the design of the particular element, such as its size, font, border, layout, position on screen, or background color. If you have ever worked with Elementor, you will quickly find your way around since the interface is very similar.
In addition, for text elements, you have options to make inline changes at the top. This includes turning them into headings, changing the text orientation, making parts of it bold and more.
With all of these, changes appear instantly. That way, you can play around with any element until you find a design you like. In addition, you are able to add more elements (via the plus symbol on the right) that work the same way. More on that below.
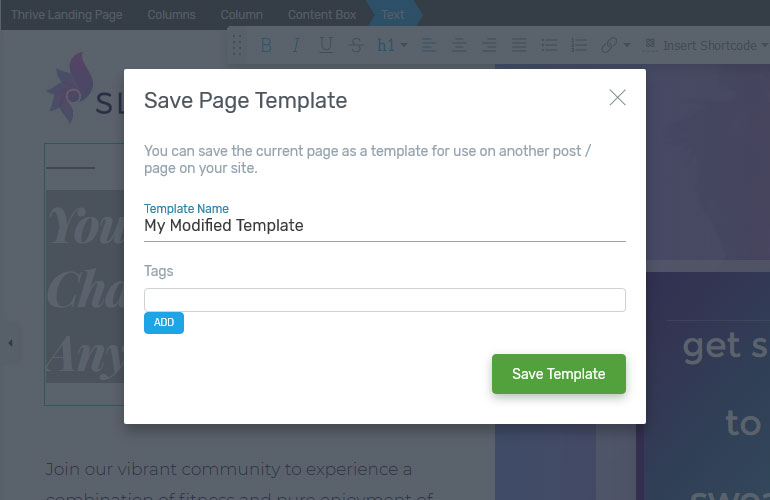
These options let you change the design of the landing page template completely to your liking. You can also save a particular version of it via the Settings button on the right side.
That way, you can revert to a previous version if necessary. Finally, at the bottom of the screen, you find options to view the design in tablet and phone size as well as preview it on your site.
Building Designs From Scratch
If you do not find a template that suits you or if you want to take charge of how your site appears, then building a page from scratch is the best option.
The beginning is the same as before. Add a new page or post, name it and edit it with Thrive Architect. Here, either stick with your theme’s design to enhance it or pick one of the blank page templates. Either will provide you with a mostly empty canvas to work with.
Setting the Background
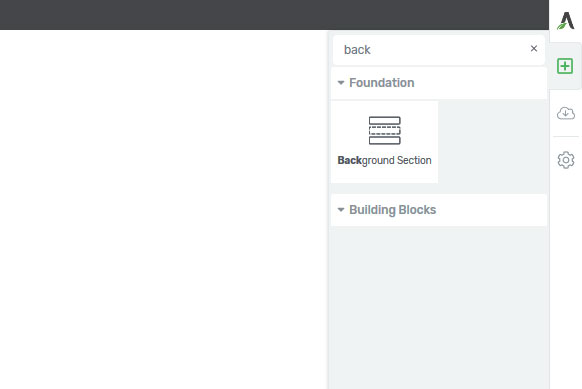
One common first element to use is the background section. You can select it from the list of elements on the right side. Either scroll until you see it or use the search function at the top. A click inserts the element into the page. Alternatively, you can also drag and drop it into your design.
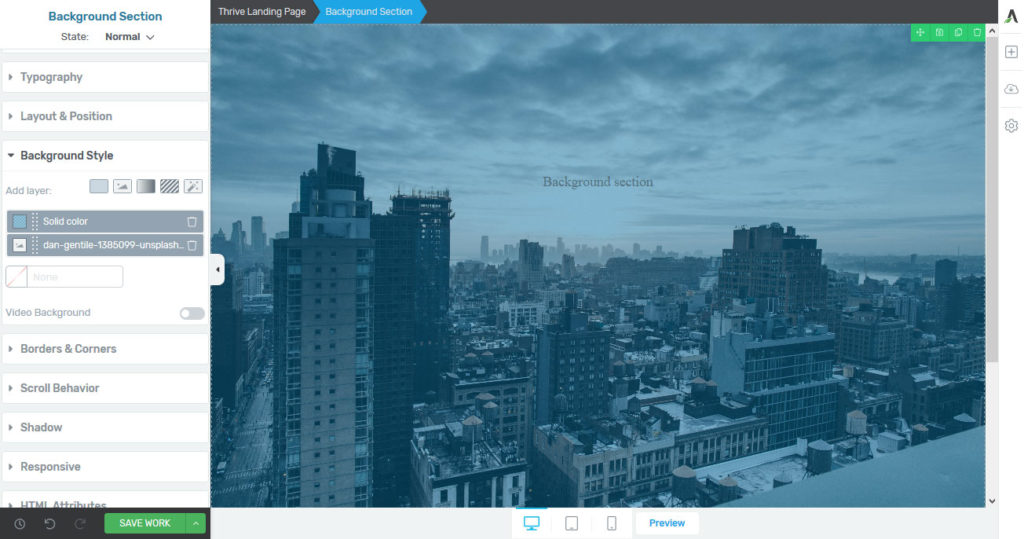
In order to create a hero image, here’s how to configure it:
- Main Options — Activate the settings to make the background stretch the entire width and height of the screen.
- Background Style — Pick whether to display a solid color, image, gradient or pattern. You can also use several layers, such as to put an overlay over an image as well as control their anchor points and more.
Adding Elements on Top
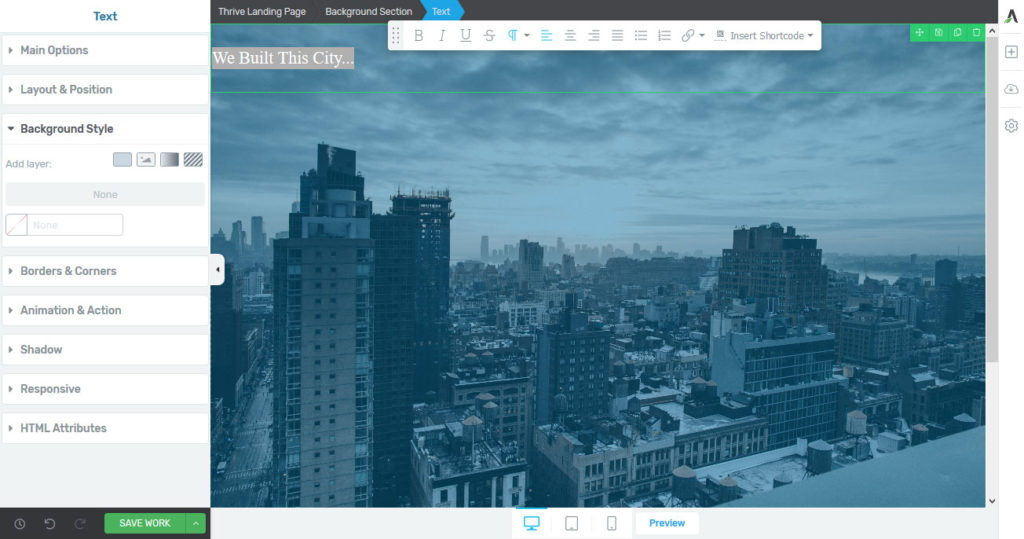
The cool thing is that you can now place other elements inside of the background. For example, simply select a text element from the right and drag it on top.
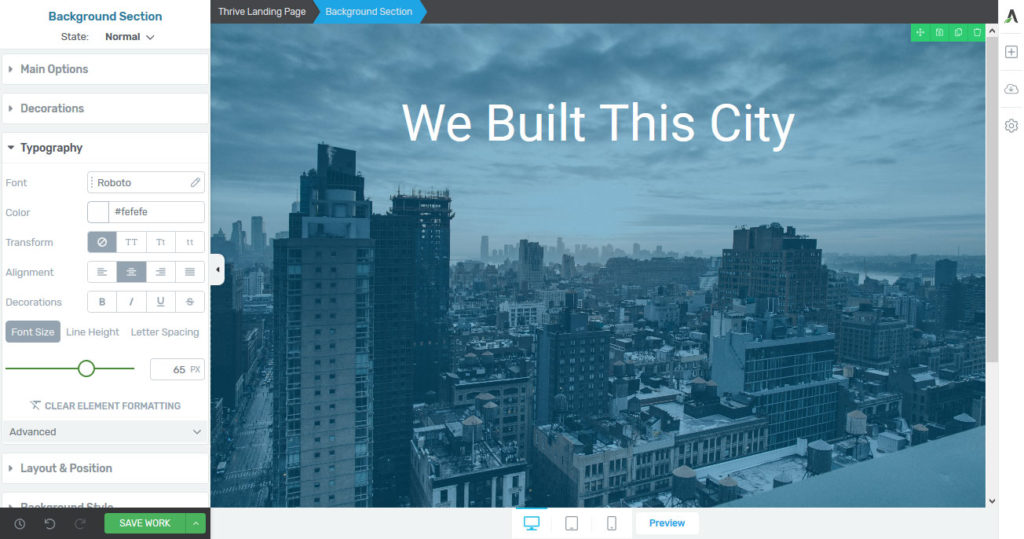
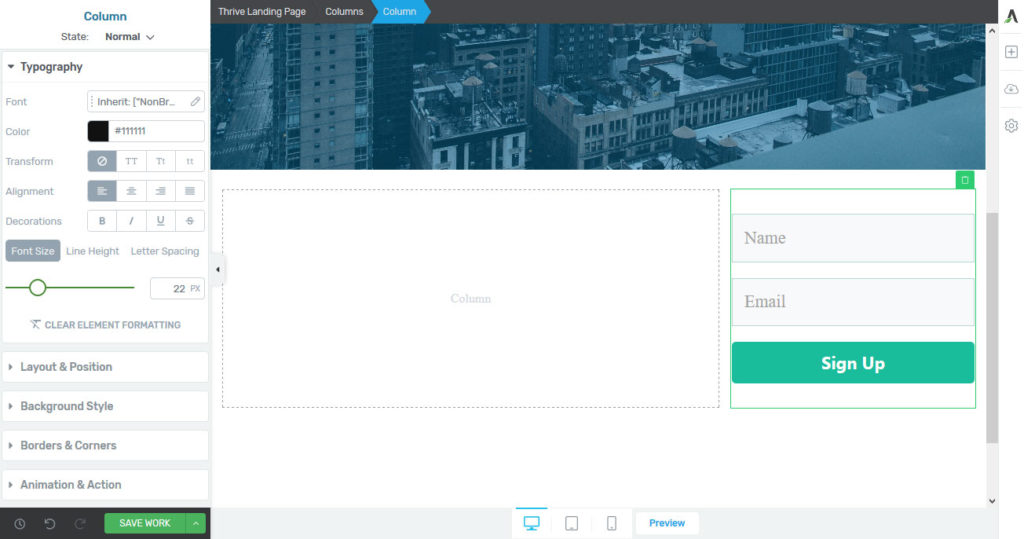
Of course, this element is also completely editable as described above. However, while you can make changes to the text itself, in many cases it makes a lot more sense to actually make modifications to the parent element. In this case, the background section.
So, if you’d like to apply a different color, font or text orientation, it’s best to click on the background section, go to Typography and make the changes there.
Why? Because when you do, the same rules will apply to any other text you might add to the same section. This way, you don’t have to edit each element but can define more global rules.
This is an important principle to keep in mind for your design work. It is the same way you would deal with things when writing CSS.
Adding More Elements
With these two steps, you have already created a rudimentary page. Now it’s time to add some more elements! Here are some of the options you can choose from:
- Buttons
- Columns
- Content Boxes
- Countdowns
- Custom Menus
- Google Maps
- Calls to Action
- Post Lists
- Pricing Tables
- Testimonials
These all work the same as described above. Drag and drop them to where you want them to appear, fill them with your own custom content and configure with the settings.
You are not limited to anything when creating a page on Thrive Architect. Get creative and try out different designs to get the best result for your site. Also, remember to save your work regularly!
Adjusting Mobile Design
No WordPress page builder worth its salt can do without extensive features for mobile responsive design these days. How does Thrive Architect approach this topic?
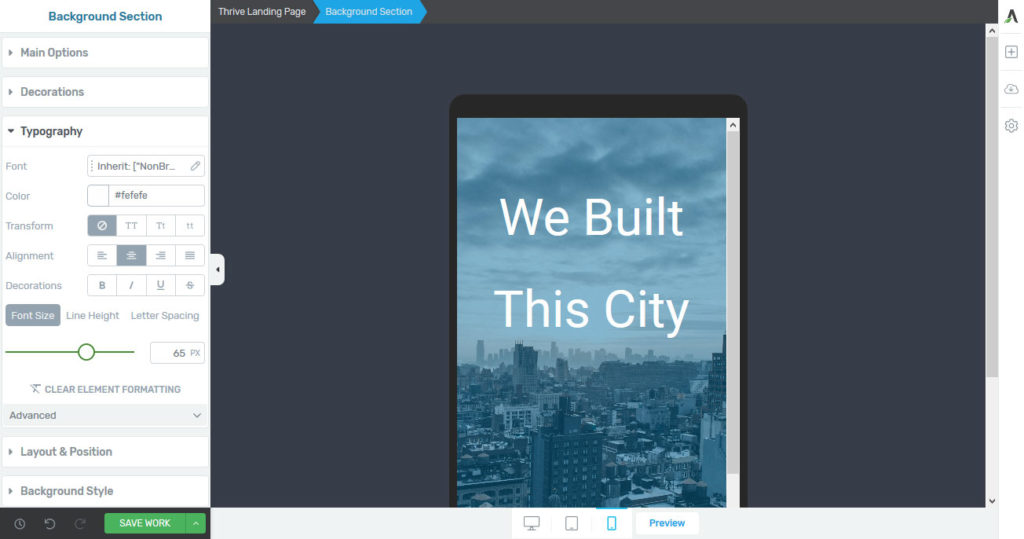
First of all, at the bottom of screen, you can always view your current work in tablet or phone format.
This gives you good impression as to how the page will look like for mobile users. In addition, for every page element, you have the option to change its configuration depending on what device it appears on.
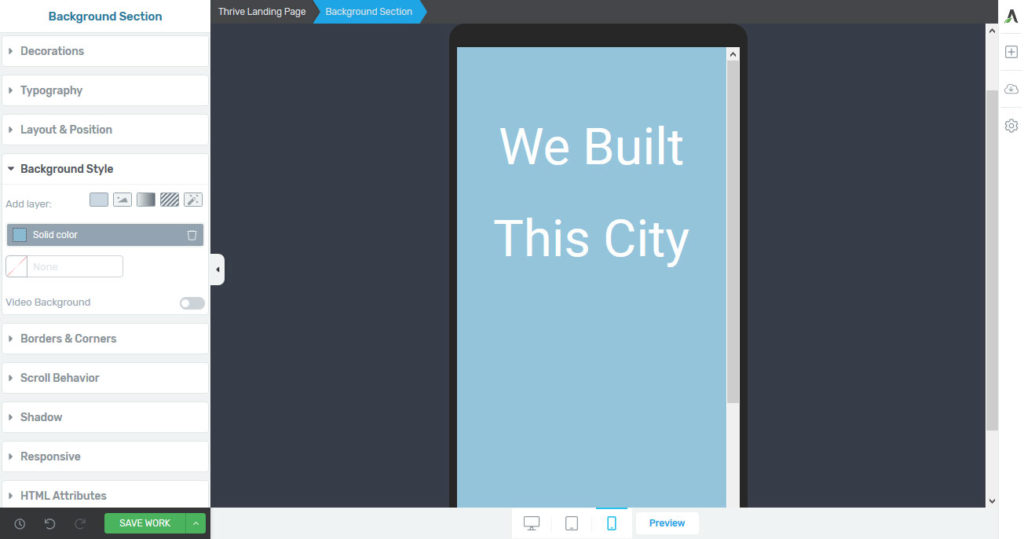
For example, let’s say you have set a background image for one of your elements that you don’t want to load on mobile.
To disable it, simply change to phone size, go to Background Style and disable it there. It will then no longer appear on smaller screens.
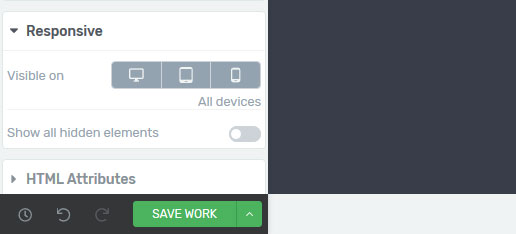
The same works for font sizes, text position, etc. In addition, under Responsive you may also switch off elements completely for certain screen sizes.
Use these options to ensure that your mobile users have a positive experience in terms of design and performance.
Lead Generation Features
Thrive Architect is not only a page builder but also a lead generation software. Besides the landing pages templates, it comes with a number of features that help you market your site.
Sign-up Forms
The simplest solution in this area are email sign-up forms. You find those as Lead Generation in the page elements.
Drag and drop the forms where you want them and then connect to the email service of your choice. You can do this either via API or HTML form connection. Thrive Architect supports a large number of email marketing services out of the box.
You can also style your forms in the aforementioned way. In addition, you find these types of forms in the landing page templates.
By the way, if you are not using Thrive Architect, you can use other list building plugins.
Thrive Lightboxes
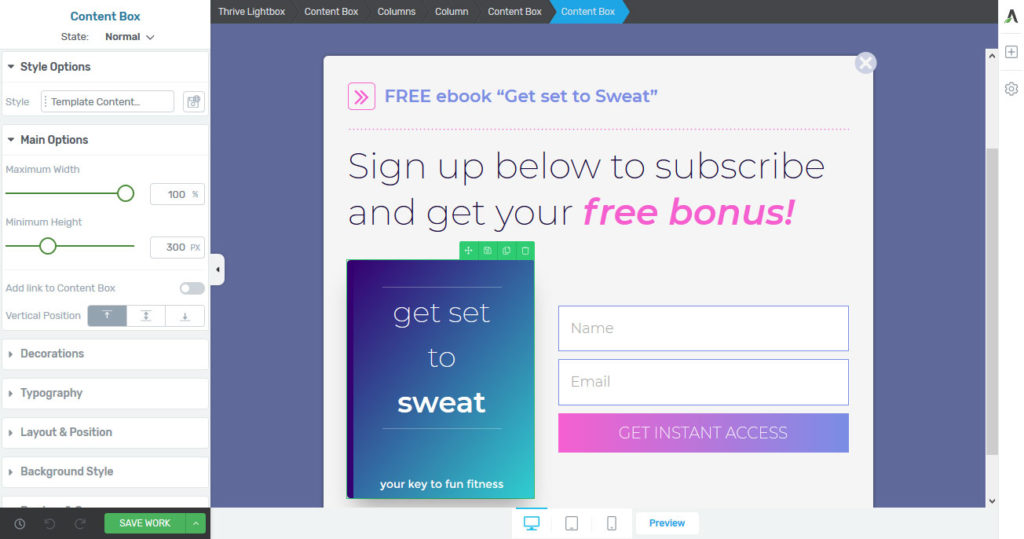
In addition to the above, Thrive Architect comes with Thrive Lightboxes. This features has its own menu item inside WordPress back end.
Here, you are able to create popups in the same way as you create pages with Thrive Architect.
Then, you have to define when and where these appear. For that, there are two different options. The first is to bind a popup to a page element.
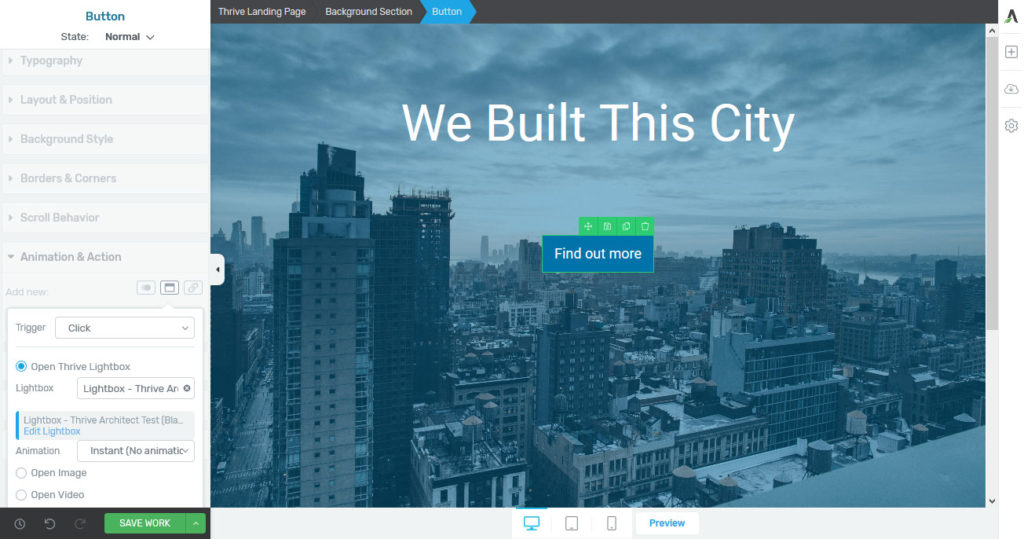
For example, when you create a button with a call to action, under Animation & Action, you can configure that a click on it will trigger the lightbox to appear.
You can also define the trigger to be when a certain element appears in the user’s viewport and you can even pick the manner in which it will appear (zoom, zoom out, slide in, etc.).
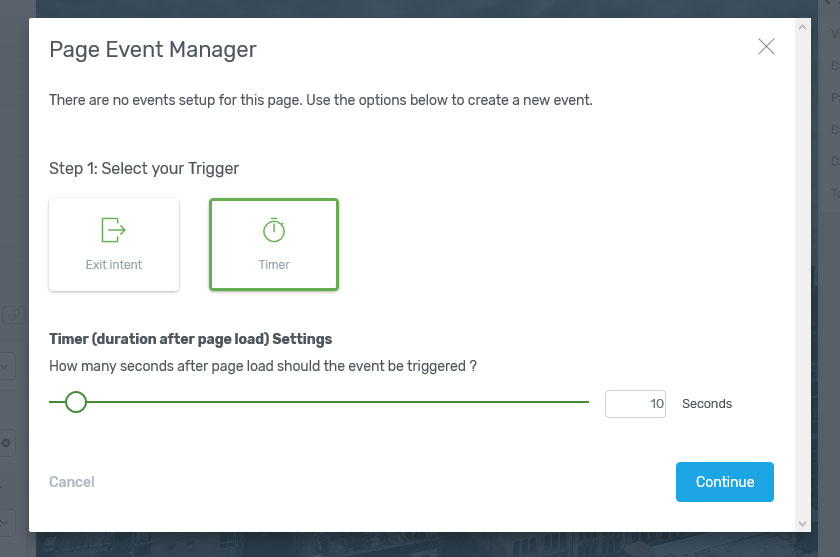
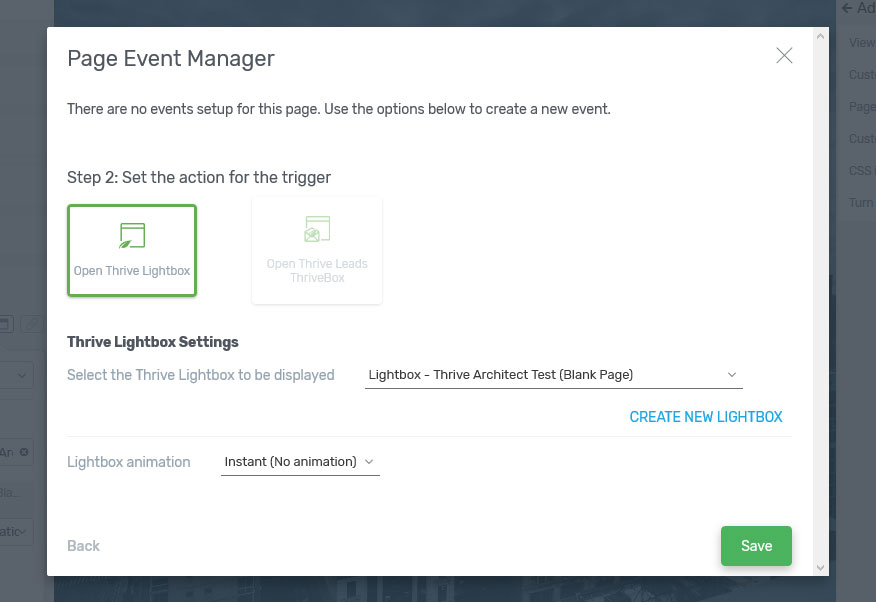
The second option to trigger popups are page events. You find them under Settings > Advanced Settings > Page Events. Here, you can configure to show interstitials after a certain time or when it detects exit intent.
For this option, too, you are able to configure different animations for their appearance.
Once saved, lead generation is set to autopilot. Of course, you are also able to apply these to pre-designed landing pages.
Pros and Cons of Thrive Architect
Alright, now that we have covered the basic functionality of this WordPress page builder, let’s talk about the upsides and downsides of using Thrive Architect.
Pros
- Easy-to-use builder — The page builder is very beginner friendly. A tutorial video helps you grasp the basic concepts, and everything else is pretty straightforward. Even without help, it is simple to figure out most things as you build your pages.
- No content lock-in — Lock-in is a common problem associated with many page builders. Once you disable them, your pages often end up chock full of shortcodes and become unusable. Cleaning up this mess is time consuming. Thrive Architect does not have this flaw and your pages will retain their format even if you stop using it.
- Variety of templates — The page builder comes with a vast collection of templates you can use as jump off points to create your own. They are organized into sets and you can easily find one that suits your needs.
- Great marketing tools — While there are many page builders out there, Thrive Architect is the one most focused on marketers. It offers landing page templates, page events, popups and more and also integrates with all other Thrive tools.
- Attractive Pricing — As you will see below, in contrast to other page builders, Thrive Architect can be quite the bargain.
Cons
- No blog-post templates — Thrive has a plethora of fantastic landing page templates, but it doesn’t offer the same for blog posts. Many people would wish to design and control their blog the same way they do their landing pages.
- Cluttered sidebar — The element settings contain a lot, resulting in unnecessary scrolling. Maybe there would be a better way to organize this part of the interface.
Pricing Comparison
Thrive is known for delivering value at a fair price, and it helps to compare it with notable builders in the market. The single-site license costs $67 and gives you 12 months of support which you can renew afterwards. However, you always get unlimited updates. There are also options for a five-site license ($97) and you can sign up for a Thrive membership for $19/month. The latter also gives you access to their themes and other plugins.
In contrast to the above, Elementor (read our Elementor Pro review) ranges from $49-$179 for one year of support and updates, Beaver Builder (read our Beaver Builder review) starts at $99 annually, and Divi (read our Divi theme review) costs $89/yr or $249 for a lifetime license. So, Thrive Architect is somewhere towards the lower end of the pack and is the only one that offers unlimited updates.
Final Thoughts
Page builders have matured into powerful software suites. They give many non-developers a chance to build complex sites and designs that would otherwise be out of their grasp. There is also a whole subsection of developers who have moved to using these types of plugins for more rapid site development.
Thrive Architect is a popular contender in this area. Above, we have gone over the main features of the plugin. You have seen how to use pre-made templates as well as build your own design from scratch. We have also gone over the mobile design options, as well as features for lead generation. Finally, we have weighed the pros and cons and compared the program’s pricing to other page builders.
Get the Thrive Architect Plugin
At the end of this Thrive Architect review, you should have a pretty good idea whether or not the plugin is worth giving it a try.
Personally, I found the plugin to be a well-rounded piece of software that strikes a good balance between feature richness and ease of use. While it can sometimes be a little more bare bones than other contenders, it also doesn’t overwhelm you. Together with the attractive pricing, I’d recommend it to anyone looking for a solid page builder plugin.
What is your favorite WordPress page builder and why? Let us know in the comments section below.






Leave a Reply