How To Make A Website – Step by Step Beginner’s Guide
So you want to make a website? That’s awesome! But if you’ve never built a website, it can be tough to know where to start (and what to avoid).
To help, we’ve created this detailed guide on how to start a website. Before we get started, we’re going to make you two promises regarding our guide:
- You don’t need to be a techie genius to follow this guide. The only technical skill that you need for this guide is the ability to click on buttons – it’s really that simple!
- You’ll have a working website within the first hour. Now, you’ll probably want to spend more time customizing it to your preferences. But we can promise that you’ll have a working website in under an hour.
To deliver on those promises, we’ve already chosen the best tools for you to use. Specifically, we’re going to show you how to make a website with WordPress, which is by far the most popular way to create a site. It’s also, at least in our opinion, the best way. Otherwise, we wouldn’t be using it for the tutorial.
In the first step of our tutorial, we’ll introduce you to WordPress so that you understand why we’re making this recommendation. Then, the rest of the steps will take you through all of the actions that you need to perform to get your site up and running.
Want to start a blog? While you can totally follow this tutorial to make a blog, we also have an entire tutorial dedicated just to how to start a blog that might be more your speed.
Tutorial Overview: 7 Steps to Your Perfect Website

In our tutorial, we’re going to detail a 7-step process to go from zero to a working website with the design and features that you want:
- Understand why we recommend WordPress and what WordPress is.
- Pick the perfect domain name for your website.
- Choose a web hosting plan.
- Install the WordPress software (you have a working website at this point! The rest of the steps are just about making it your own).
- Pick a theme to control how your website looks.
- Add your content.
- Install some plugins to add new features as needed.
* It’s actually only 6 steps of actions – the first step is just some basic background knowledge.
If any of those instructions sound confusing, don’t worry! We’ll cover each step in much more detail and introduce you to any concepts that you need to know. Again, if you can click on buttons, you can follow this tutorial.
#1 Understand What WordPress Is & Why We Recommend It
Before we get to the fun part of this guide, it’s important that you get a basic understanding of what WordPress really is.
If you want to make a website (without coding everything from scratch), you need some type of content management system. A content management system, or CMS for short, is software that you can use to easily manage your website’s content, such as images, videos, and articles from a beginner-friendly dashboard. Another name you can think of is a “website builder”.
A CMS simplifies everything. Instead of needing to use code, you’ll just use your CMS’ user-friendly dashboard whenever you want to add/manage content or make other changes to your site. Then, your CMS will take all of your decisions and turn them into a working website for your visitors.
So what’s WordPress then? WordPress is, by far, the most popular CMS on the Internet. According to W3Techs, WordPress powers over 39% of all websites on the Internet. If you only look at websites that are built with a known CMS (rather than custom-built), WordPress powers over 63% of those websites.
You know those website builders like Squarespace and Wix that you might’ve heard about? Well, Squarespace powers 1.5% of all websites and Wix powers 1.4%. So while they might have the big advertising budgets, they’re still a long way from catching up to WordPress.
Why is WordPress so popular? And why are we recommending that you use WordPress (and using WordPress in our tutorial)? Let’s go over the reasons…
Why Choose WordPress?
There are a lot of reasons why we and others recommend WordPress. However, if we had to boil it down, these are the biggest reasons:
- Free and open-source – the WordPress software is 100% free and open-source. That means that anyone, including you, can just take the software and use it to make a website. It also means that there’s a huge global community of people who contribute to WordPress to make it even more awesome.
- You can use it for anything – WordPress is super flexible – you can use it for anything from a blog to a portfolio website, an eCommerce store, a forum, an online course, and more. This also means that you can easily add new features to your website in the future if needed. Even if you might not be planning anything right now, having that flexibility is great as your website grows.
- It’s non-technical – while there is a learning curve to some parts of WordPress, anyone can make a website with WordPress. You don’t need to be a developer or a super-techie – anyone can use WordPress (and we’ll show you how).
- There are tons of extensions – to help you control how your website looks and functions, you can find tens of thousands of extensions. You get two types – themes (design) and plugins (functionality). Put together, these pre-built extensions are another part of what makes WordPress so easy for non-technical users.
- It’s easy to find help – because WordPress is so popular, you’ll find tons of learning resources to help you get up and running. For example, the blog you’re reading right now!
Long story short, we believe that WordPress is the best way to start a website for the vast majority of people. WordPress powers over a third of all the websites on the Internet, so most other people agree too. That’s why we’re going to use it in this tutorial.
👉 Learn more about what WordPress is
A quick note – when we say “WordPress”, we’re talking about the self-hosted WordPress software that’s available at WordPress.org. This is different from WordPress.com. If you want to learn more, check out our full introduction to WordPress. However, the only thing that you really need to know for this tutorial is that you should not use WordPress.com. Just follow the tutorial and we’ll guide you through everything.
What You Need to Make a WordPress Website
While the WordPress software itself is free, you will need two things to power WordPress and make it accessible to your visitors. This is the “self-hosted” part of “self-hosted WordPress”.
First, you need web hosting. With web hosting, you’re basically renting space on a computer to run the WordPress software. You can think of it kind of like your website’s “engine”. Behind every single website, there’s web hosting. It’s a basic requirement to make any kind of website.
Second, you need a domain name. Your domain name is your website’s permanent address on the Internet – it’s what lets your visitors access your website on its web hosting. For example, our domain name is designbombs.com – you’ll be able to choose your own domain name.
In the next few steps, we’ll take you through how to pick a domain name, purchase your web hosting, and easily install the WordPress software. Don’t worry – while that might sound a little intimidating, remember that all you’ll need to do is click a few buttons.
#2 Find The Perfect Domain Name

Again, your domain name is your website’s permanent address on the Internet. However, it’s also an important part of your branding because you usually want your domain name to be the same as your business name. For example, “Facebook” is “facebook.com” and “Design Bombs” is “designbombs.com.”
Searching for the perfect domain name is the toughest part of creating the website because, simply put, most of the good domain names are already long gone. Only one person can own a domain name at a time, so you’ll have to find a domain that hasn’t been taken yet.
When choosing a domain name, it’s wise to get a domain name with a .com extension if possible. When most people think of a website, they think “.com”, so using a .com website makes it easier for them to remember your website. It’s also the most popular domain name extension, which means that finding a .com domain name isn’t easy. But, if you’re creative enough, it won’t be too hard to find a great domain name.
For example, if you can’t find a .com domain name for your business name, you can try adding an extra word. Like how the team behind Pocket did with their domain name. When setting up their website, the Pocket.com domain was already taken, so these guys used the getPocket.com domain instead.
You can also use a domain name generator tool to come up with a unique name for your website. These tools will check if your domain name is available and also give you suggestions based on the keywords that you enter. Some good options here are:
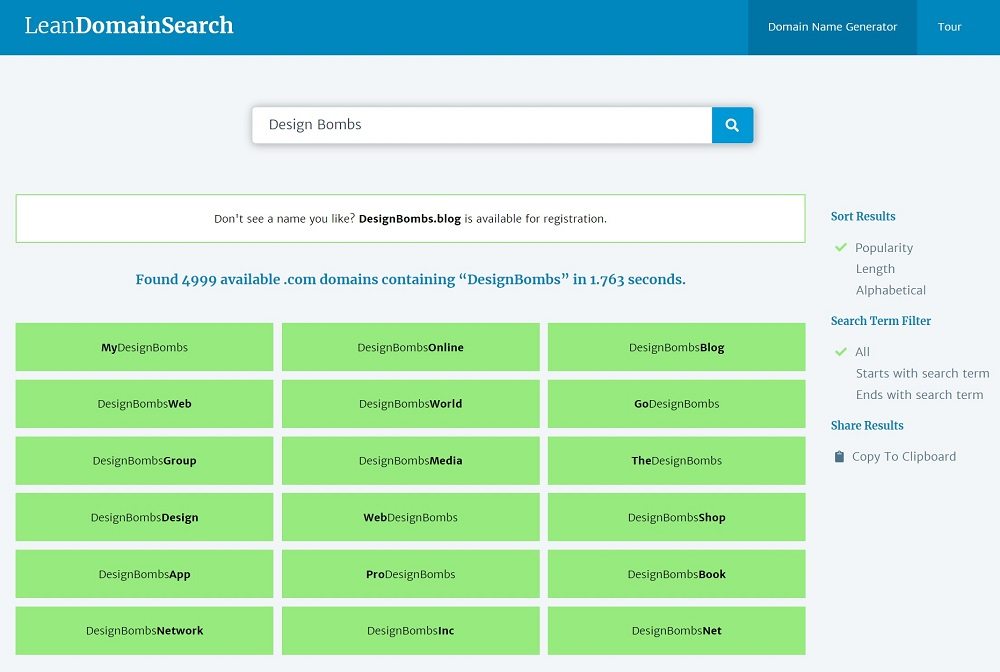
You can also use Instant Domain Search to quickly check if a domain name is still available for registration.
If you have no other choice, you can settle for a different domain extension, like .Net, .Biz, or .Blog. There are hundreds of top-level domains (TLDs) you can choose from. These types of extensions are also becoming more popular with the general public.
Don’t worry about purchasing your domain name yet – we’ll cover that in the next step as we take you through how to purchase hosting for your website. For this step, all you need to do is come up with the domain name that you want to use and make sure it’s available for registration.
#3 Purchase Your Web Hosting and Domain Name

In order to create your website, you need a place to host that website of yours. This is where web hosting providers come to aid. These service providers will give you space on their powerful servers to host your website and let people from around the world access your website.
While there are different types of hosting and a huge array of hosting providers, you don’t need to overthink things when you’re just getting started. For making your first website, we recommend a type of hosting called “shared hosting”. Shared hosting is great for beginners because it’s super affordable (under $10 per month) and usually has a beginner-friendly dashboard.
Once your site becomes a smashing success and has hundreds of thousands of monthly visitors, you’ll probably need to upgrade your hosting. However, that’s a good problem to have because it means you’re successful! It’s also pretty easy to do, though that’s a topic for another post.
For now, all you need to know is that shared hosting offers everything you need at an affordable price. And when it comes to shared hosting, we recommend a service called Bluehost.
Why We Recommend Bluehost
We’re using Bluehost in this tutorial mainly because of how easy Bluehost makes it for beginners to get up and running with a working website.
Bluehost has done a great job of simplifying the WordPress install process so that it’s pretty much just as simple as creating a website with a tool like Squarespace or Wix. But at the same time, you still get to keep the flexibility of self-hosted WordPress.
So in a way, Bluehost helps you get the best of both worlds – the simplicity of a website builder with the flexibility of WordPress.
Beyond that, Bluehost builds in lots of tools to make your life easier, such as:
- Caching – this makes your website load faster.
- Automatic backups (except on the cheapest plans) – this keeps your data safe.
- Staging sites – these give you a safe spot to test out changes to your site before you make your changes visible to your users.
Basically, Bluehost makes it easy to both create and maintain your website, which is great when you’re a beginner.
Oh, and as an added bonus, Bluehost also gives you a free domain name for your first year! So you’ll save some money, too.
Here’s how to get started…
How to Purchase Your Web Hosting and Get Your Free Domain Name
Step 1: Visit the Bluehost website to choose a package.
If you’re on a budget, you can use the Basic plan. However, we recommend choosing at least the Plus plan if possible because it gives you more storage and lets you create unlimited websites (which might be useful later if you want to make another site). The Choice Plus is also great because it gives you free automatic backups and is only a little more expensive.

Step 2: On the next page, enter the domain that you chose in the previous step in the Create a new domain box. Again, Bluehost gives you a free domain for your first year, so you won’t pay anything:

Step 3: Enter your details and billing information to create a new Bluehost account.
You’ll also need to choose the length of your hosting. You can choose one year, two years, or three years. You’ll get the best price if you pay for three years upfront, but you can choose whichever duration works best for your needs/budget:

Bluehost will try to upsell you on some Package Extras, but you can safely disable all of those as you don’t need any of them right now.

Step 4: When you’re ready, agree to the terms and conditions and click Submit to confirm the order.
#4 Install WordPress
Great news! After you finish this step, you will officially have a working website.
Once you create your Bluehost account, Bluehost offers a user-friendly setup wizard to help you install WordPress and create your website. This is another benefit of using Bluehost vs some of the other hosting options.
When you sign into Bluehost (using the credentials that you entered in the previous step), Bluehost should automatically show you a prompt to create your website.
If you don’t see this prompt right away, you can always access it by going to the My Sites tab in your Bluehost dashboard and clicking the button to Add site:

Step 1: To get started, enter the title and subheading for your site. Basically, your site’s “name” and “slogan”. Don’t worry too much, as you can always change these later on.
We also recommend expanding the Advanced settings. This will let you choose the email, username, and password that you’ll use to log in to your actual WordPress website.
Then, click Next.

Step 2: Choose the domain that you want to use – you should see the free domain that you picked when you set up your Bluehost account. Since this is your first website, you can leave it as the defaults.
Bluehost will also suggest some plugins to install. We recommend unchecking all of these for now – you can always install these plugins later on if you decide that you want to use them. Then, click Next:

Step 3: Wait for Bluehost to install WordPress. It should only take about 30 seconds.
Step 4: Log in to WordPress. Once Bluehost finishes setting up your WordPress website, you should see a prompt to log in to WordPress. Or, you can always access your WordPress dashboard by visiting yoursite.com/wp-admin. Make sure to replace yoursite.com with your actual domain name. You’ll log in to WordPress using the credentials that you entered in the WordPress installer a moment ago.

Once you log in, you should see the WordPress dashboard. It looks like this:

For the rest of the tutorial, you’ll be working inside the WordPress dashboard to finish setting up your website.
Note – for now, Bluehost will create a coming soon page for your website so that anonymous visitors can’t see your site yet. When you want to remove this coming soon page, click the Launch your site button in the screenshot above.
#5 Set Up Your WordPress Theme

You have a working website at this point. However, if you look at it, you’ll probably think it’s pretty ugly. That’s because your WordPress website is currently using the default WordPress theme. But, don’t worry you can easily change this theme to a better-looking theme.
In a nutshell, your WordPress theme controls how your site looks. You can think of it kind of like your website’s clothing – you can change your theme at any time without losing your underlying content. That is, the content will still be there with a new theme – it will just look different.
You can normally find themes that match your website’s “niche”. For example, if you’re creating a portfolio website for your photography business, you can find lots of themes for photographers. Or if you’re creating a website for your gym, you can find dedicated fitness themes. You get the idea…
Where To Find The Best WordPress Themes
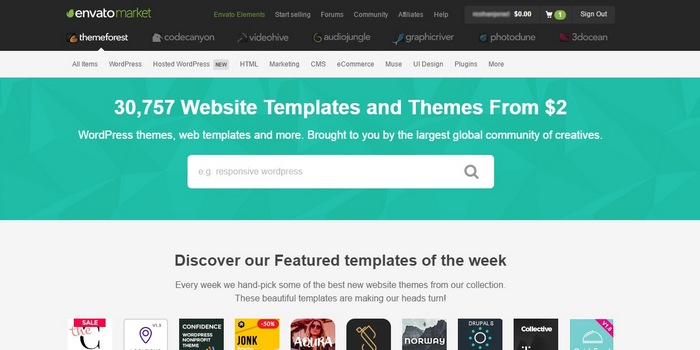
You can find both free and premium themes for your site. It’s totally fine to use a free theme if that’s all that fits in your budget, but premium themes often have more flexible options and more professional-looking designs (though you can certainly find some great-looking free themes).
Here are the best spots to find free or premium themes:
- WordPress.org theme directory – this is the official directory for free themes. It contains over 3,800 free themes for you to choose from.
- ThemeForest – this is the biggest marketplace for premium themes. While the price varies by the theme, you should typically expect to pay around $60 for a theme at ThemeForest.
- Our theme roundups – we publish roundups that showcase the best themes for certain uses. For example, the best business WordPress themes or the best fitness themes.
- MeridianThemes – this is our own little boutique theme shop where we sell blog & magazine style themes.
- Google – you can find additional options by searching Google – just be careful to make sure you only use themes from reputable sources/developers.
How to Install Your WordPress Theme
If you found a free theme at WordPress.org, here’s how to install it:
- Go to Appearance > Themes in your WordPress dashboard.
- Click WordPress.org Themes.
- Search for your theme by name.
- Click Install.
- After your theme installs, click the Activate button to make it live.

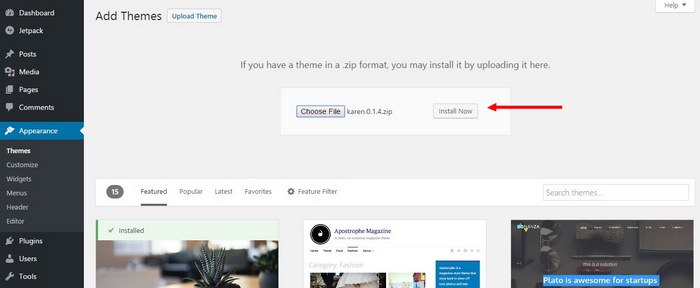
On the other hand, if you purchased a premium theme from ThemeForest or another spot, you’ll need to manually install it. It’s still pretty easy:
- Go to Appearance > Themes in your WordPress dashboard.
- Click Add New.
- Click the Upload button next to ‘Themes’.
- Select the ZIP file that contains your theme (you should have been given a link to download this file after purchasing your theme).
- Click Install Now.
- After your theme installs, click the Activate button to make it live.
How to Customize Your WordPress Theme
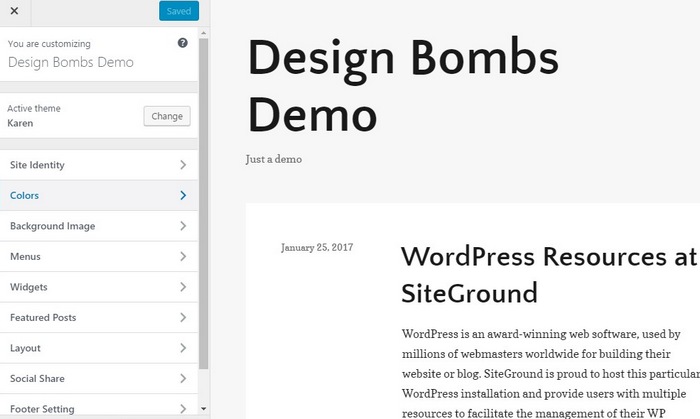
Different themes have different ways of customizing the design. However, most modern WordPress themes use something called the WordPress Customizer. In the Customizer, you’ll get a list of customization options along with a live preview of your website. As you change the options, you’ll instantly see the live preview update. This makes it super easy to customize your theme in real-time – no technical knowledge needed.
Here’s how to use it…
Step 1: Go to Appearance and choose Customize from your WordPress dashboard.
Step 2: Use the settings in the sidebar to change the colors, add background images, change the layout, and personalize your theme however you like.
How to Set Up Your Theme’s Navigation Menu
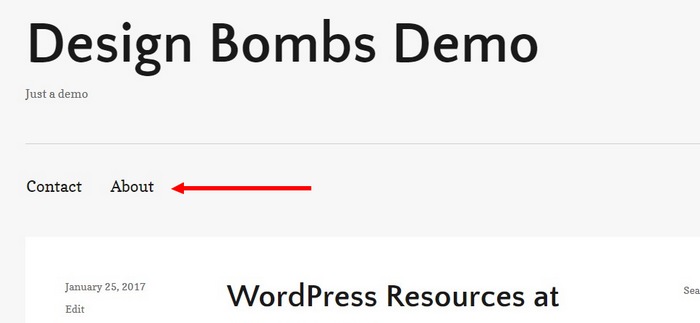
Most websites (and WordPress themes) include a navigation menu at the top of the site. This is how you can help your visitors find your most important content, like your “Contact” page or a link to your blog.
Here’s how to create it…
Step 1: Go to Appearance > Menu in your WordPress dashboard and create a New Menu.

Step 2: Add your Pages, Categories, and Links to your menu using the sidebar. If you don’t have any content yet, you might want to come back to this later. We’ll talk about how to add content in the next section.
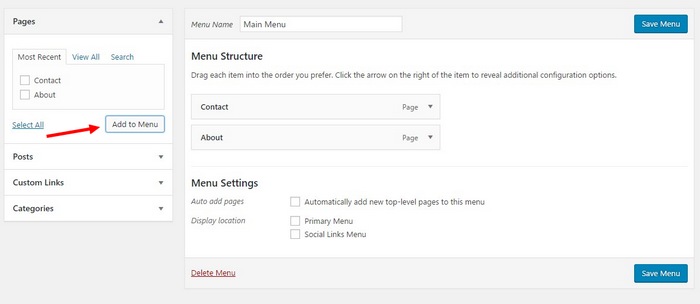
Step 3: Choose where you want your menu to appear on your theme using the Display location setting. While the exact location name varies by theme, typically you’ll want to look for something like “Primary Menu”, “Main Menu”, “Top Navigation”, etc.
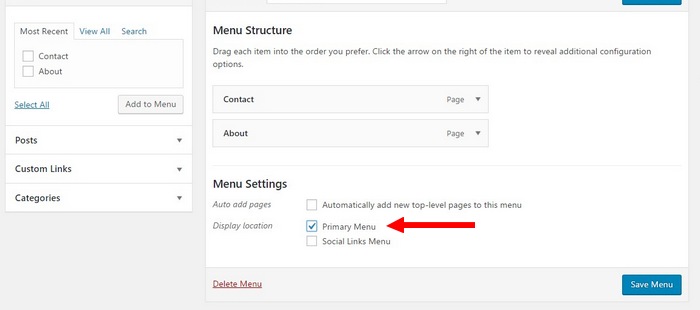
Step 4: Make sure to Save your changes. You should see your new menu appear on your website now.
How to Customize Your Website Sidebar
The sidebar of your website is one of the key areas that allow you to show important content to your visitors, such as advertisements, social sharing buttons, email opt-in forms, etc.
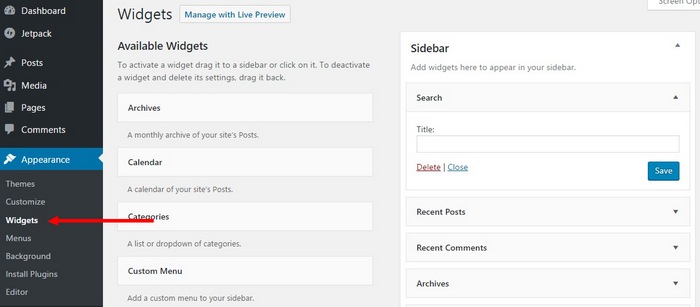
Not all themes include sidebar areas. However, if your theme does, you can configure it by going to Appearance > Widgets. From there you can add new widgets to your sidebar or even delete unnecessary widgets.
#6 Add Your Website’s Content
Now, you’re ready to start adding content to your website.
By default, WordPress includes two types of content:
- Posts – these are blog posts. Each post has a specific publish date and your blog page will automatically list all of your latest blog posts.
- Pages – these are static pages. For example, a “Contact Us” page or your “About” page.
To create new content, you go to Posts > Add New or Pages > Add New, respectively. No matter which type of content you’re creating, that will launch the WordPress block editor.
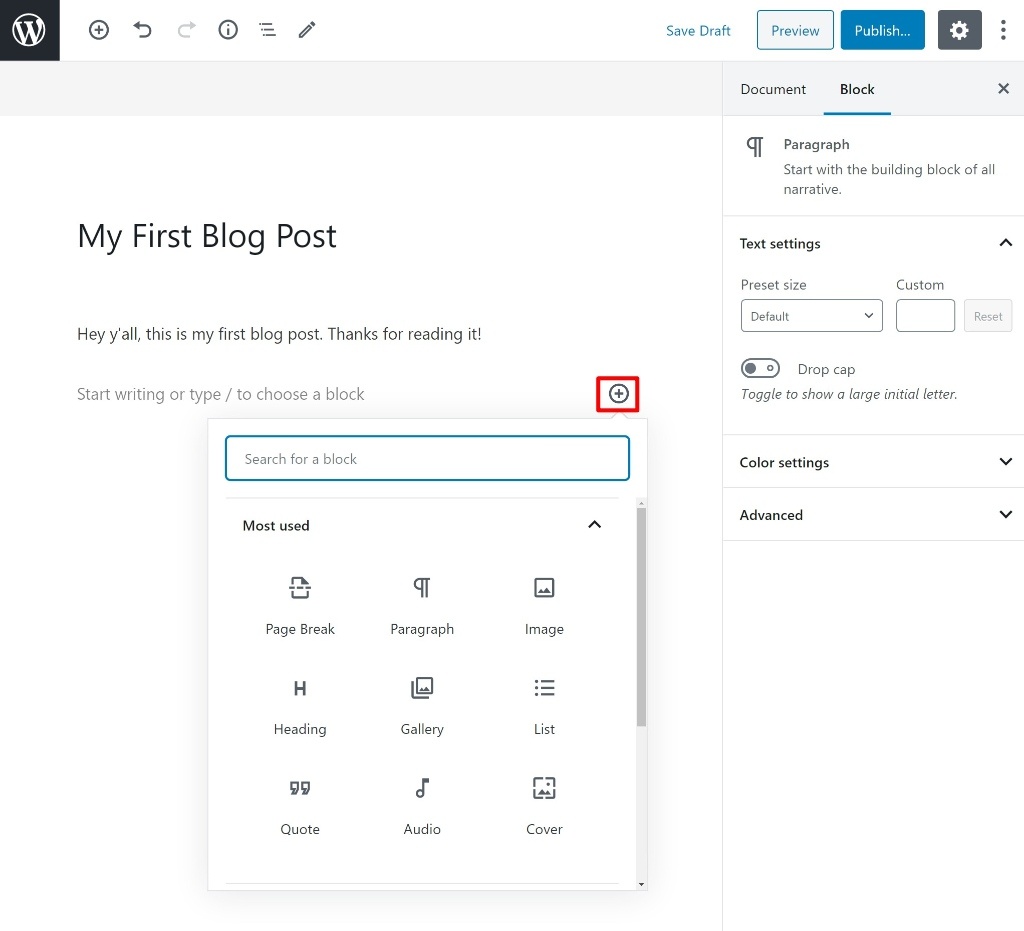
The block editor lets you add both basic text, as well as advanced content elements and layouts.
To add text, all you need to do is click and start typing, just like you would in Microsoft Word. If you want to add a “block” for another type of content, you can click one of the plus icons to open the block inserter:
Again, you’ll use blocks for all different types of content like:
- Images, either individual images or galleries
- Videos
- Headings
- Buttons
- Tweet embeds
- Map embeds (like embedding Google Maps with the location of your business)
- Etc.
You can also use blocks to make basic layout changes. For example, if you want to create a multi-column layout, you can use the Columns block.
We’d recommend exploring all the different blocks on offer as you might find an option that’s useful. With WordPress plugins, you can also add new blocks that you can use in your content. We’ll talk about plugins more in the next section.
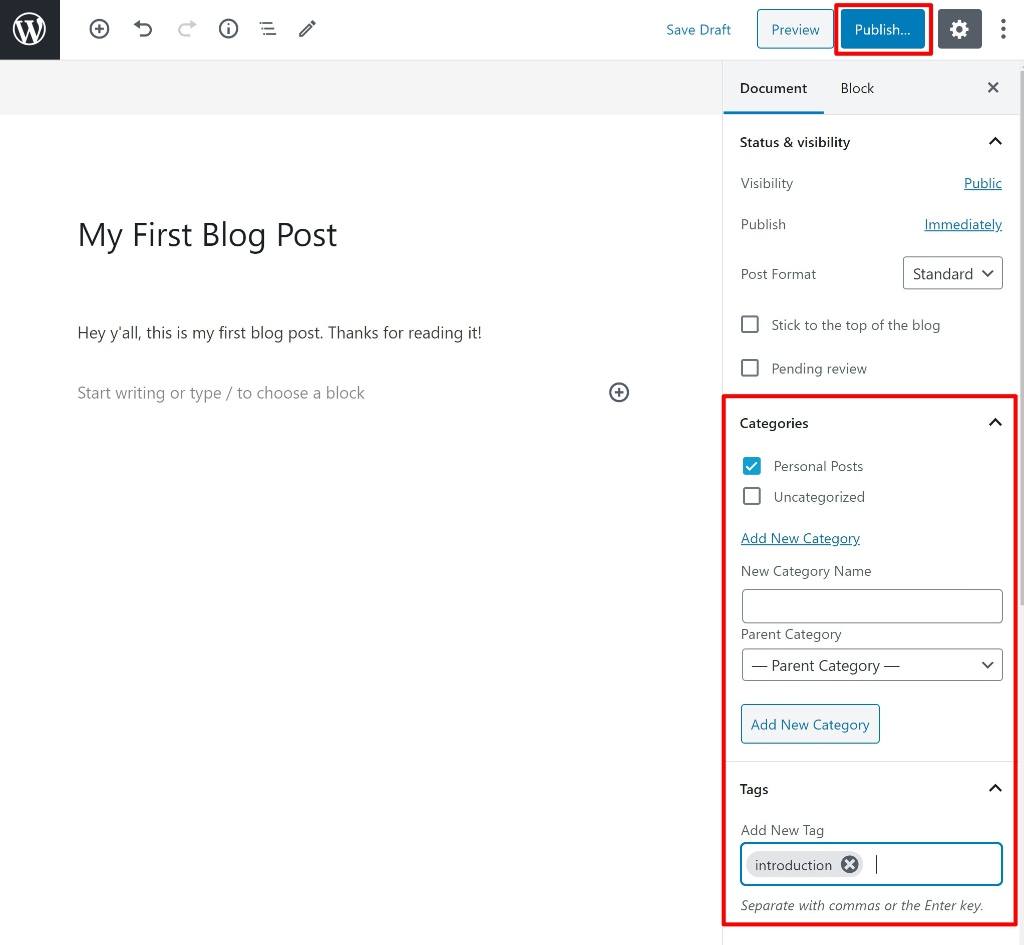
In addition to the content editor, you might also get some additional options in the sidebar. For example, if you’re creating a blog post, you can use categories and tags to organize your blog posts.
Once you’re happy with your post or page, you can click the Publish button to make it live:
#7 Install Plugins to Add Functionality as Needed
Whereas your WordPress theme controls how your website looks, plugins help you add new functionality to your website. For example, if you want to add a contact form to your site, you’ll use a plugin. Or, if you want to add tools to rank your website in Google and other search engines, you’ll use a plugin.
Plugins can make both big and small changes. For example, while a contact form is a fairly small addition, you can also find plugins that turn WordPress into a fully-functioning eCommerce store, forum, social network, etc.
For your website, you can think of plugins in roughly two categories:
- Must-have plugins – these are plugins that all WordPress sites need. Think of them as basic extensions to WordPress – no matter what your website is about, these plugins are a useful addition.
- Site-specific plugins – these are plugins that you’ll use to add features that are specific to your site. For example, if you want to add a pricing table to display your services, you might look for a pricing table plugin.
Useful Must-Have Plugins
Here are the plugins that we think can benefit virtually all WordPress sites:
- Search engine optimization (SEO) – to help you optimize your site for Google, you should use an SEO plugin. Two good free options here are Rank Math or Yoast SEO.
- Contact form – pretty much every website needs a contact form. To easily add a contact form for free, you can use the Simple Basic Contact Form plugin.
- Speed optimization – to make sure your site loads quickly, you’ll want to use a performance plugin. For the best option, you can purchase the WP Rocket plugin. Or, for a free option, consider WP-Optimize.
- Optin form – most websites can benefit from building an email list. Optin Forms is a free plugin that can help you attract email subscribers.
- Anti-spam – because WordPress is so popular, it’s a popular target for spammers. To stop most comment spam, you can use the free Akismet plugin.
In addition to the plugins above, there are two other plugins you might want to consider.
First off, if you feel limited by the WordPress block editor, you might prefer using a WordPress page builder plugin to create some/all of your content. A page builder gives you a visual, drag-and-drop editor to create custom designs. It’s kind of like the block editor on steroids.
Elementor is the most popular option here – the free version makes a great starting point. You can also consider upgrading to Elementor Pro for more features, like the ability to design your own theme or create popups. You can learn more in our Elementor Pro review.
You also might want a social media share plugin. These plugins add share buttons to encourage your visitors to share your content on social media, which can boost your visibility there. Kiwi Social Share is a good free option that’s easy to use.
Where to Find Other WordPress Plugins
If you want to add other features to your website, here are some good places to find free or premium WordPress plugins:
- WordPress.org plugin directory – this is the official directory for free plugins. It contains over 57,000 free plugins for you to choose from.
- CodeCanyon – this is the biggest marketplace for premium plugins. It comes from the same company as ThemeForest.
- Our plugin roundups – we also publish roundups that showcase the best plugins for certain uses. For example, the best form plugins or the best landing page plugins.
- Google – as with themes, you can find additional options by searching Google – just be careful to make sure you only use plugins from reputable sources/developers.
How to Install a WordPress Plugin
Installing plugins is a lot like installing themes. Here’s how:
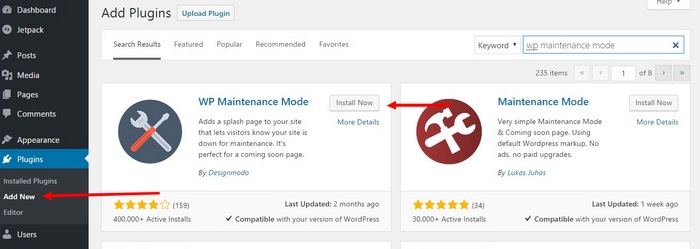
Step 1: Go to Plugins and choose Add New.
Step 2: Search for the plugin you want to install and click Install.
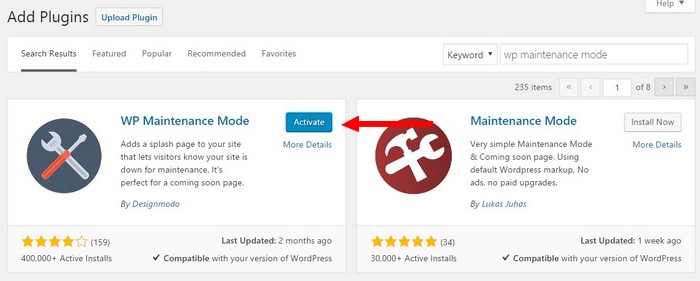
Step 3: Click Activate to activate the plugin.
Step 4: That’s it!
The method above is for a free plugin from WordPress.org. If you purchased a premium plugin, you can click the Upload Plugin button to upload the ZIP file that you got from the plugin developer.
That’s How to Make a Website With WordPress!
Congratulations! You are now the proud owner of a WordPress website. When you’re ready to make it public, click the launch your site button inside your WordPress dashboard to remove the coming soon page and share your website with the world.
You can take a few minutes to relax and pat yourself on the back. However, if you want to make your website a success, your work doesn’t stop here. Now, you need to find a way to get people to visit your website and maybe even make a little money (if that’s what you want).
To help with the first part, we’d recommend learning about website marketing tactics such as:
- Search engine optimization (SEO)
- Social media marketing
- Guest posting
- Paid ad services like Google Ads or Facebook Ads
And to help with the second part, you can check out our collection of 25 ways to make money online.
Still have any questions about how to make a website? Ask us in the comments!
And if you followed our tutorial already, share your newly-built website so that everyone can check it out.


Thanks so much for the helpful guide!😁
Just made my portfolio site using your blog. Thank you for a simple and helpful guide.
Making a website is not easy but this article made it very easy to make. This is a great help for beginners and anyone in the industry who is planning to make a website.