How to Use the Lasso Tool in Photoshop
Removing objects from their original background is one of the critical uses of Adobe Photoshop.
With multiple ways to select, extract, and refine photos from their source, it can become overwhelming. This software is full of complicated tools with confusing settings, but luckily the Lasso tool in Photoshop isn’t one of them.
Though this tool isn’t flawless, it is the perfect mix of fast to use and easy to learn. With three different tools to choose from, there are very few situations where it won’t work. So let’s take a look at it, its different variations, and when to use them.
What Is the Lasso Tool in Photoshop?
This tool in Photoshop is a freehand selection instrument. Freehand means the user controls the selection border with a mouse or pen tablet by drawing. It’s ideal for creating quick selections without dealing with any other settings, like anchor points or curves, when using the Pen tool. You use the Lasso tool to draw a selection, just as you would use the Brush tool to draw a line.
It offers a high level of control and speed in exchange for accuracy. Selections done with the Lasso tool will need a higher level of refinement if you are using it to create precise or complicated selections.
Just the same, it remains a handy tool to master, even though it often needs extra refinement. Each of the three tool variants has its own best case scenario. Let’s cover each of them, their settings, and their ideal use cases.
When to Use the Lasso Tool in Photoshop
Generally, the Lasso tool is a great option when something needs to be extracted quickly and is best used to create a selection along simple, straight edges or when accuracy is not a priority. Images containing rectangular and geometric shapes are the best use cases. This includes things like buildings and picture frames.
It’s also ideal for quickly removing a large portion of an image that may be in the way or simply be excessive, much like how you might tear a piece of paper.
However, there are three different tools, each one with distinct settings and use cases.
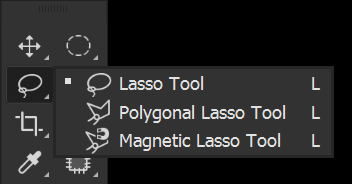
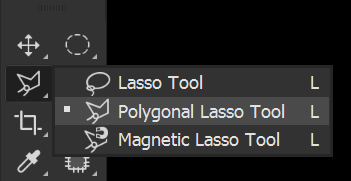
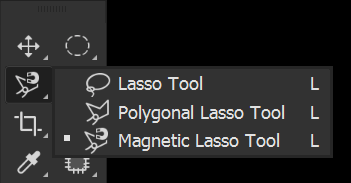
The 3 Types Of Lasso Tools
- Lasso Tool — The Lasso tool is the default instrument used to create a complete freehand selection. The only setting available to change is the amount of Feather applied to the edge of the selection. It’s ideal to select large areas of an image when no accuracy is needed.
- Polygonal Lasso Tool — The Polygonal Lasso tool creates straight lines. As it can not create curved shapes of any kind, this tool is ideal for selecting and extracting geometrical objects such as boxes, buildings, and other flat edges.
- Magnetic Lasso Tool — The Magnetic Lasso tool is the only instrument with pre-determined settings and created semi-automatic selections. The Magnetic Lasso will automatically snap to any well-defined edges in a photo, making it the ideal tool to extract more complicated shapes or elements with a well-defined hard edge. This includes dark objects on white backgrounds or light objects on dark backgrounds.
How To Use the Lasso Tool in Photoshop
Each tool works slightly differently, so now that we know some of the ideal scenarios for each of them, let’s cover how to actually use it.
How to Use the Default Lasso Tool
The shortcut for the tool is L on the keyboard, or it can be found on the Toolbar. The icon is a simple lasso rope shape. It should be the default tool. If not, then you can switch tools by right-clicking the icon and then choosing the Lasso tool.

First, before making your selection, check to see if the settings in the upper Settings bar are correct. Let’s focus on the Feather setting for now. A Feather of 0px will create a sharp crisps selection, while a higher Feather setting will create a softer edge. The higher the pixels setting, the softer the edge.
If an edge is so soft that no pixels will end up being selected, a warning prompt will appear. If this happens, lower the Feather amount.
If you simply want a slightly less sharp edge, which can help create a better extraction, you can try setting the Feather to 1 – 5px.
You have to set the feather amount before starting your selection, and the selection path will not visually show the Feather amount. Try a smaller test selection first if you are about to create a larger selection with a Feather.

Next, let’s make a selection. Click and drag to draw a freehand selection path, holding down on the mouse the entire time.
When you want to close your selection, either loop back to the start of your selection or simply let go of the mouse button, and the selection will automatically close itself. If you let go of the mouse button, the selection will complete itself using a straight path leading to the starting point of the selection.

With a selection created, you can add a Layer Mask to the layer you want to extract. The Layer Mask will automatically take the shape of the selection.
I wanted the drops located on a layer set to Screen to appear on the hand layer in this image, so I made a fast selection using the Lasso tool and added a layer mask.
Creating quick selections that don’t require accuracy is one of the best use cases for the default tool.

How to Use the Polygonal Lasso Tool
The Polygonal Lasso tool is ideal for creating straight-edged selections and extracting objects or shapes with hard angles. Right-click the Lasso tool to open the fly-out menu, or hold Shift + L to scroll through the different tools, choosing Polygonal Lasso.

The Polygonal Lasso tool has a Feather setting, just like the default one, and works the same. The highlighter the Feather, the softer the selection edge will be, with a Feather of 0px being a completely sharp edge.
Click on the image to set a starting point. Next, position the pointer where you want the first straight segment to end, and click again.
Each click will create an anchor point that your path will follow, only creating straight and angled lines.
Complete a path by clicking on the starting anchor point. Below, I used the Polygonal Lasso tool to create a selection of the inside of the frame.

I can then add a mask to the image, and it will mask the shape of the selection and appear inside the frame. This tool is also great for extracting modern buildings and signs.

How to Use the Magnetic Lasso Tool Settings
Finally, right-click on the Lasso tool icon, or scroll through the Lassos using Shift + L and select the Magnetic Lasso tool.

When using the Magnetic Lasso tool, the selection will snap to the edges of any well-defined areas in an image. This makes this tool ideal for images with high contrast and semi-complicated edges. It can also be a great alternative to the default one.
The Magnetic Lasso tool has a Feather setting just like the previous ones. It also has a few settings that are specific to the Magnetic Lasso tool. These settings help tell the Magnetic Lasso what edges to snap to and how often.
- Width — The width determines how far ahead Photoshop will look for an edge. The width mouse icon is hidden by default, so press the Caps Lock key to show it. When choosing a width, you want a large enough radius to where the edge is inside the radius icon, but not so big that Photoshop starts to include and grab onto unwanted edges. 50px is often a good starting point when working with high-resolution images.
- Contrast — The Magnetic Lasso determines an edge based on light and color contrast, which is why either dark-colored objects on light-colored backgrounds or vice versa work best with it. Photoshop is set to 10% contrast by default, which means the tool will decide a variance of only 10% is considered an edge. If your object has high contrast, increasing this value may help; however, keeping it at 10% will work for most photos.
- Frequency — The Magnetic Lasso works by placing down anchor points as you drag your mouse along an edge. The Frequency setting determines how often an anchor point will be created. A lower Frequency can result in a smooth edge, but also in missed edges. If your object is smooth, set the Frequency lower. If there are a lot of small ridges, then set the Frequency higher. The default of 57 will work for the majority of images.

Use the Magnetic Lasso tool by clicking and dragging on the object’s edges that you want to select. You don’t have to hold the mouse down as you drag. To finish the selection, click back on the starting anchor point.
If an anchor or path that you don’t like gets created, you can backtrack the selection by pressing the Delete key.

How to Refine a Selection With the Lasso Tool
After a selection has been created, there are a few different ways you can refine it if you need to. While making a selection, you can also switch between tools, giving you even more control over the final selection.
Step 1: Add to a Selection
If you need to add to a selection that has already been made, press and hold Shift. A plus icon will appear on your mouse cursor. Keep holding down Shift, and select the areas you want to add to your selection. This can be useful for filling in gaps that auto-select might have missed.


Step 2: Remove from a Selection
If you want to remove a section of a selection, hold down Alt, and select the part of the path you’d like to delete. This can be helpful for removing and refining areas that were incorrectly selected by auto-select or other selection tools.

Step 3: Switch Between Lasso Tools
Each of the three tools has its own strengths and weaknesses, and you’ll likely need to use more than one of them while creating selections. Here is a shortcut you can try.
- First, with the Magnetic Lasso tool active and a selection path started, hold Alt and Click to switch to the Polygonal Lasso tool.
- Switch to the Default tool by holding Alt, Clicking, and then dragging, while not letting go of the mouse button.
- Let go of Alt and click again to go back to using the Magnetic Lasso tool.
Conclusion
While the Lasso tool in Photoshop is often considered basic, it’s one of the easiest and quickest ways to create selections. Instead of relying on complicated settings and Adobe’s own AI, it allows you to create freehand selections, so you’re the one who determines what does and doesn’t get selected.
Still, the free-form nature of the tool can also be its downside, allowing for a less refined selection and more errors in your selection’s path. Remember, when using the Lasso tool, use it on objects where accuracy is less critical and that have simple, clean edges, or try to make quick and general selections that you can refine later.


Leave a Reply