How to Use the Pen Tool in Photoshop
With all of Photoshop’s automatic selection tools powered by Adobe Sensei, Adobe’s powerful artificial intelligence technology, you might think the glory days of the Pen tool are long gone.
There’s still a good reason why learning how to use the pen tool in Photoshop is recommended by most seasoned designers. Even after years of updates, the Pen tool remains one of the best ways to create precise and clean selections.
With multiple, different Pen tools and settings to choose from, the task of learning how to master it may seem daunting. However, it’s as easy as knowing the right Pen tool to pick for the job.
Let’s start by figuring out what the Pen tool actually is.
Table of Contents:
- What Is the Pen Tool in Photoshop?
- The Five Pen Tools in Photoshop
- How to Create a Selection Using the Pen Tool
- How to Create a Stroke Using the Pen Tool
- How to Create a Shape Using the Pen Tool
What Is the Pen Tool in Photoshop?
The Pen tool in Photoshop can create both selections and vector shapes. Using the Pen tool, you create paths connected by anchors. You can then convert the path into selections, strokes, or shapes.
The paths created by the Pen tool are vector-based, as opposed to pixel-based. This means you can create and adjust a path without it degrading in quality. If using a path to create a stroke, the stroke will be pixel-based, but the path will remain until deleted.
However, you can convert paths into vector shapes and vice versa as well. A path will not appear in an image when exported, if not converted into a shape, stroke, or otherwise.
The Five Pen Tools in Photoshop
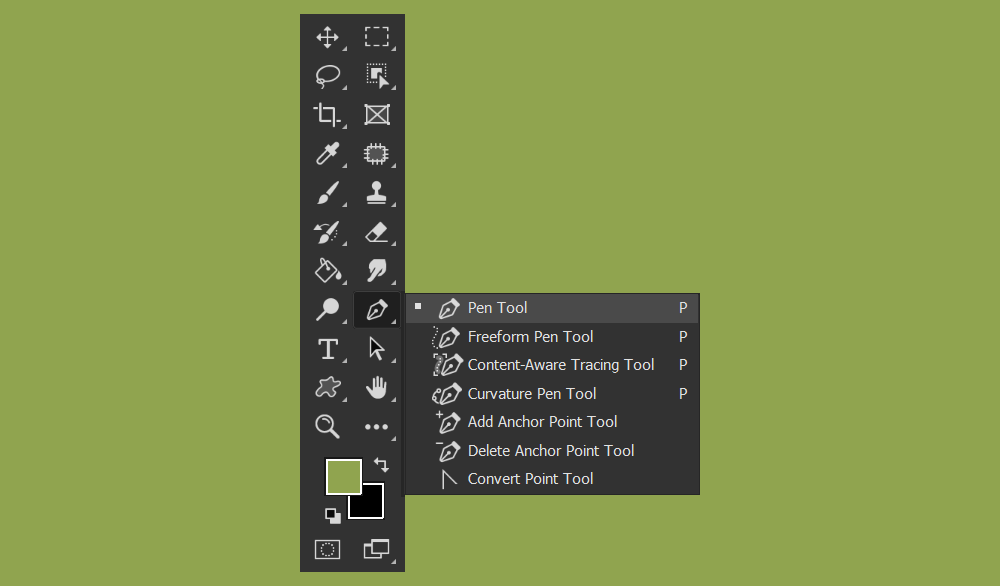
There are multiple, different Pen tools in Photoshop, each excelling at different creative styles or use cases. You can use the Shift + P key to cycle through the other tools in the Pen group.
1. The Standard Pen tool — The standard Pen tool lets you create both curved and straight segments with unmatched precision. It’s ideal for extracting human subjects or objects with smooth edges. It’s the most commonly used Pen tool and the one I recommend learning first.
2. The Freeform Pen tool — The Freeform Pen tool allows you to create paths as if you were drawing using the Pencil tool. It’s ideal for creating freeform shapes like swirls or other abstract designs.
3. The Curvature Pen tool — The Curvature Pen tool was explicitly designed to help create curved paths. You can use the Curvature Pen tool to create selections and extractions. It’s often considered to be more intuitive than the Standard Pen tool. It excels in making script-like shapes, paths, and designs.
4. The Magnetic Pen tool — The Magnetic Pen tool creates a path that snaps to the edges of denied objects or subjects. Unlike the other pen tools, it is not found in the Pen tool group. You can find the Magnetic Pen tool in the Freeform Pen tool’s options bar.
5. Contact-Aware Tracing tool — The Contact-Aware Tracing tool creates automatic paths, tracing hard edges and defined pixels. Unlike the Magnetic Pen tool, you do not drag the Content-Aware Pen. Currently, you need to activate the Content-Aware Tracing tool by going to Preferences > Technology Previews > Enable Content-Aware Tracing tool.
Now that we’ve covered the different Pen tools, let’s look at creating shapes, selections, and strokes.
How to Create a Selection Using the Pen Tool
First, let’s cover how to make a selection using the Pen tool in Photoshop using the default Pen tool, as it’s the most versatile of all the Pen types. It’s also the one you’ll likely be reaching for the most and is arguably the hardest to get the hang of, so mastering the Standard Pen means all other Pen types will come easier.
Step 1: Set the Pen to Path
With the Standard Pen tool active, look towards the top Options bar and make sure it’s set to Path.
Step 2: Place Your First Anchor Point
Choose a starting point, and click to place an anchor. We will be circling our way back to this anchor when our path is ready to be completed.
Step 3: Create a Second Anchor Point and Path
Place another anchor further down the edge of the object you’re extracting.
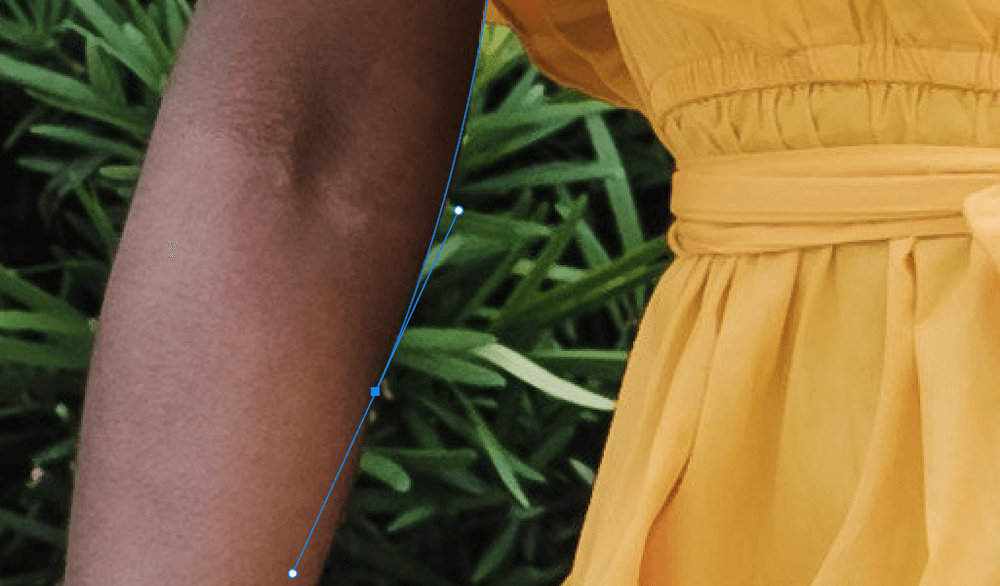
A path will be created between the two anchors. The path will start straight. Pull-on the anchor to adjust the path, so that it outlines the edges of the object.
Step 4: Adjust the Anchor Handles
Depending on the object’s edges you are extracting, you might need to adjust the current anchor’s handles before placing your following anchors.
You can do this by holding Alt and then dragging the handle. The anchor handles influence the direction the anchor will go.
A trick I’ve learned is to bring the handle closest to your mouse in and over the anchor point.
Step 5: Complete the Path
Place more anchors, making sure the adjoining paths outline your subject until you reach your starting anchor point.
You can undo and redo placing an anchor point, using Control + Z to undo and Shift + Control + Z to redo.
You can add and delete specific anchors using the Add Anchor Point and Delete Anchor Point tools found in the Pen tool group.
Finish the path by clicking the starting anchor point. The white anchors will turn blue, confirming the path has been closed.
Step 6: Create a Selection
You can turn a path into a selection using three different methods:
- First, you can Right-click > Create Selection.
- Second, you can choose the Selection button in the top Options menu.
- Third, you can press Ctrl + Enter/Command + Return to turn a path into a selection.
Step 7: Delete or Mask the Selection
You can either delete what’s in the selection or add a Layer Mask to the object’s layer to extract the object.
The mask will take the shape of the selection. Depending on how you create the path, you may need to invert the selection or layer mask to reveal the subject.
How to Create a Stroke Using the Pen Tool
Creating strokes with the Pen tool is helpful for both image editing and graphic design. The edges created by the generated path will be smoother, straighter, or more precise than what you might be able to draw by hand. It can even simulate pen pressure if you don’t have a drawing tablet. Luckily, it’s also straightforward to do.
Step 1: Set the Pen to Path
Like before, we want to make sure our Pen tool is set to path and the layer we want to add a stroke to is selected.
Step 2: Create Your Path
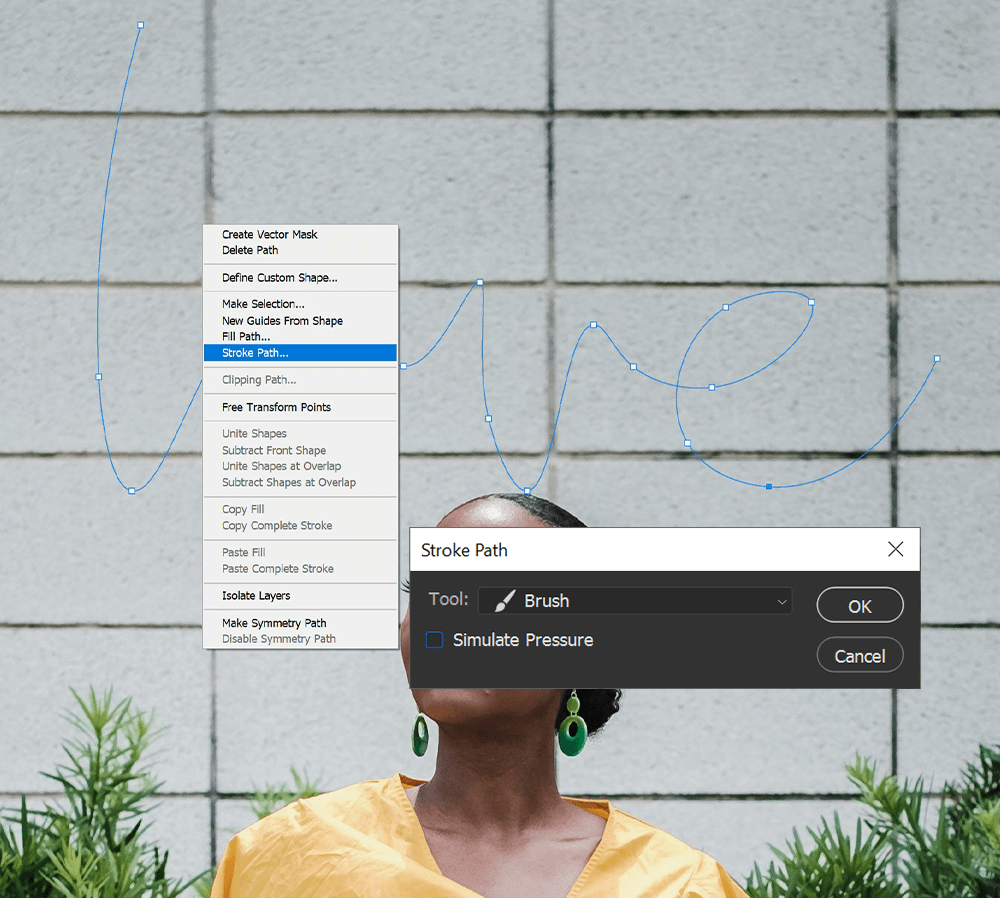
Let’s switch to the Curvature pen tool. Unlike the other Pens, the Curvature Pen tool does not rely on anchor handles, making it much easier to use, and is ideal for creating script fonts, as we see below.
Place an anchor, place a second anchor, and then adjust the path and anchor by simply clicking and dragging.
Repeat this until your design is finished.
Step 3: Create Your Stroke
Switch to the Brush tool, and choose the brush tip you’d like your stroke to be. It can be any brush tip.
Next, set the Foreground color to the color you’d like the stroke to be.
Now, Right-Click > Stroke Path, and set Tool to Brush. If you want your lines to taper, you can check Simulate Pen Pressure. If you’re going to create a uniformly even line, leave it unchecked.
Once the stroke is placed, you can Right-click > Delete Path.
How to Create a Shape Using the Pen Tool
Creating shapes and then converting them into custom shapes are great for design elements you might find yourself wanting to use repeatedly. You can also edit pre-existing shapes, as all vector shapes in Photoshop are based on paths you can edit using the Pen tools.
Step 1: The Options toolbar Settings
Finally, let’s create a custom shape using the Pen tool. This time, let’s look towards the top Options bar and set the Pen type to Shape.
Next, choose the color of your shape by setting its Fill. You can also add an outline to the shape by setting the Stroke color, thickness, and style.
Step 2: Create Your Path
Create your path just as you would normally, only this time it will fill itself with the color and stroke settings you choose. I’m using the Curvature pen tool again, but the standard Pen tool will work the same.
Finish the path by connecting the first and last anchor points.
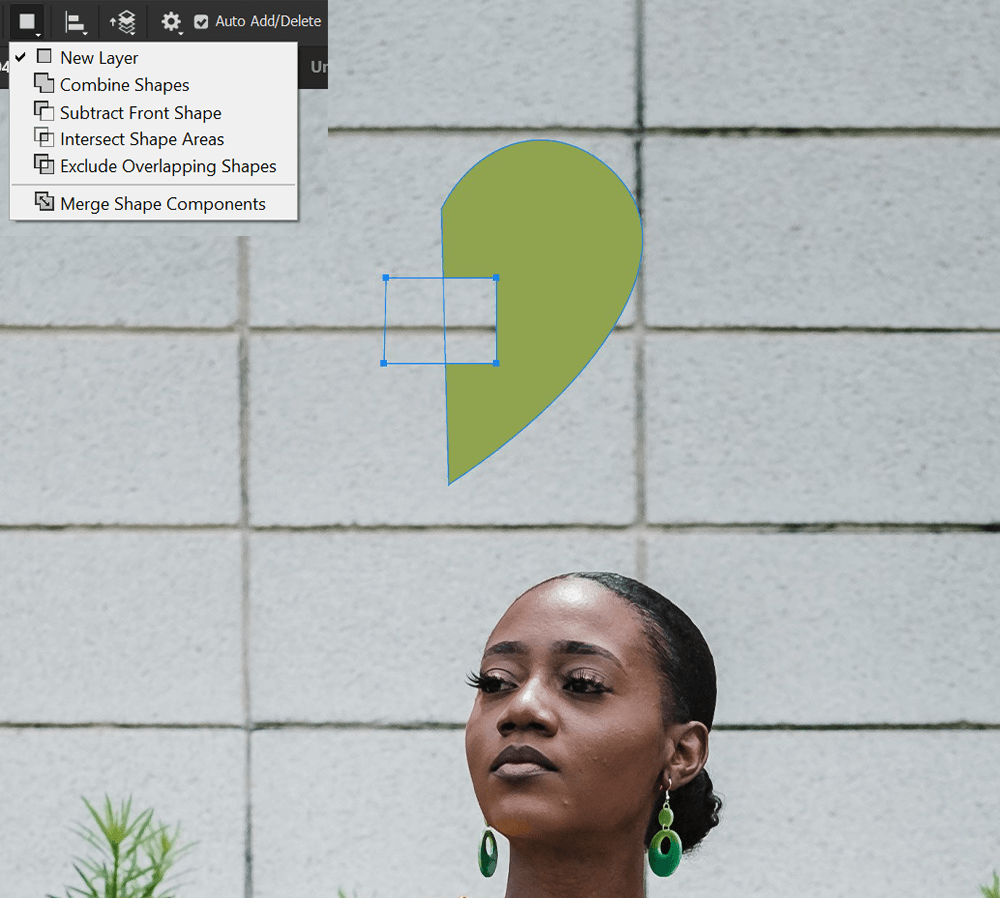
As I’m using the Curvature Pen tool, I switched to the Standard Pen tool and then finished the path to get a straight edge on the left side of the shape. You can switch between pen tools to edit or add paths at any time.
Step 3: Add to or Subtract From Your Shape
If you want to add more or subtract from your shape, go into the upper Options bar and change the interaction settings.
Step 4: Combine Shapes
With the shape made, let’s create a quick heart by duplicating the shape, flipping it horizontally, and then placing them so that their flat edges line up.
Select the two shape layer, and Right-click > Merge Shapes. The shapes will merge, but the paths will remain adjustable. The shape also stays a vector shape, so you can freely change its color, stroke, and size anytime.
Step 5: Create Custom Shapes
Finally, as long as a path is active, you can turn it into a custom shape that can be saved and reused repeatedly.
With one of the Pen tools active, Right-Click > Define Custom Shape. Name your Shape and press OK.
Select the Shapes tool, and choose Custom Shapes. You will find your created shape at the bottom of your shape options.
You can create the custom shape as either a Shape or Path, using the Options toolbar.
Conclusion
Whether you’re creating shapes and selections or stroking paths with the Brush tool to create interesting and precise lines and designs, the Pen tool is still a tool worth learning.
While the Pen tool may not be the fastest, there is no better selection tool if you are after accuracy. Need custom shapes? The Pen tool can make them as well.
And while it is a bit notorious for being hard to understand, becoming familiar with the Pen tool is a surefire way to amp up your Photoshop game and well worth your time and effort.


Leave a Reply