How to Make a Website with Webflow: A Step-by-Step Guide
New to Webflow and not sure where to start? This step-by-step guide will show you how to make a website with the Webflow site builder, even if you’re a complete beginner.
Using a pre-designed template or theme with a CMS like WordPress is the quickest way to create a professional website without hiring a web designer.
But if you want a 100% unique design, you have a specific vision for your site, or you just want the satisfaction of building something from scratch, making your own site is definitely the way to go.
Luckily, it’s no longer necessary to spend weeks learning HTML, CSS, and Javascript before you can even create a basic website. The rise of the no-code movement means there are now dozens of tools you can use to help you build an impressive website with no coding skills required.
Webflow is one of the most powerful and flexible of this new generation of website builders. The learning curve is a little steeper than the drag-and-drop builders aimed at complete beginners. But the effort is definitely worth it if you want to build a one-of-a-kind website.
In this guide, we’ll take you through the process of building a website in Webflow, step by step. By the end, you’ll have a beautiful website that’s fully responsive and looks great on any device.
So grab a coffee, settle in, and let’s get started!
1. Create a Webflow Account
It’s completely free to get started with Webflow. So head over to webflow.com and hit the “Try Webflow” button in the top righthand corner of the screen. From here, you can either sign up with your email or log in directly with your Google account.
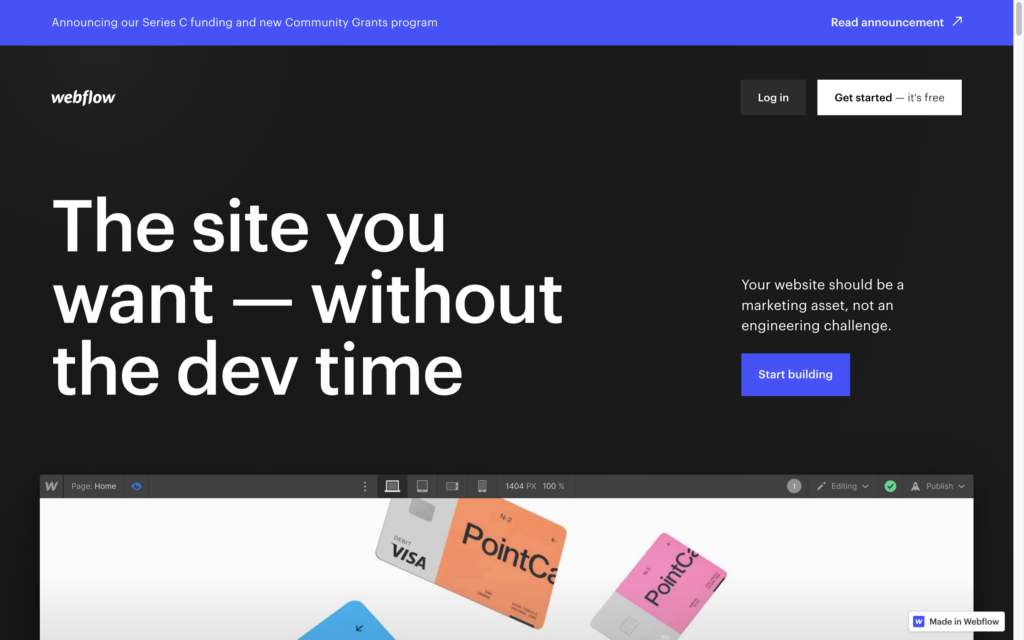
You’ll start out on the Starter plan. This is the free staging Webflow plan that you can use to build up to two sites. You will publish your sites to webflow.io and they will have a small Webflow badge on the bottom right corner.
Starter sites are also limited to 2 static pages, 50 CMS items, and 500 monthly visits. This should be enough for you to get to grips with the Webflow builder and decide if it’s a good fit for you.
If your website is getting more traffic, or you want to add more pages you can upgrade. Paid plans start from $12 a month, and also allow you to connect to a custom domain.
2. Create Your First Site Project
Once you’ve signed up with Webflow, you’ll see your dashboard, where you can access all the sites you’ve built. You can create up to two site projects on the free Webflow plan.
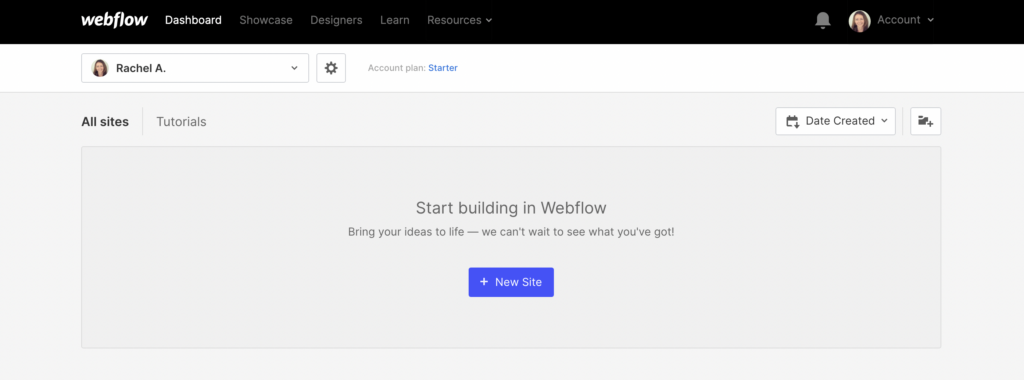
Click the “New Site” button to get started.
From here, you have the option of starting your site with a completely blank canvas. Alternatively, you can select an un-styled skeleton template to get you started or use a pre-designed template.
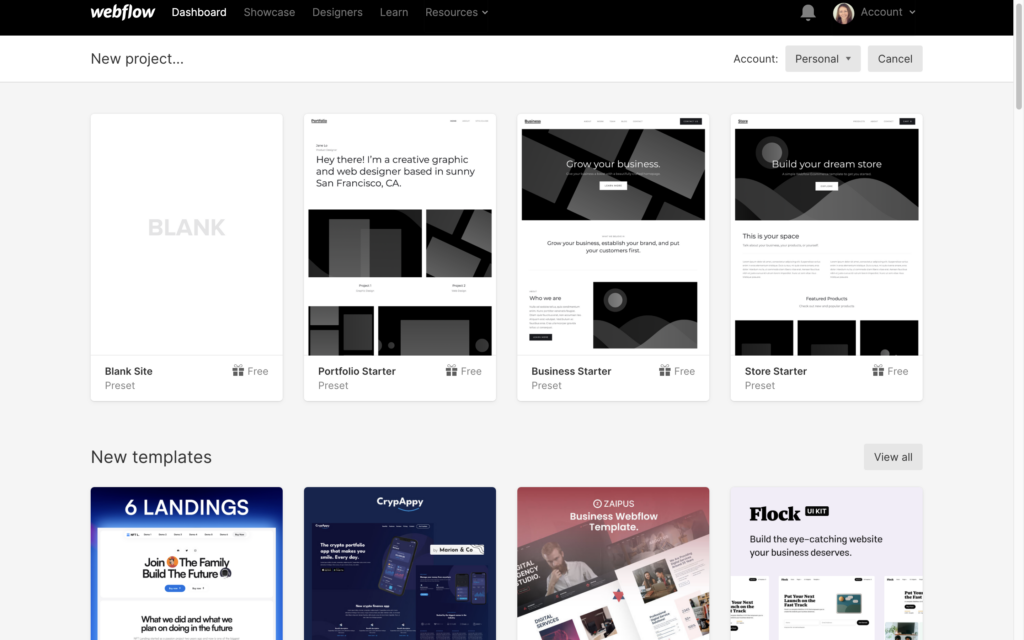
If you’re in a hurry, choosing a pre-made template and customizing it can save you a lot of time. You don’t even need to customize it if you don’t mind having the same design as other sites.
I did promise that I would show you how to make a site from scratch. However, starting with a totally blank canvas can be a bit intimidating for beginners. This is especially the case if you don’t even have any idea of how to structure your site.
For this reason, I’m going to be using the “Business Starter” template for this tutorial. This is a completely unstyled template, but the basic structure is there, which will save us a lot of time and means you don’t have to do a whole other course on UX design before you get started.
However, feel free to have a go at starting with a completely blank slate once you’ve got to grips with the basics.
For now, go ahead and hit the “Select” button to get started.
Type a name for your project (or leave the auto-generated one that Webflow suggests and click the “Create Site” button.

Wait a few moments for Webflow to do its thing, and it’s time for the fun to begin.
3. Finding Your Way Around the Webflow Editor
The Webflow site builder looks similar to image editing software you may have used before, like Photoshop.
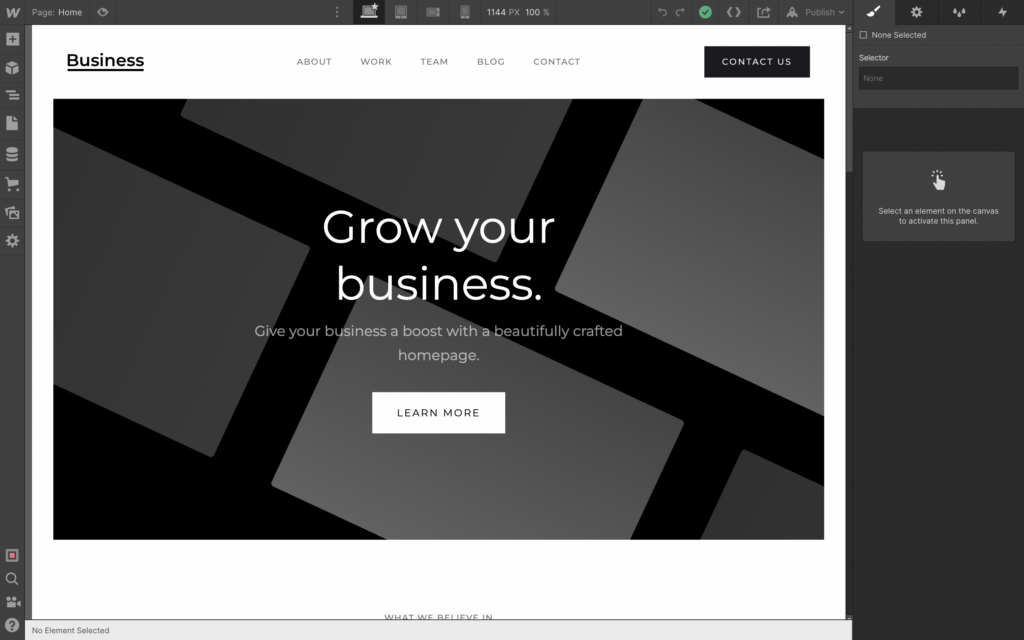
The majority of the screen is taken up with the site preview. As the site builder is visual, you can see all the design changes you make to your site in real-time, so there’s no need to keep switching back and forth between browser tabs.
If you hover over any of the elements in your site preview, the editor will automatically highlight them, and you can see the name of the element. For example, above the fold with this site template, we can see:
- Navigation
- Intro Header
- Heading Jumbo
- Paragraph Bigger
- Button
- Text Block
Click on any of these elements to see the styling options.
Take a look at the color-coded diagram below to start finding your way around the Webflow visual site builder:
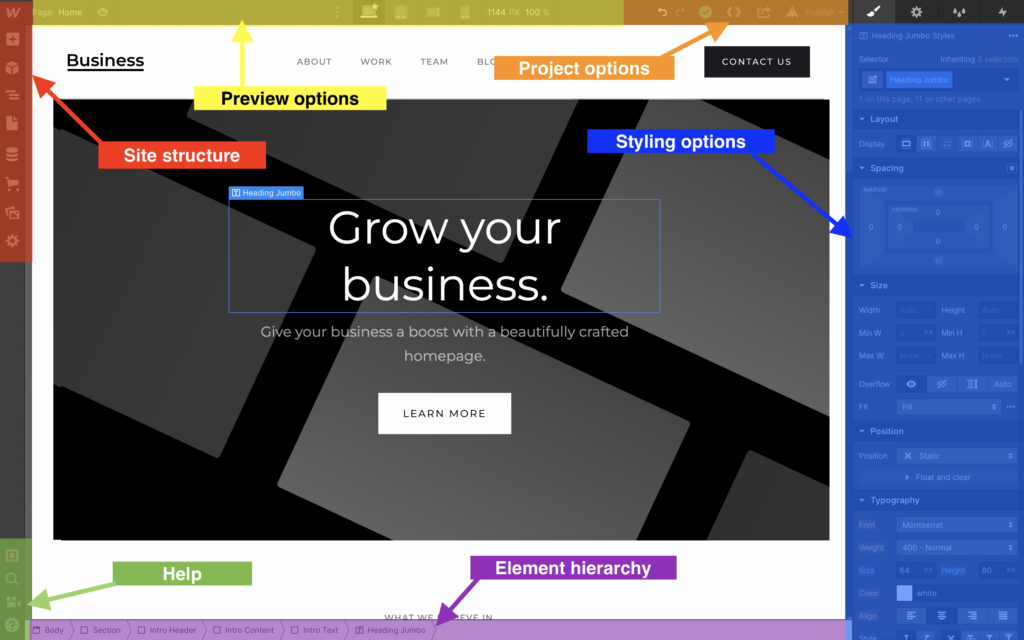
Site structure (red)
Tools for editing the layout and structure of your site. From here, you can:
- Add any element (sections, buttons, headings, images, navigation, etc.) to a page you’re building
- View and rearrange the main sections of each page
- Add new pages
- Connect to the Webflow CMS
- Add eCommerce functionality
- Access your asset library (images and videos)
- Change the main settings of your site.
Preview options (yellow)
Change the page you’re previewing or preview on a different screen size or device.
Project options (orange)
Undo or redo changes, export code (not available on the free plan), share your project with others, and publish your site.
Styling options (blue)
This is where you can change the visual appearance of every element on your site, including position, size, spacing, typography, background colors and images, borders, animation effects, and more.
Element hierarchy (purple)
Webflow designed its builder to create sites with a box model where every element on the site fits into a grid of boxes. Each box can contain several elements, and you can nest elements inside other elements. This panel displays where the element you’ve selected fits within the overall structure of your site.
Help (green)
Tools to help you out if you get stuck:
- A site audit to automatically check for potential problems
- A search feature to find elements or tools
- Video tutorials and links to documentation
- A walkthrough of the whole editor
It’s well worth taking some time to explore the editor before you get started. If you don’t understand some of the tools, don’t worry: it will all become clear as you start building your site.
It’s also worth remembering that Webflow is actually a pretty powerful web builder, and you won’t need to access all its functions unless you’re a professional web designer.
We’ll just be skimming the surface in this tutorial, but if you want to learn more, Webflow has a library of courses called Webflow University that walks you through all the advanced features.
4. Understanding Webflow Elements
If you’re already getting a little freaked out and ready to give up, don’t panic!
As a beginner, you won’t need to understand everything about how Webflow works. To build a basic website, all you need to do is add some elements to a page.
Elements are the building blocks of a Webflow site. You can think of them as being like Lego bricks you stick together to create a finished product.
There are all sorts of elements available in Webflow, from headings and paragraphs to images, buttons, forms, and even embedded video.
You can add elements to a page by dragging them from the left-hand panel onto the stage. If you hover over an element in the side panel, you’ll see a small “?” icon in the top right corner. Clicking this will give you a brief explanation of what exactly the element is and how you can use it.
Basic Webflow Elements
Let’s take a look at some of the most common elements you’ll need to create a website.
- Sections – Section elements divide blocks of content on your site. They take up the full width of the screen.
- Containers – Container elements act as a wrapper for other elements on your page. You can use them to center and organize your content.
- Grid – You can use this element to create a responsive grid system. This is the foundation that contains your content with the number of columns and rows you choose.
- Div block – Div blocks are the basic building blocks of every Webflow site. You can use Div blocks to group elements together or as a spacer between other elements.
- Button – You can use buttons to prompt visitors to take an action on your site, such as submitting a form or adding items to a shopping cart. You can style buttons and add animation effects as you wish.
- Link block – Surround any other element such as an image or Div block to turn it into a link.
- Heading – Use headings to add titles and subheadings to your content. You can choose from a variety of heading sizes and format them as you like.
- Paragraph – Use the paragraph element to add body copy to your site. You’ll add most text on your site as a paragraph element.
- Image – You can use the image element to add images to your site that are part of the content (ie, not a background image). You’ll select images from your asset library.
- Video – Embed videos on your site that are hosted at third-party video sites like YouTube and Vimeo.
- Form – Use the form element to add a contact form, signup form, or any other type of form to your site.
- Navbar – Use the navbar element to create a navigation bar that links to other pages on your site.
- Slider – Create a slideshow of images, text, or videos.
There are several other elements available, so feel free to explore the available elements in your Webflow editor and experiment with adding them to the page you’re working on.
5. Adding Elements to Your Site
As we’re working with a basic template, there are already several elements added to the page. If you hover over them, you’ll see the existing layout is made up of several sections, headings, images, buttons, and paragraphs.
You can add new elements to the page by dragging them from the left-hand panel and dropping them onto the stage.
Let’s have a go at adding a lead capture form underneath the main header section.
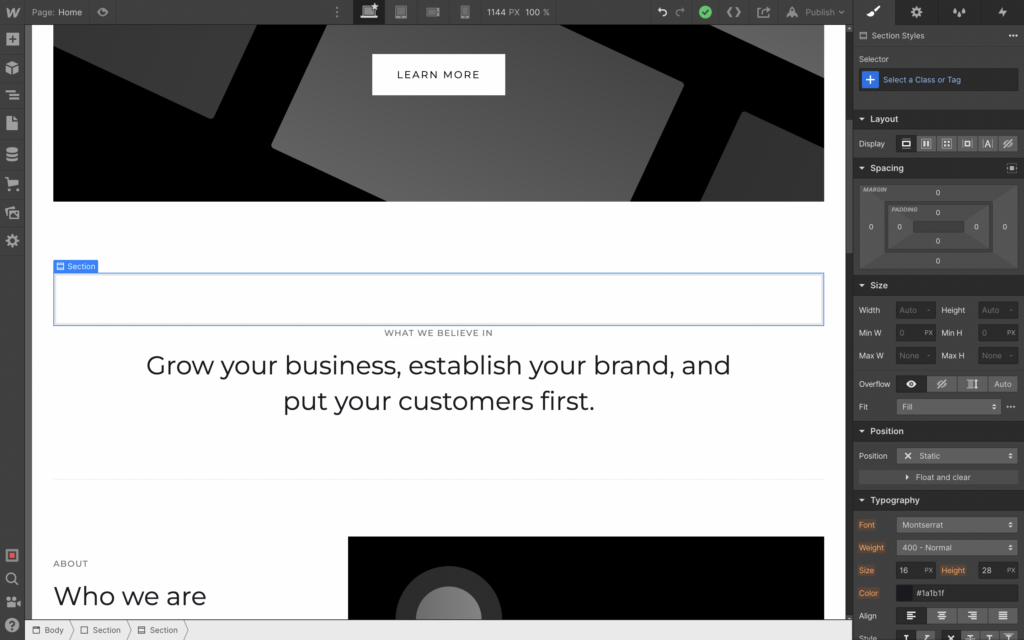
1. Add a new section for your form
Click the “+” icon to open up the element browser, click on “Section,” and drag and drop it underneath the header section.
Here’s our new section:
2. Adjust spacing
Now we’ve added a new element, we need to reduce the white space under the header. You can do that by clicking on the header element and adjusting the bottom margin.
The margins are located in the “Spacing” section of the element styles panel to the right. If you hover over the lower margin (which is currently set to 100px), you’ll see the margin shaded in blue in the preview panel.
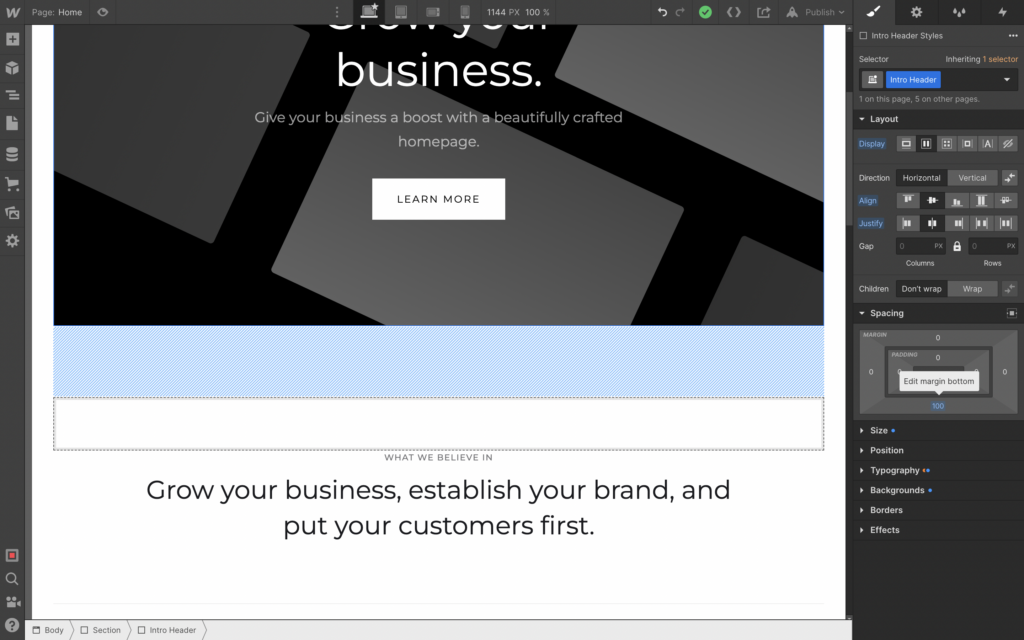
You can then either click and drag the margin in the style panel, which will change it in real-time in the preview pane, or click and type in the value you want to set. Use the method you prefer to change the margin to around 50px.
We now need to add some bottom margin to our new section, so click on it and repeat the steps to add a 50px margin to the bottom of the section. This should be the result:
3. Adding the form
Now everything is all nicely spaced, we can go ahead and start working on our form.
Sidenote: Webflow actually provides a pre-built subscription form along with several other useful preformatted collections of elements to save you starting from scratch. You can find these under “Layouts” in the Add elements panel.
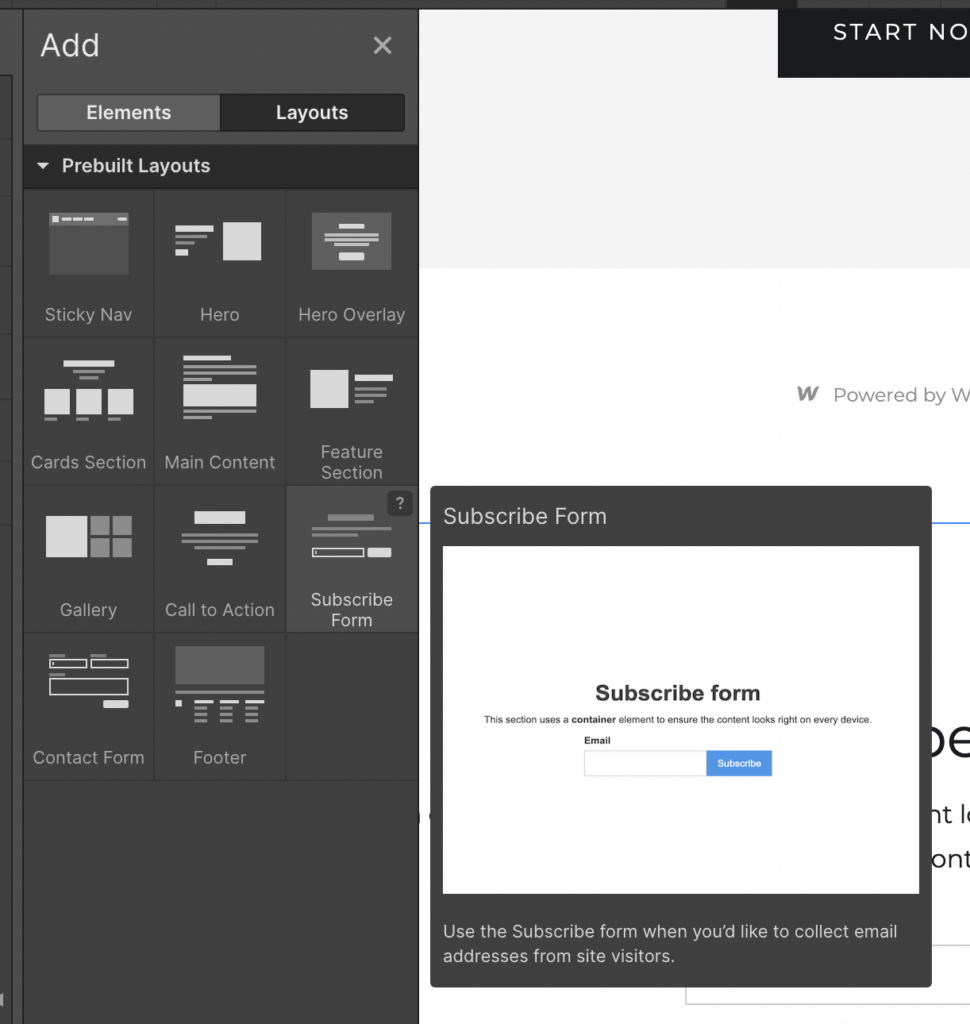
So feel free to make use of these pre-built layouts. For now, let’s go ahead and look at how to add our own form.
Adding form text
I want to keep this simple as it’s right on the homepage, so let’s stick to a single line of text with a form field for name and email address and a submit button.
Let’s start by adding a Text Block. This is a generic Webflow element intended for text which isn’t a heading, paragraph, or link. Click on the Text Block element from the Add Elements panel and drag and drop it into your new section.
Ta-da! You now have a text block. Go ahead and click on the text to edit it and check it into some fancy CTA copy.
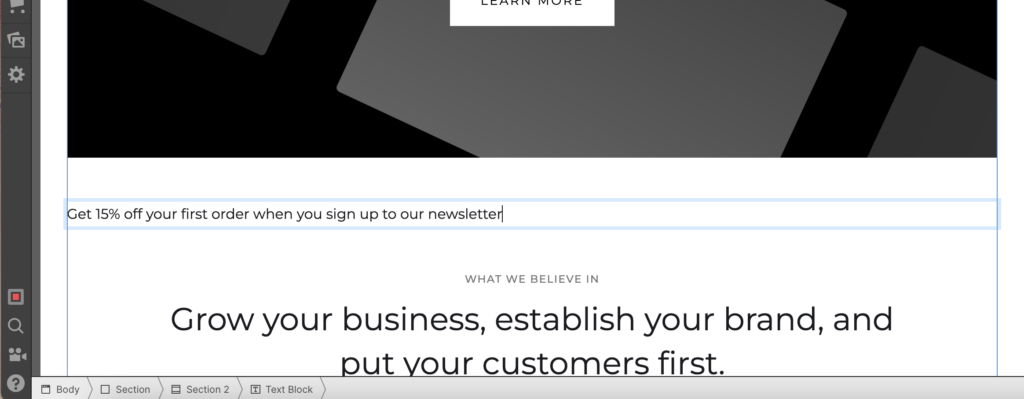
We’ll want to style that text a bit but let’s leave that for now and go ahead and add the form elements.
Adding form elements
Click on the “Form Block” element and drag and drop it under your text. The basic form is already set up with an input box for name and email address and a submit button, which is handy because that’s exactly what we want.

However, I want this form to be arranged as a single row.
Creating columns for form layout
The easiest way to change the layout of the form is to drag in a column element above the form and change the settings to three columns.
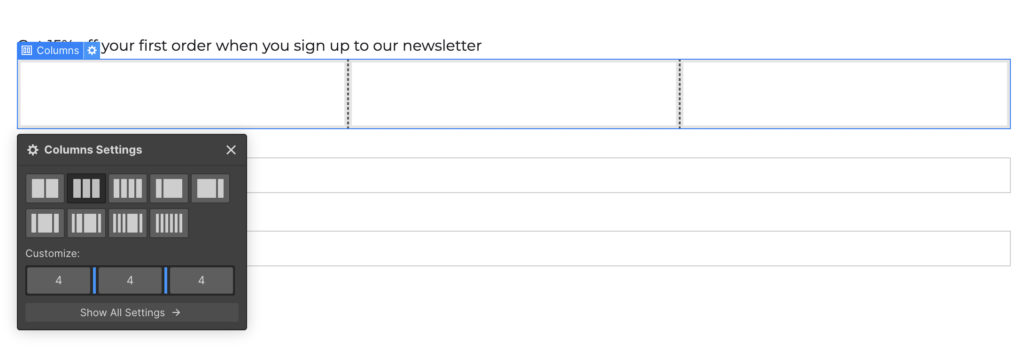
Then simply drag each of the form elements into the columns.

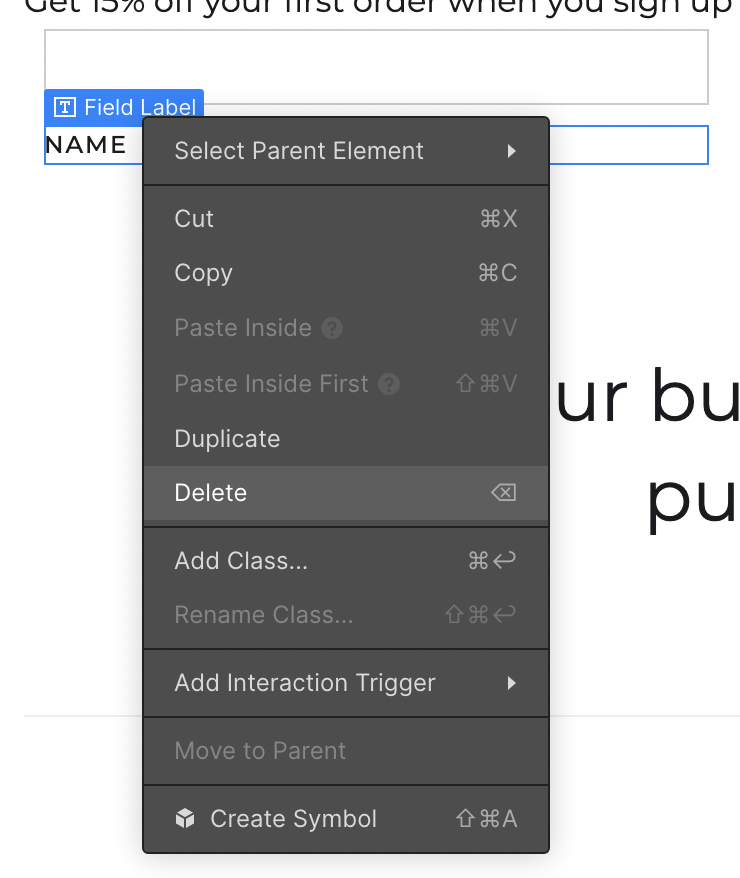
I’m going to delete the form field labels for a cleaner look. To delete elements, click on the element to select it, right-click, and choose “Delete” from the contextual menu.
We’ve successfully added a form to our new site. It just needs a little styling. But so does the rest of the page! So let’s cover that next.
6. Styling Elements
Styling the elements on your Webflow site is as simple as selecting the element and adjusting the styling settings in the panel to the right. You already did this to adjust the margins.
Let’s try it out with the new form we just added.
Adjusting size of elements
Firstly, we need the form fields and submit button to all be the same height.
If you click on one of the input fields and look at the “Size” settings in the Style panel, you’ll see the height is set to “auto.” Let’s change that to “PX” to set a fixed pixel size for the height and change it to 50px.
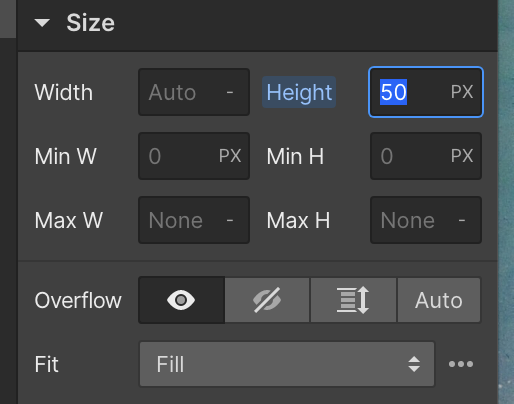
You can repeat this for the other form field and the submit button to make them all the same height:

We also want to change the width of the submit button, so it’s the same size as the input fields. Just change the width to 100%, so it takes up the whole column.

Adding form filler text
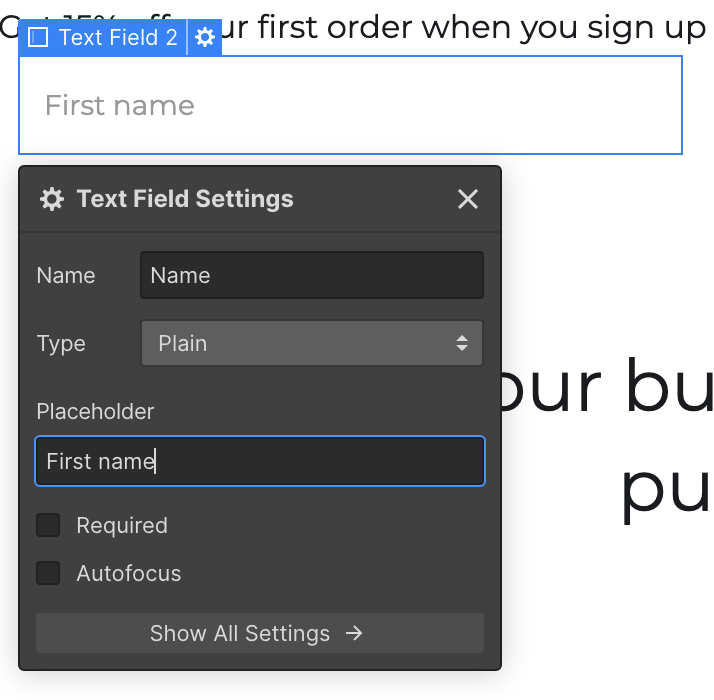
We removed the form labels earlier, so let’s put some filler text in the form fields instead, so it’s clear what the user needs to type in. Click on the form element and click the little cog icon on the top right to access the element settings. You can then add some filler text for your form.
Adjusting typography styles
Let’s go back to the text above our form. I want to center it and make it bigger.
You can easily do this in the “Typography” section of the style settings. Select the text block and make any style changes you wish. I increased the size to 24px, chose center-align, and changed the weight to semi-bold.
While we’re in the text block style settings, we could do with adding some space between the text and the form fields, so go ahead and add some margin as we did before. Here’s the final result:

Changing background colors
Now I want to change the background color of our form section to make it stand out more. Select the element for our new form section and find the “Background” section in the styling settings. Here we can set a background color or select an image or gradient. I’m going to stick to the solid background color.
You can either enter the hex code directly or use the color picker. You can also pick a color directly from your design preview panel, which is very happy for choosing complementary colors to match images on your site or just to quickly match the color of buttons and other elements. However, you’ll need to install the “Webflow Chrome Extension” for this to work (assuming you’re using Chrome as your browser.)

After you’ve changed the background color of the form section, you’ll need to adjust the text color, button color, and the padding of the section to get it all looking nice. Here’s the final result:

By now, you should have a good feel for how to use the editor to adjust the styling of the elements on your page and get everything looking the way you want it.
Go ahead and have a play around with the styling for the other elements. Try changing the background image of the header, adjusting heading sizes and fonts, and making any other style changes you want. When you’re happy with your changes, we can move on to activating the CMS to add a blog or other dynamic content to your site.
Here’s my site with some minor design changes. As you can see, it’s very quick and easy to customize the basic templates to add your own elements and tweaks so that your site looks unique.

7. Adding New Pages to Your Site
Up to this point, we’ve just been working on the homepage of our new site. Some websites are just one long page; however, most sites are made up of multiple pages.
To add new pages to your site, click on the “Pages” tab in the left panel. Here you’ll see a list of all the pages on your site. As we started with a template, we already have a few pre-made pages on our site. This particular template has pages for About, Contact, Team, Projects, Blog, and a few others.
If these pages meet your needs, you can simply edit the design of them as you did with the homepage. However, if you want to add another page, just click the icon in the top right-hand corner of the pages panel.
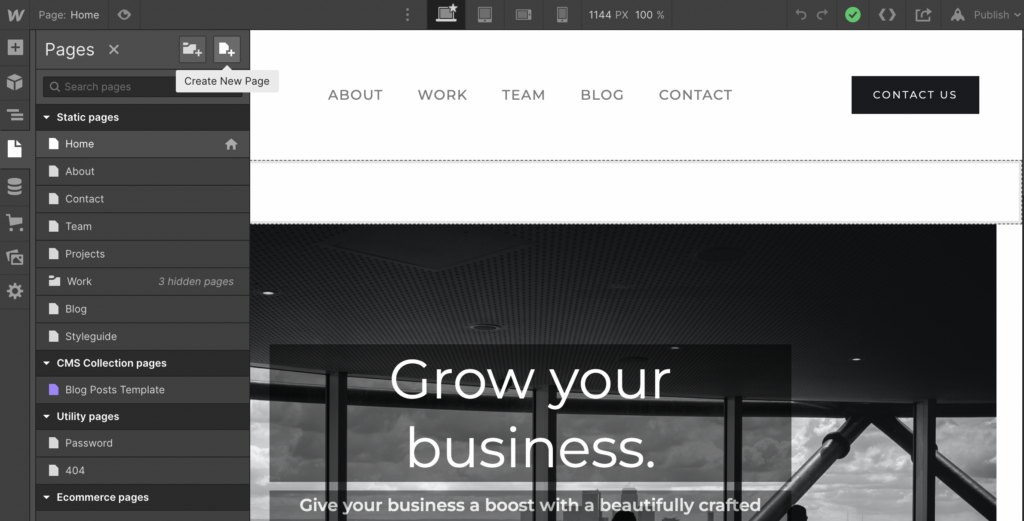
New pages you add are completely blank, so you’ll need to add your header, footer, and any other sections that are standard across your site.
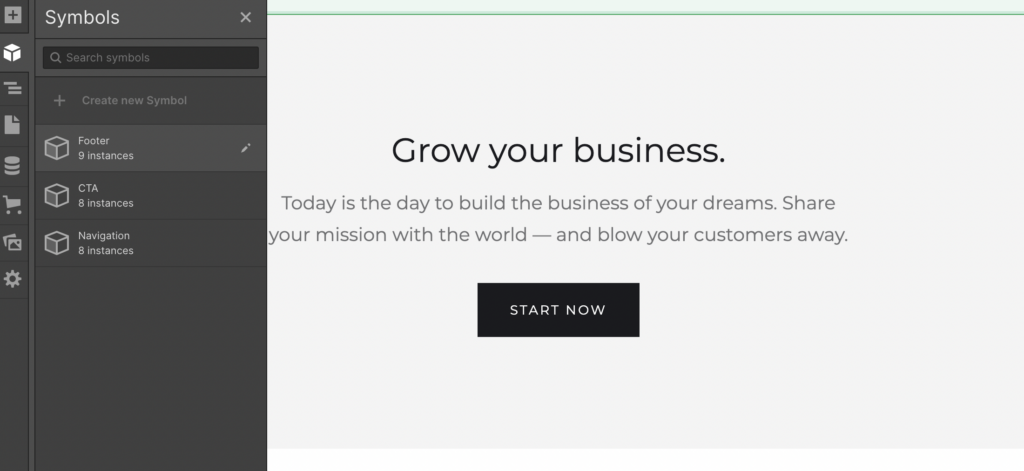
If you’re building a site from scratch, you should save these sections as “Symbols” so you can drag and drop them onto new pages without having to build them from scratch for each page. You can save any collection of elements as a Symbol by right-clicking and choosing “Create Symbol” from the contextual menu.
For pre-built templates, you’ll find the Symbols in their own panel. Just click the icon that looks like a cube and drag the header and footer across when you create a new page.
8. Adding Dynamic Content to Your Site
You’ve now got a fully-functioning site but it’s static. That means every time you want to add a new page or change some content, you’ll have to go into the editor and do it manually.
This is ok if you don’t need to update your site very often, but if you’re planning on adding a blog or other frequently updated content, you’ll want to use Webflow’s CMS (Content Management System.)
The CMS allows you to store your content in a database and then dynamically pull it into your pages. So, for example, instead of creating a new page for each new blog post, you can write your post in the CMS, and it will automatically appear on your blog page.
Webflow’s CMS uses what it calls “Collections” to store different types of content. For example, you might have a Collection of blog posts, another for products, and another for projects.
The template we’re using already has a Collection of blog posts, which you can see by opening the CMS Collections panel.
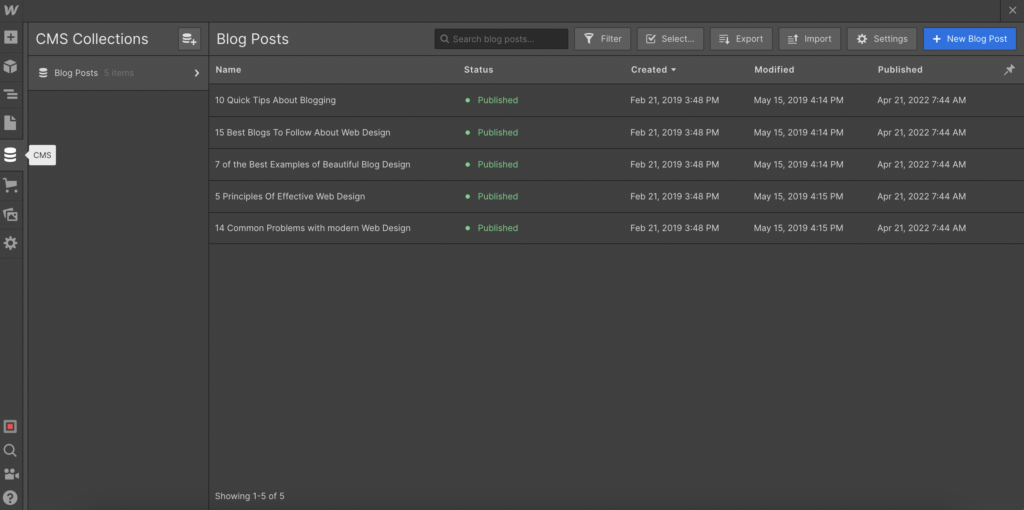
If you’re using a template that already has collections set up in this way, you can just hit the blue “New Blog Post” button, which will take you to a form where you can enter the title and body of your blog post and upload images, etc. just as you would do on any blogging platform.
To add a new Collection, just click the icon in the top right of the Collections panel. There are various readymade Collection templates you can use (blog posts, menu items, authors, recipes, events, etc.) which will be suitable for many types of sites.
If the templates don’t suit your needs, you can add custom fields and create your own type of Collection.
9. Previewing and Publishing Your Site
There’s a lot more to building sites in Webflow, but this should be enough to get you started. Once you’ve built out your pages and added your content, it’s time to preview your site to see how it looks on different screen sizes.
You’ve already seen the live preview of the site as you’ve been building it but you can preview what it looks like on a mobile phone or tablet by switching between the different preview buttons at the top of the panel.
For example, here’s how my site looks on mobile in portrait mode.
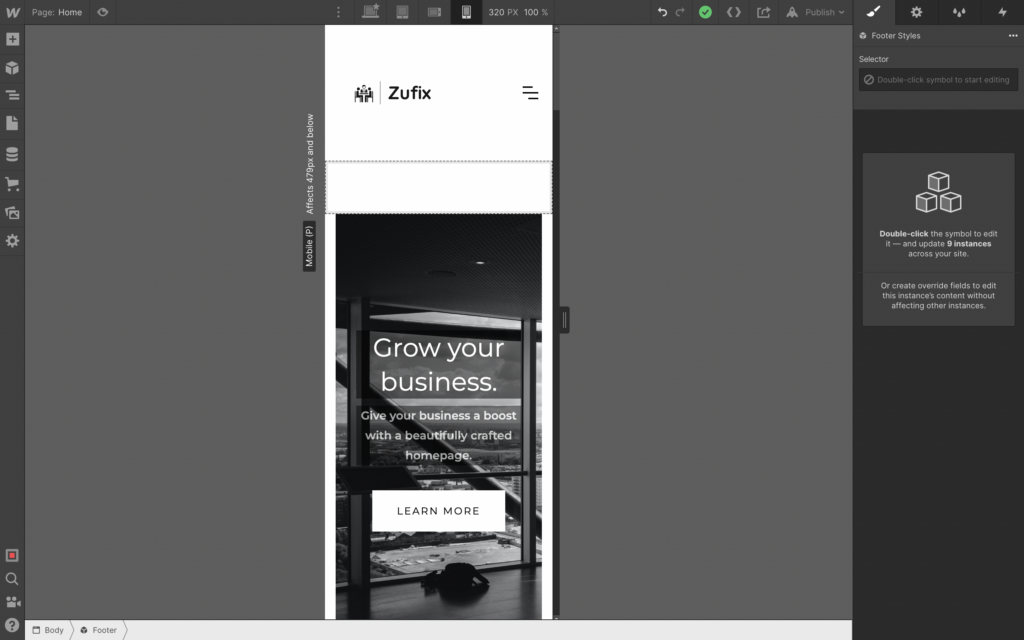
As you can see, the logo and menu are taking up too much of the screen, so we’d want to adjust that before going live.
When you’re happy with how your site looks, it’s time to publish it. Just hit the “Publish” button in the top right corner and choose whether to publish it to a subdomain of webflow.com or your own custom domain.
10. Further Reading and Resources
We’ve only skimmed the surface of what’s possible with Webflow in this post, but hopefully, it’s given you a taste of what the platform is capable of.
For more detailed tutorials, be sure to check out Webflow University – they have an excellent series of video tutorials that will take you through everything from setting up your first site to more advanced features like e-commerce. The Webflow 101 Crash Course is a great place to start.
If you want to explore some of the sites people have built with Webflow, head over to the Showcase section where you can filter by industry, style, and other criteria. You can also open some of these sites in the Webflow editor and use them as a starting point for your own project or simply take a closer look at how they were put together. We’ve also compiled a list of some beautiful Webflow sites to inspire you.
Apart from entire sites in the Showcase section, there are UI kits, which are reusable blocks of code that can be imported into any project. The Prospero UI kit is a good one to start with as it includes all the basic elements you’ll need to put together a simple site, including page layouts, content layouts, product feeds, and more.
Also, make sure to check out the Webflow forum where you can ask questions, give feedback, and connect with other Webflow users.
And that’s it! You now know the basics of how to make a website with Webflow. With a little practice, you’ll be able to build sites that are not only beautiful but also responsive, interactive, and feature-packed.
The best way to get to grips with Webflow is to just jump in and start building. So go ahead and give it a try – you might be surprised at what you can achieve.


Leave a Reply