How to Add Google Analytics to WordPress (Manually and via Plugin)
As a website owner, something that you should definitely be familiar with is how to add Google Analytics to WordPress. Web analytics allow you to understand how visitors interact with your site. That information enables you to make improvements and create an even better user experience.
For that reason, this article will show you everything you need to know about this topic. It will explain what Google Analytics is and why you should use it, talk about privacy concerns in connection with the new GDPR rules and several ways how you can add Google Analytics to WordPress both manually and via plugin.
Ready to go? Then let’s.
What is Google Analytics (And Why Use It)?
Before getting to the how-to part, let’s quickly cover what we are talking about. If you don’t know what Google Analytics is and what you can use it for, this part is for you.
Get to Know Your Audience
Google Analytics is a popular suite of web analytics tools present on literally millions of websites. One of the main reasons for its prevalence is that it is available for free. However, what does it do?
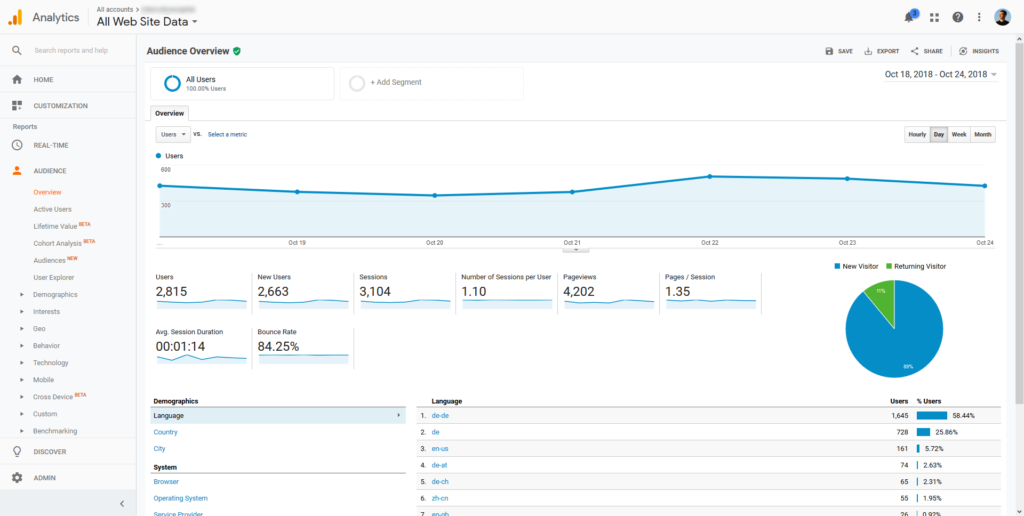
Basically, Google Analytics collects information about your web traffic and makes it available to you. For that to happen, all you need to do is add a piece of JavaScript code to your site (more on that soon), which enables the software to track every visitor on your website and what they do. After it does so, Google Analytics turns this information into graphs and statistics that you can access inside your account.
In particular, you can learn the following:
- Who are your visitors? — Where are they located in the world? What devices do they use to access your website?
- What do they do on your site? — See which pages they frequent, how many of them leave after just one page (the so-called bounce rate), how long they stick around, which links they click and other interactions with your site. You are also able to set goals (i.e. email subscriber conversions) and track them.
- When are they coming by? — Learn when your site is particularly popular, broken down by hour, day, week and month.
- How do they find you? — Google Analytics can tell you what your primary traffic sources are: search engines, social media, links or direct traffic
Use This Information to Improve Your Site
You might be thinking, “that’s all fine and dandy, but how does that help me?” Well, knowing the above allows you to further optimize your site in many ways, such as:
- Improve the user experience for different kinds of devices if needed
- Optimize under-performing traffic sources or establish more of those that perform well already
- Improve your content strategy to give visitors more of what they want
- Make under-performing landing pages better
- Track the performance of your marketing campaigns
In short, learning how to add Google Analytics to your site means you no longer have to guess what would make your site better. Instead, you can take steps based on facts and data to improve what you have to offer. However, collecting this data also comes with some responsibility. Let’s talk about that next.
Google Analytics and GDPR
By now, you are probably aware that we recently saw a new European rule on consumer data protection come into effect. It is called General Data Protection Regulation. This law has consequences for anyone who is active in the European market in any way. If that is you (which is likely), you have to make sure your use of Google Analytics is compliant with it.
- Don’t send any Personal Identifiable Information (PII) — This means things like email or home addresses, phone numbers or anything else that can be used to personally identify someone. It’s crucial that you audit your site whether you are passing any of this kind of data on to Google. More on that in this article.
- Enable IP anonymization — PII extends to IP addresses. For that reason, to be on the safe side, it makes sense to switch on anonymization within Google Analytics. Find out how here.
- Include a privacy policy — Under the new law, every website needs their own privacy policy. This document needs to lay down in plain language everything you are doing concerning collecting and processing user data, including for cookies and contact forms. Read this post for details.
- Make your cookie consent GCPR compliant — For all cookies that are not strictly necessary, you need to get consent from your users to use them. Your consent solution must include information about the purpose of the cookies, ensure that visitors can still use your site even if they decline, provide access to cookie settings and document their acceptance. There are several plugins in the WordPress directory for that.
For more information on GDPR and what it means for your site, I recommend this post. Alright, now we can finally get to what you came here for.
How to Add Google Analytics to WodPress Manually
In order to use Google Analytics on your site, you first have to sign up to an account. You can do this on the Google Analytics homepage. Either sign into your existing account or follow the instruction to create a new one. This will give you access to your tracking ID and code, which you will need soon. You can find it under Admin > Property > Tracking Info > Tracking Code.
Method #1: Add the Tracking Code to header.php
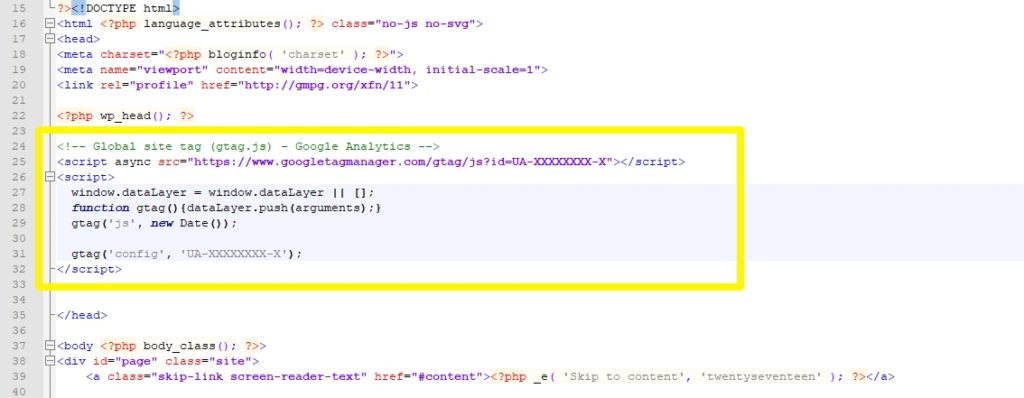
One of the easiest ways to add Google Analytics to WordPress is to insert the tracking code into the header file. That way, it will load on every single page. This is an especially good solution if your theme is using the standard header.php file.
Be aware, however, that the best idea to implement this is in a child theme. Otherwise, you will lose your changes to a theme update. So, either open up header.php in your main theme or copy it to your child theme folder and then edit it. After that, copy the tracking code from your Google rel=”nofollow”Analytics account and paste it right before the closing </head> bracket.
Don’t forget to include the <script> brackets so browsers know what it is. Save the file, upload it to your theme and you are done.
Method #2: Use functions.php
Another possibility of how you can add Google Analytics to WordPress manually is functions.php. It works the same way as above only that you add the analytics code to your header with a function instead of inside the file.
To achieve this, edit the functions.php file of your theme or child theme and add the tracking code like so:
function ns_google_analytics() { ?>
<script async src="https://www.googletagmanager.com/gtag/js?id=UA-XXXXXXXX-X"></script>
<script>
window.dataLayer = window.dataLayer || [];
function gtag(){dataLayer.push(arguments);}
gtag('js', new Date());

gtag('config', 'UA-XXXXXXXX-X');
</script>
<?php
}

add_action( 'wp_head', 'ns_google_analytics', 10 );
Be sure to change the details so it uses your own tracking code! After that, save, upload and you are done.
Installing Google Analytics via a WordPress Plugin
Of course, WordPress also gives you the ability to add Google Analytics through a plugin. There are several options and for this tutorial, we will be using GA Google Analytics. It makes connecting your site very easy, is fast and not as bloated as other plugins on the market. Plus it supports IP anonymization for GDPR compliance and other privacy settings. You will find more plugin options at the bottom and I recommend you compare to find your favorite solution.
1. Install the Plugin
In order to use the plugin, the first thing you need to do is install it on your site. For that, go to Plugins > Add New and write its name into the search bar.
Find it in the results list and click Install Now to start the download onto your site. Once done, hit Activate and you are done.
2. Input Tracking Code
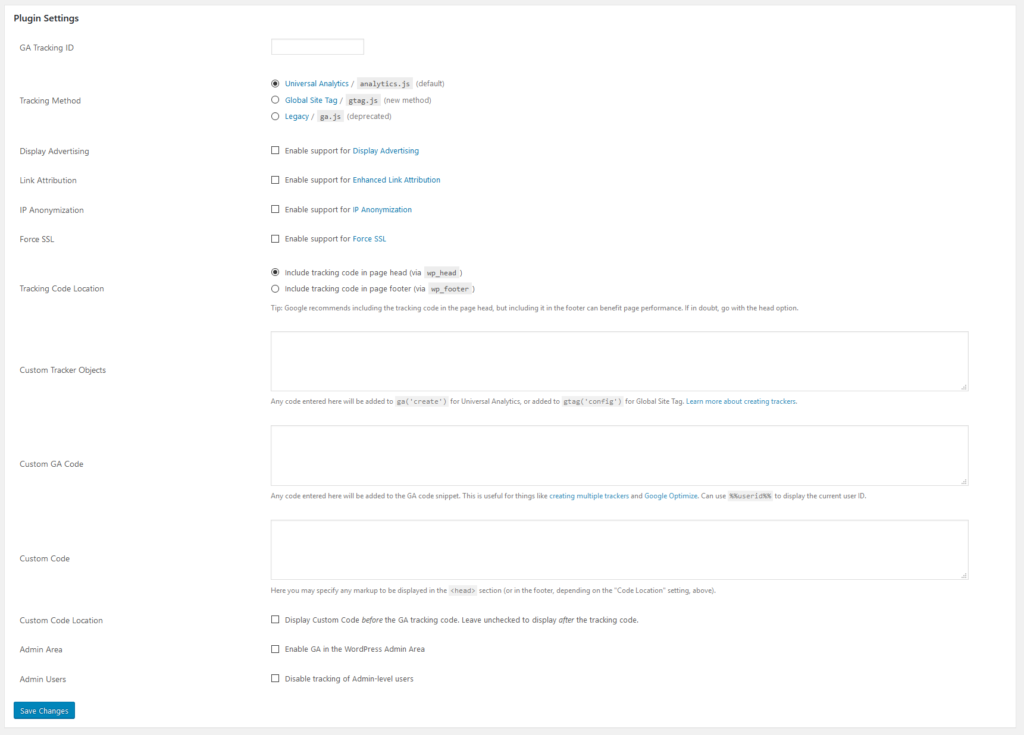
With the plugin installed, you can find its configuration options under Settings > Google Analytics. Alternatively, click on Settings under its name in the plugin list. Both will take you to the same screen. There, all you need to do is click on Plugin Settings either at the top or bottom to open up the settings.
The next thing you will need is your Google Analytics Tracking ID. As mentioned, you find it in your account under Admin > Property > Tracking Info > Tracking Code. This time you don’t need to copy the entire code but only the ID at the top. In addition to that, pay attention to the name of your tracking code, whether it’s gtag.js, analytics.js or ga.js.
Now go back the plugin settings on your WordPress site. Input the tracking ID at the top of the plugin settings where it says GA Tracking ID. After that, be sure to choose the correct tracking method according to the name of your tracking code.
3. Configure the Rest of the Plugin
Once you have done that, it’s time to move on to the rest of the settings. Let’s go over them real quick. Not that some of the settings are only available for certain types of the Google tracking code.
- Display Advertising — This will enable Google Analytics data for the Google Display Network.
- Link Attribution — Enhanced Link Attribution is a feature that lets you track which link to the same URL users click on a single page. You can enable it here.
- IP Anonymization — Check this box to enable IP anonymization, recommended for anyone who has to obey the new GDPR.
- Force SSL — Switch this on to send all data via secure HTTPS connections, even if your site is not on HTTPS yet.
- Tracking Code Location — Determine whether to load your tracking code in the header or footer of your pages. Google recommends the former but moving the script to the footer can increase page performance.
- Custom Tracker Objects — Here you can add code to collect custom data. More information here.
- Custom GA Code — Add any custom code here that you want to include in the Google Analytics tracker.
- Custom Code — If you have any other markup to execute together with the tracking code, you can input it here.
- Custom Code Location — This option lets you define whether to execute any custom code before or after the Google Analytics tracker. The default is after.
- Admin Area — Enable this to include user behavior in the WordPress admin area in your Google Analytics data.
- Admin Users — Here you can disable tracking for admin-level users on your site, I would recommend doing so.
Once you have configured everything to your liking, don’t forget to save the changes for them to take effect. After that, it can take up to 48 hours before you see data in your analytics account. However, that’s it. Well done, you just learned how to add Google Analytics to WordPress!
Other Plugin Solutions
Of course, the above is not the only way to get the Google Analytics tracking code on your site via plugin. Here are a few more options. By the way, WordPress also offers many more useful plugins.
#1. Google Analytics for WordPress by MonsterInsights
The most popular plugin solution in this area. It used to be my favorite because it makes connecting your WordPress site to Google Analytics super easy. However, in my opinion, they went a little overboard in terms of (paid) features and I find MonsterInsights a bit bloated by now.
Nevertheless, it’s still quick and easy to set up, allows you to display your analytics data inside the WordPress dashboard and has a ton more features. Highly recommended, especially for beginners.
#2. Google Analytics Dashboard for WP by ExactMetrics
A similar solution to the first one on the list. It allows you to easily include the Google Analytics tracking code and see your site stats in the WordPress back end. You also get reports for posts and pages and the plugin allows you to further customize the tracking code. It also has privacy features and more than a million users trust it on their sites.
#3. Google Analytics Germanized (GDPR / DSGVO)
For anyone under the new GDPR rule, there is this plugin. It comes pre-configured to fulfill privacy laws, including IP anonymization, can be included in cookie consent, has an opt-out shortlink to include in your privacy policy and many of the features included in GA Google Analytics.
#4. CAOS | Host Google Analytics Locally
Because loading the tracking code can be a performance issue, this plugin allows you to host it locally. That way, you don’t have to contact the Google servers every time someone loads your pages. It’s GDPR compliant, lets you choose the location of the tracker script and is compatible with MonsterInsights. Definitely worth checking out.
Summing Up
Knowing how to add Google Analytics to WordPress is crucial for any website owner. Having analytics in place allows you to understand what is going on on your site and how users interact with it. This helps you make your site better and improve its performance. Plus, it’s pretty easy to do.
Above, you have learned several ways of adding the Google Analytics tracking code to your site. You can either do it manually or use one of the many plugins out there. Whichever route you choose, be sure to check your analytics regularly. It will help you create a much better website.
What is your favorite way of adding Google Analytics to WordPress? Let us know in the comments section below!


Leave a Reply