
How To Create And Display A Custom Post Type On WordPress
Custom post types are a big part of what moved WordPress from a blogging platform to a full-fledged content management system that can be used to build any type of website.
If you’re not familiar, custom post types are a lot like a regular WordPress post, only you can use them to store whatever type of content you want (i.e. they’re not just for blog posts). For example, WooCommerce products are custom post types. Or the actual event listings in an event calendar plugin are also a custom post type.
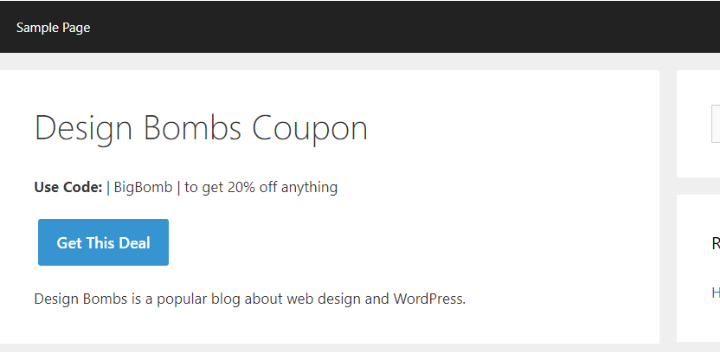
But custom post types aren’t just beneficial in plugins – you can also create your own custom post types to help you display different types of information on your site. For example, the Design Bombs deal section is powered by a custom post type for easy organization/customization.
In this post, I’ll show you an easy, code-free way to both create and display custom post types on your WordPress site.
To make it concrete, I’m going to build a coupon custom post type based roughly on the aforementioned deals section. But you’ll be able to apply the same principles to any type of content on your own site.
What You Need To Create And Display Custom Post Types
If you search the WordPress.org plugin directory, you’ll find tons of plugins that can help you easily create a custom post type.
But here’s the issue with most of those plugins (at least for casual users):
While they can help you create a custom post type, they don’t necessarily help you display the content in your custom post type on the front-end of your site.
That’s why I recommend the Pods plugin. It’s well supported, has tons of documentation, and has the benefit of being free!
Another good option is the premium Toolset plugin, but I’m going to stick with Pods for this tutorial because I want to keep everything 100% free.
To get started, all you need is Pods installed and activated on your website. The whole process looks like this:
- Create a custom post type for coupons
- Add some custom fields to that post type so that we can store the coupon code and discount percentage
- Create a template to actually display the coupons custom post type on the frontend site
Step 1: Create New Custom Post Type
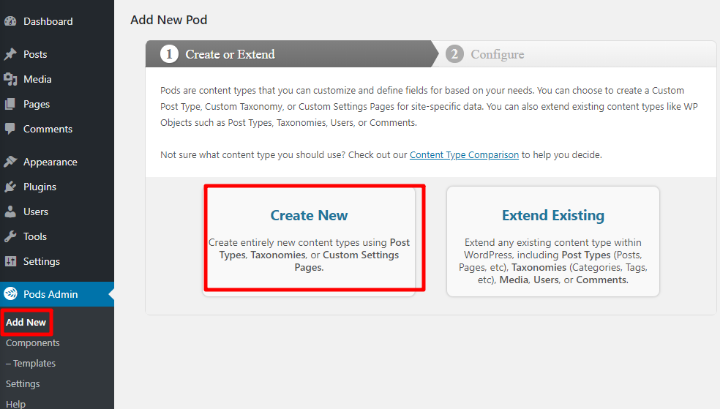
Once you have the Pods plugin installed and activated, go to Pods Admin → Add New in your WordPress dashboard.
Then, select Create New:
On the next screen, leave the Content Type as Custom Post Type. Then, enter a singular and plural label. For this example, that’s:
- Coupon
- Coupons
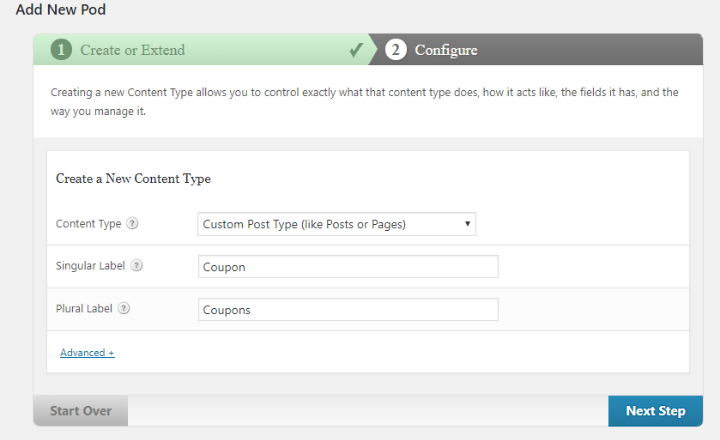
Then, click Next Step.
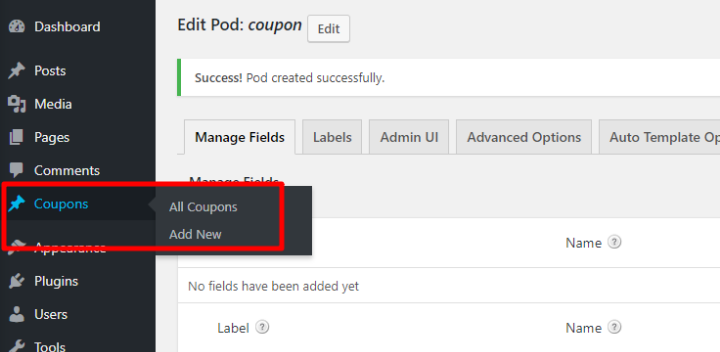
Congratulations! You just created a custom post type. You should notice a new Coupons option in your dashboard sidebar (or whatever label you used):
Step 2: Add Custom Fields To Custom Post Type
Right now, if you went to Coupons → Add New, you’d basically see the normal WordPress editor.
But we want to use this custom post type to display something specific – a “deal”. Not just a regular WordPress post.
To make that easier, you can use something called a custom field. A custom field is an extra input area that shows up in the WordPress editor. For this example, three helpful custom fields would be:
- Coupon Code
- Discount
- Link
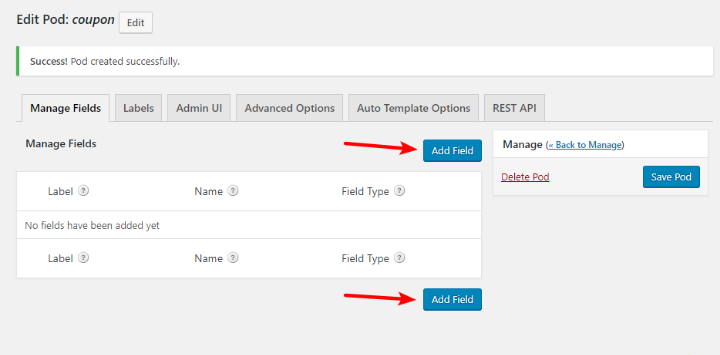
To add a custom field, all you need to do is click Add Field in the Pods interface:
That will open up a new set of settings. First, give the field a Label. Then, use the Field Type drop-down to select what type of field you want to add:

Pods offers a number of premade field types for inputs like:
- Text
- Website
- Date
- Number
- Etc.
For this example, you might want to do something like:
- Coupon Code – text field
- Discount – text field
- Link – website field
Repeat the process for as many fields as you want to add. Then, you should see something like this:
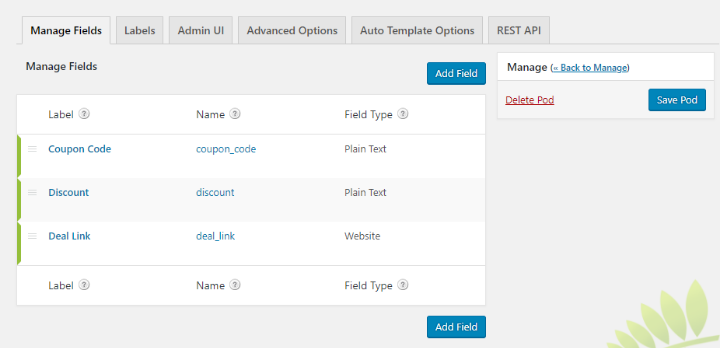
Once you’re done, make sure to click Save Pod.
Step 3: Add Your Content
Now, you can go to Coupons → Add New to add your first coupon. You should see those new custom fields hanging out underneath the regular WordPress editor:
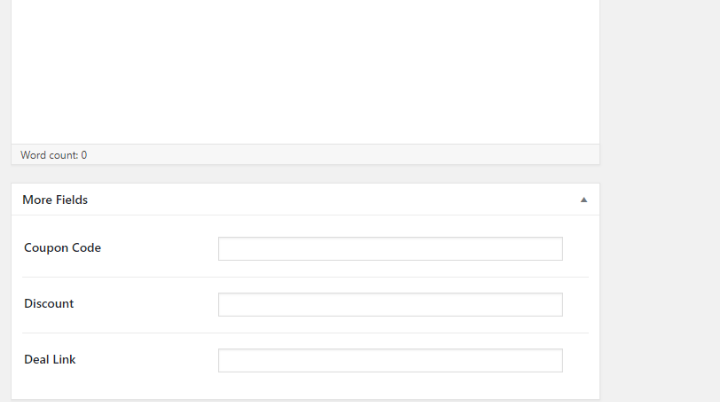
You can enter:
- The title of the entry in the regular title box (that’s the store, for this example)
- A description of the store/deal in the regular WordPress editor
- The actual coupon code in the Coupon Code field
- What the discount is in the Discount field
- The deal link in the Deal Link box (this could be your affiliate link, for example)
Then you can publish your post and…
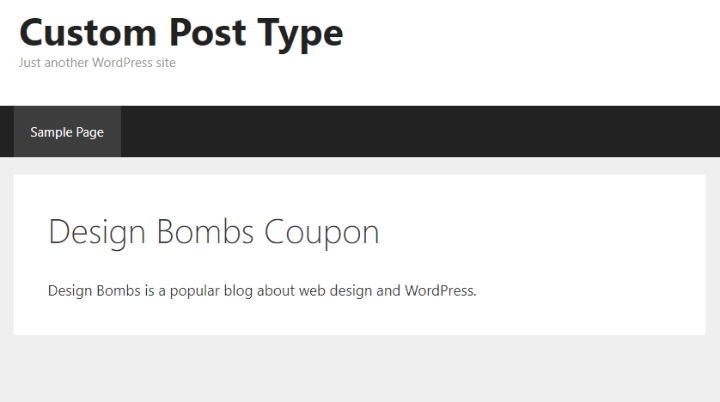
Wait! Where did our custom fields go?
See, this is what I was talking about earlier:
WordPress will output the regular WordPress editor fields for your custom post type. But it won’t output the custom fields by default.
Most custom post types plugins stop here and make you do the rest using PHP. But Pods actually gives you an easy way to get your custom fields to display on the frontend of your site.
Here’s how to do it…
Step 4: Create Pods Template For Your Content
Pods includes a helpful feature that lets you create a custom template for your custom post type using regular HTML and magic tags, rather than requiring you to create a template using PHP.
To access this area, go to Pods Admin → Templates → Add New. You should see a code editor:
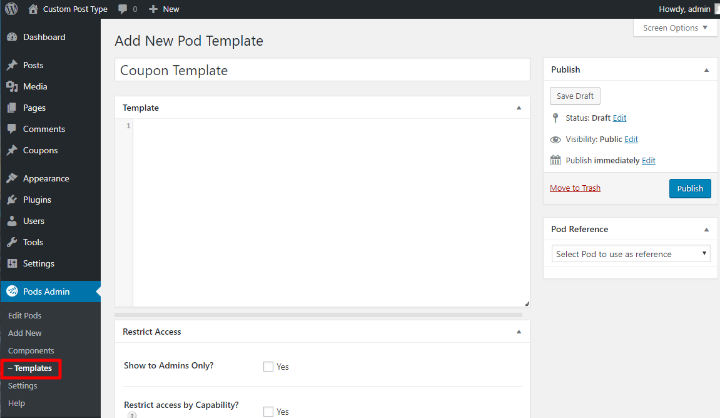
Here’s how this editor works:
- You can use regular HTML/CSS to format your page.
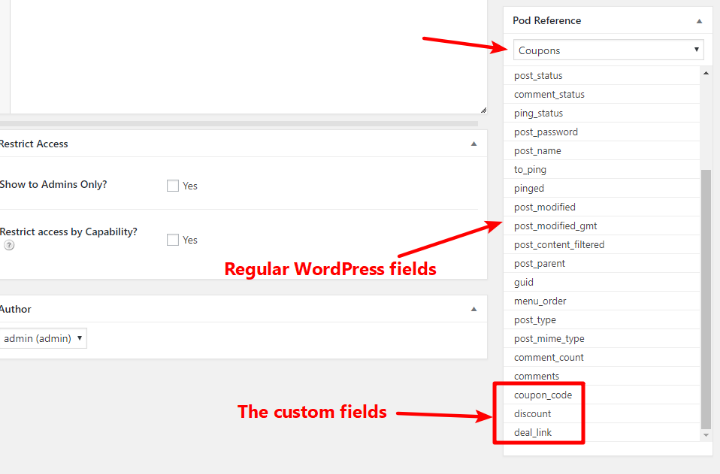
- You can insert content from the regular WordPress fields and/or custom fields by choosing your custom post type from the Pod Reference drop-down. These are called magic tags.
When you select your custom post type from the drop-down, it will show all the available fields, including the custom fields that you added:
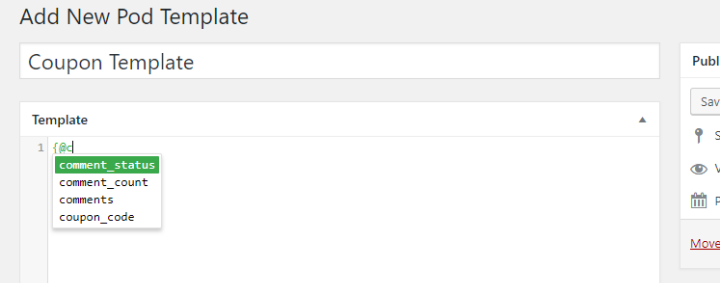
To insert a custom field, you open a new “magic tag” by typing {@. Then, you can select the field from the autosuggestions:
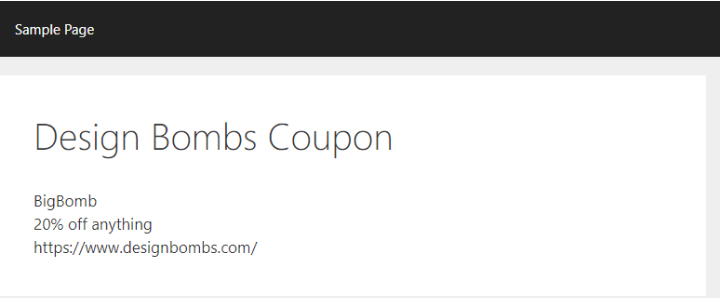
For example, if you do something like this:

It will just output those three fields for each entry:
So now, you’re kind of there…
But it’s not exactly looking great design wise, right?
To actually make things look good, you’ll need to add some basic HTML/CSS. Note that you can:
- Add regular static text
- Use divs for styling
- Use magic tags inside HTML (like using a magic tag to create a link)
- Etc.
For example, doing something like this (I’m using inline CSS so that you can see what’s happening):
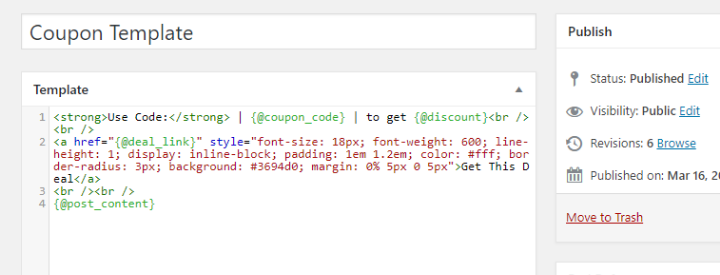
Will generate a more appealing design on the frontend of your site:
Unfortunately, you do need at least some basic HTML and CSS to do this part well. But the big thing is that Pods’ magic tags completely eliminate PHP from the equation, which really does make the process a lot simpler than the alternatives.
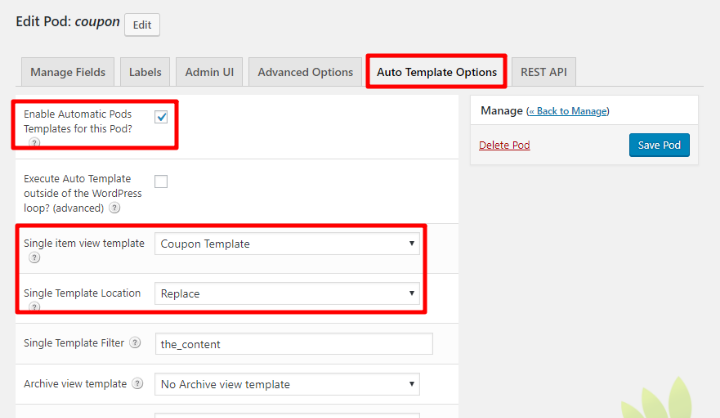
Step 5: Force Custom Post Type To Use Template
To make Pods actually use the template that you just created, you’ll need to make one more quick change (I already made this so that I could take the example screenshots above).
Edit your custom post type by going to Pods Admin → Edit Pods.
Then:
- Go to the Auto Template Options tab
- Select Enable Automatic Pods Templates for this Pod
- Choose your template from the Single item view template drop-down
- Select Replace from the Single Template Location drop-down
Other Helpful Tips For Working With Your Custom Post Type In Pods
Here are some other tips for working with your new custom post type:
Creating Archive Pages
If you want to create an archive page to list all of your different coupons (rather than just the page to list a single coupon like I showed you above), you can create a new template to control what information displays on the archive page.
Then, follow a similar process to force your custom post type to use that in the Auto Template Options.
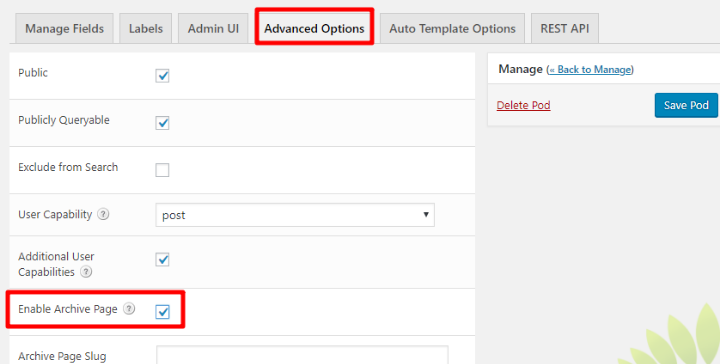
You’ll also need to go to the Advanced Options tab and turn on the Enable Archive Page option for your custom post type:
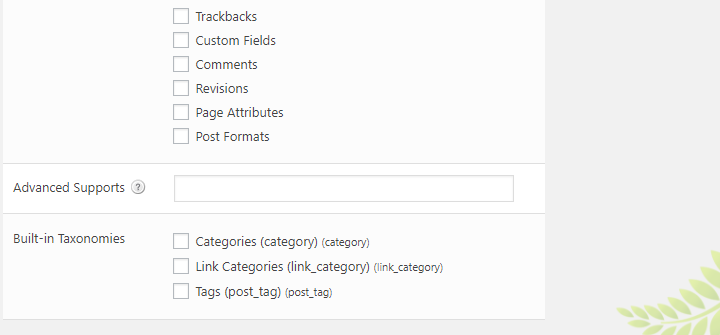
Adding Custom Taxonomies To Your Custom Post Type
If you want to add a taxonomy to your custom post type (like a tag or a category), you can use Pods to create a new taxonomy by going to Add New and selecting Custom Taxonomy from the drop-down.
Then, you can associate that taxonomy with your custom post type by using the Built-in Taxonomies section in the Advanced Options tab of the Edit Pod interface:
Custom Post Types Unlock The Power Of WordPress
Custom post types are one of those things that open up a whole new world for building sites with WordPress.
Once you get the hang of them, you’ll no longer be limited by the constrained world of posts and pages.
There’s still a whole lot more that you can learn – covering everything would take a whole series of posts. But for now, you should have a solid grasp of what it takes to create your own custom post type and actually display it on the frontend of your site.
Have fun building something awesome!
And to take things even further, you might want to check out our other posts on how to use ACF to create a portfolio site, or how to start learning WordPress development.
Nice tutorial. How to delete or hide the title generated in the pod custom post?
Hi,
Well written article on pods and cpt’s. I have a question, can pods use a cpt type that is created from a plugin? I have a church plugin (sermons) that is a cpt.
But the single template looks bad and I want to change it? Is this possible with Pods?
Thanks for the good article!
Mel
Awesome intro for newbies to CPTs like me. Many thanks
I’ve sort of followed this…
I have a CPT called Application (slug is foh_app) and I have created a Pod that is also called foh_app. I have created the template within the Pods Admin piece and associated it to the Pod.
But, where does it all display? You have sort of skipped that bit by use of phrases such as “Then you can publish your post and…” – well, I sort of get that. I presume you mean you publish your CPT (in your case Coupon and in my case Application).
All my application type posts are published and they are associated with standard WP categories. But I cannot see any data. Even if I have Category Pages.
So, looking at the template piece of your post – I created the template and did all the asociations that you stated in the Pod – but I still have no idea what URL to put in to see what I wish?
Can you help?
I sort of moved on from there after a lot of messing around. I still cannot list any CPTs on my category pages though. Any tips.
Many thanks
what will be the php code to display pods item (custom texonomy) itself instead of its fields?