
Full Guide: How to Transfer WordPress.com to WordPress.org
Want to make the switch to self-hosted WordPress (AKA WordPress.org) from WordPress.com? Congratulations! I think you’re making an excellent choice. And guess what? It’s surprisingly easy to transfer WordPress.com to WordPress.org, even if you don’t have any technical experience.
And I’m going to show you exactly how to do that in this post! I’ll cover two different, but connected, aspects of migrating your site:
- Moving all of your content from WordPress.com to WordPress.org – this won’t cost you a penny.
- Automatically redirecting visitors from your WordPress.com site to your new WordPress.org site – unfortunately, this does cost $13 per year. But if you’re serious about migrating from WordPress.com to WordPress.org while maintaining your traffic and search engine rankings, it’s an unavoidable investment.
I’ll divide the guide according to those two goals!
Note – for most of these steps, I’ll assume you’re using a subdomain of WordPress.com. That is, your domain name is something like yoursite.WordPress.com. If you’re already using a custom domain name like yoursite.com, you can skip a few of these steps.
Let’s dive in…
How to Transfer WordPress.com to WordPress.org – Moving Content
In this part of the guide, I’ll show you how to migrate all of your content to your new self-hosted WordPress site. Excluding the inherent costs of self-hosted WordPress, this part is 100% free!
If you don’t care about retaining your existing traffic and search rankings, you can consider yourself finished after you complete this section.
Step 1: Set Up Your Self-Hosted WordPress Site
I’m not going to go through the full process of setting up a self-hosted WordPress site because we already have a detailed guide on how to create a website with self-hosted WordPress. So if you need more help, you should give that post a quick read.
Basically, you’ll need to:
- Choose a quality WordPress host.
- Purchase your own domain name.
- Install the self-hosted version of WordPress.
- Pick a WordPress theme for your new self-hosted site.
If you haven’t already completed those steps, go ahead and do that now because you’ll need self-hosted WordPress installed to import your WordPress.com content.
Step 2: Export Your Content from WordPress.com
Before you can import your existing content into your self-hosted site, you need to export it from WordPress.com. Makes sense, right?
To do that, head to your WordPress.com site’s dashboard and go to Tools → Export:
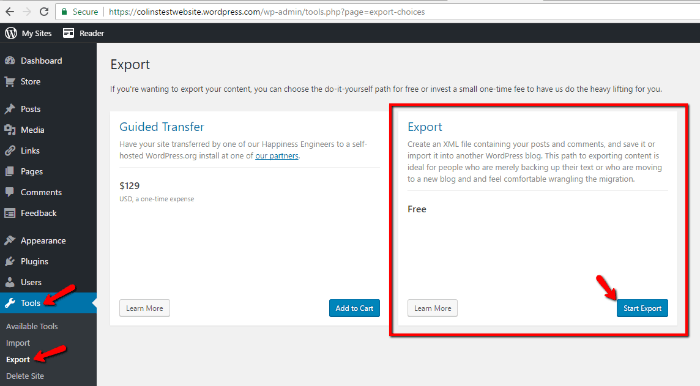
Unless you want to shell out $129 for something you can do yourself, make sure to choose the regular Export and not the Guided Transfer. Seriously, the process is easy – you don’t need to pay Automattic $129 to do it unless you’re Mr. or Ms. Moneybags.
On the next screen, make sure to choose the All content option and then click Download Export File:
![]()
Once you click that button, you should see a download start for a file that ends in .xml. This file contains all of the data for your WordPress.com site. Keep it handy because, in the next step, you’ll use it to import your content to your new self-hosted WordPress.org site.
Step 3: Import Your WordPress.com Content to Self-Hosted WordPress
Next up, head to the dashboard for your new self-hosted WordPress site. Then, go to Tools → Import and click Install Now under the WordPress option:
![]()
After you click Install Now, the button should change to read Run Importer. Go ahead and give that a click:
![]()
Next, you need to choose the file to import. Remember that .xml file from the previous step? Here’s where you use it. Just click the Choose File button and select the .xml file you downloaded. Then click Upload file and import:
![]()
On the next screen, you can choose which WordPress account to assign authorship to.
Basically, this defines who will be listed as the author on all of the posts you import. Usually, you want this to be your own account.
So to that end, I recommend choosing the or assign posts to an existing user option and selecting your own username from the dropdown.
But you can also import your old WordPress.com author account or create a new user.
Additionally, you should make sure to check the Download and import file attachments box. Checking this box ensures that all of your media content (like images) gets imported as well. Then, click Submit:
![]()
And once that’s done, you should see a success message. When you browse to your self-hosted WordPress site, you should see all of your content from WordPress.com:
![]()
While the import process should work properly, it’s always a good idea to go through and test your site to make sure all the text and images look right.
Step 4: Update Your Internal Links
While your content is now imported, you’re not quite done yet. See, there’s still one issue. If you ever linked between your posts on WordPress.com, those links (known as internal links) will still point to your WordPress.com site, not your new self-hosted WordPress.com site. That is, unless you were already using a custom domain with your WordPress.com site.
Let’s look at an example. Say you linked to a post called “cool post”. That link will still look something like this:
yoursite.wordpress.com/cool-post
When really, you want it to look like this:
yoursite.com/cool-post
Now, you could go through everything manually and update all the links…but that’s a ton of work if you have a bunch of posts. Thankfully, you can automate the whole process using the Velvet Blues Update URLs plugin.
To get started, go ahead and install and activate Velvet Blues Update URLs. Then, head to Tools → Update URLs.
In the Old URL box, enter the link to your WordPress.com site’s homepage. And in the New URL box, enter the link to your self-hosted WordPress site’s homepage.
Then, make sure to only check the URLs in page content option and click Update URLs NOW:
![]()
And now all of your internal links will point to the proper version of your site!
Remember – if you were already using a custom domain name, you don’t need to complete this step.
Step 5: Make Your WordPress.com Site Private
Because you’re no longer using your WordPress.com site, now is a good time to make it private so that you don’t have a perfect duplicate of your self-hosted WordPress site. To do that, head to the dashboard of your WordPress.com site.
Then, go to Settings → Reading and choose the I would like my site to be private, visible only to myself and users I choose box:
![]()
And that’s it for migrating your content from WordPress.com to WordPress.org! If you don’t care about keeping your old search engine rankings and traffic, you can stop right now.
But if you do care about search engine rankings and traffic, you’ll need to complete the next section as well.
How to Redirect WordPress.com to WordPress.org Site
To keep your search engine rankings and traffic after transferring from WordPress.com to WordPress.org, you’ll need to set up something called a redirect. What does a redirect do?
It automatically sends humans and search engine robots from your WordPress.com site to your new self-hosted WordPress site. For example, say someone tries to go to:
yoursite.wordpress.com/cool-post
With a redirect, that person will be automatically sent to:
yoursite.com/cool-post
Unfortunately, WordPress.com does charge money to add a redirect. But if you want to keep your site’s traffic, there’s no way around paying for this service. Don’t worry, though. It’s not too expensive – it will only cost you $13 per year.
To set up your redirect, go to this link and choose the website you want to redirect:
![]()
Then, enter your new domain in the box and click Go:
![]()
You’ll need to fill in your details and pay. Then, you’re all finished!
Any traffic to your old WordPress.com site will now be redirected to your new self-hosted WordPress.org site.
Wrapping Things Up
As you can see, it’s pretty painless to transfer from WordPress.com to WordPress.org. Once you get your new self-hosted WordPress site installed and configured, it really only takes a few minutes to import your content from WordPress.com.
And once you’re cruising on self-hosted WordPress, you’ll have a great deal more flexibility over how you use your WordPress site. Just remember that such flexibility also adds new responsibilities. You’ll need to install some basic plugins to ensure your self-hosted WordPress site runs smoothly.
To that end, I recommend you look into our posts on caching plugins, backup plugins, and security plugins. While those are by no means the only plugins you’ll need, they are essential plugins to get you started.
Leave a Reply