
How To Make WordPress Private In 5 Different Ways – Single Posts To Your Entire Site
Need to make WordPress private?
Sometimes you don’t want everything on your WordPress site to be available to the public. And when that happens, you’re off to the hills trying to find a way to make your WordPress site private.
To help you out, I’ve collected everything about creating a private WordPress site in one place. I’ll cover various degrees of making your site private, starting narrow with making a single post or page private and working up to making your entire site private.
In total, I’ll cover how to create a private:
- Individual post, page, or custom post type
- Category (and all posts contained therein)
- WordPress site, either permanently or just while you’re working on it
And I’ll also cover some more flexible solutions – like membership plugins.
1. How To Make A Single WordPress Private Page Or Post
It’s easy to create a WordPress private page or post because the functionality is already built into the WordPress core.
To access it, just go to the WordPress editor for the specific post, page, or custom post type that you want to make private.
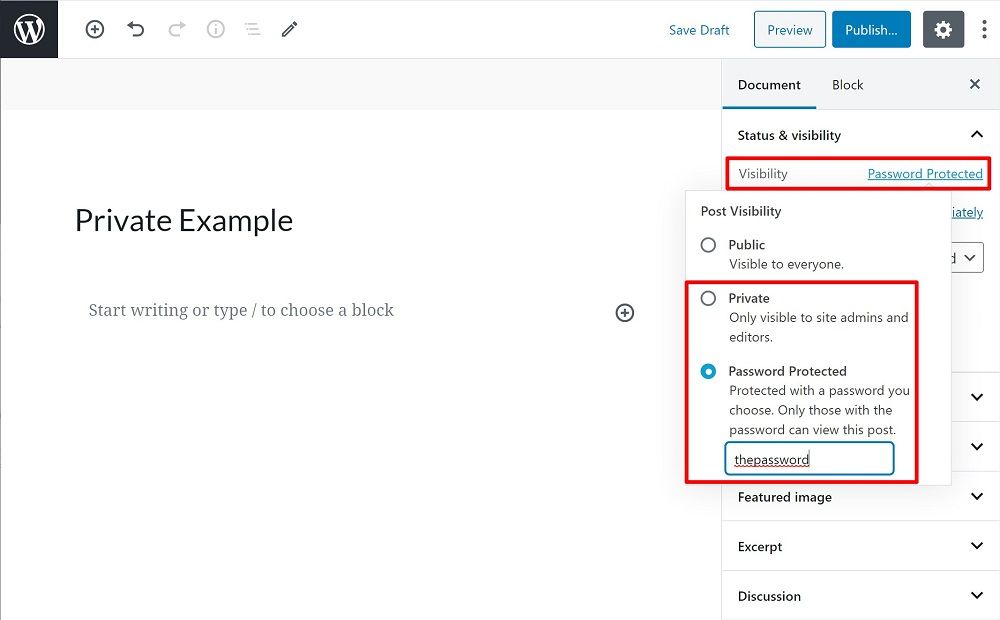
Then, look for the Visibility option in the Document sidebar. Click on it to open the sub-panel. There, you can choose to either:
- Add a password – users will be prompted to enter a password before they can view the post.
- Make it 100% private – only users with the read_private_posts capability will be able to view the post. By default, this is only users with the role of Editor or Admin. You can give additional user roles this capability using the User Role Editor plugin, though.
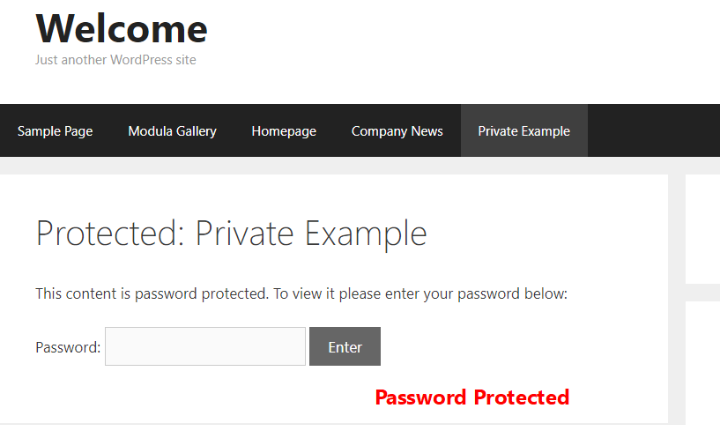
Here’s what it looks like when someone tries to view a Password Protected post:
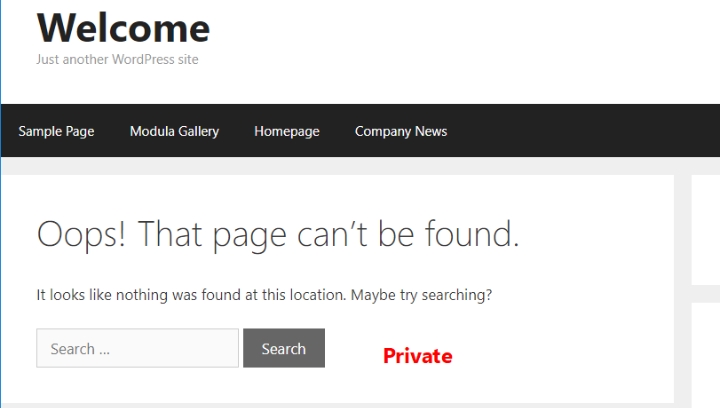
And here’s what it looks like when someone without the read_private_posts capability tries to view a Private post:
If someone is logged in and does have the capability, they’ll just see the post like normal.
2. How To Make A Private WordPress Category
Ok, let’s say that instead of making a single piece of content private, you want to make an entire category of content private.
Here, I think the best option is to use a premium plugin if you can afford it. With that being said, I’ll also share a free option in the second half of this section if you’re on a budget.
Premium Plugin
If you’re willing to pay €39, the Password Protected Categories plugin from Barn2 Media extends the same functionality detailed above to WordPress categories.
When you make a category private, only authenticated users will be able to view:
- The main category
- Any content inside that category (like posts or custom post types)
- Any subcategories
And the cool thing is that it’s not limited to regular post categories – you can also extend it to custom taxonomies to make private event categories, private product categories, and more.
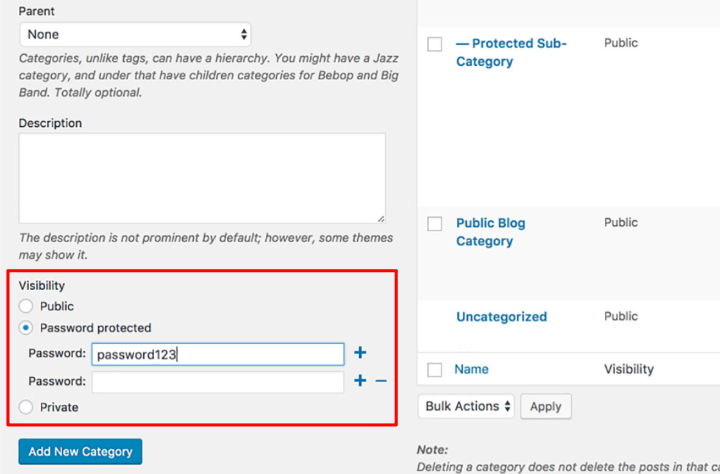
When you have the plugin installed and activated, you’ll get a new Visibility setting when creating or editing a category that you can use to make it:
- Password Protected – visitors need to enter a password before they can view the category and posts contained therein.
- Private – only users with the read_private_posts capability can view the category and the posts contained therein. This is the same capability as viewing individual private posts. Only Admin and Editor user roles have this by default, but you can grant it to other user roles by using the free User Role Editor plugin.
In addition to extending the core private/password protected functionality to categories, this plugin also has some other helpful features that let you:
- Automatically unlock different categories from one single login page depending on which password a user enters. For example, if someone enters “PasswordA” they unlock “Category A”, whereas “PasswordB” unlocks “Category B”.
- Automatically show/hide categories from navigation menus depending on whether the user has permission to see them.
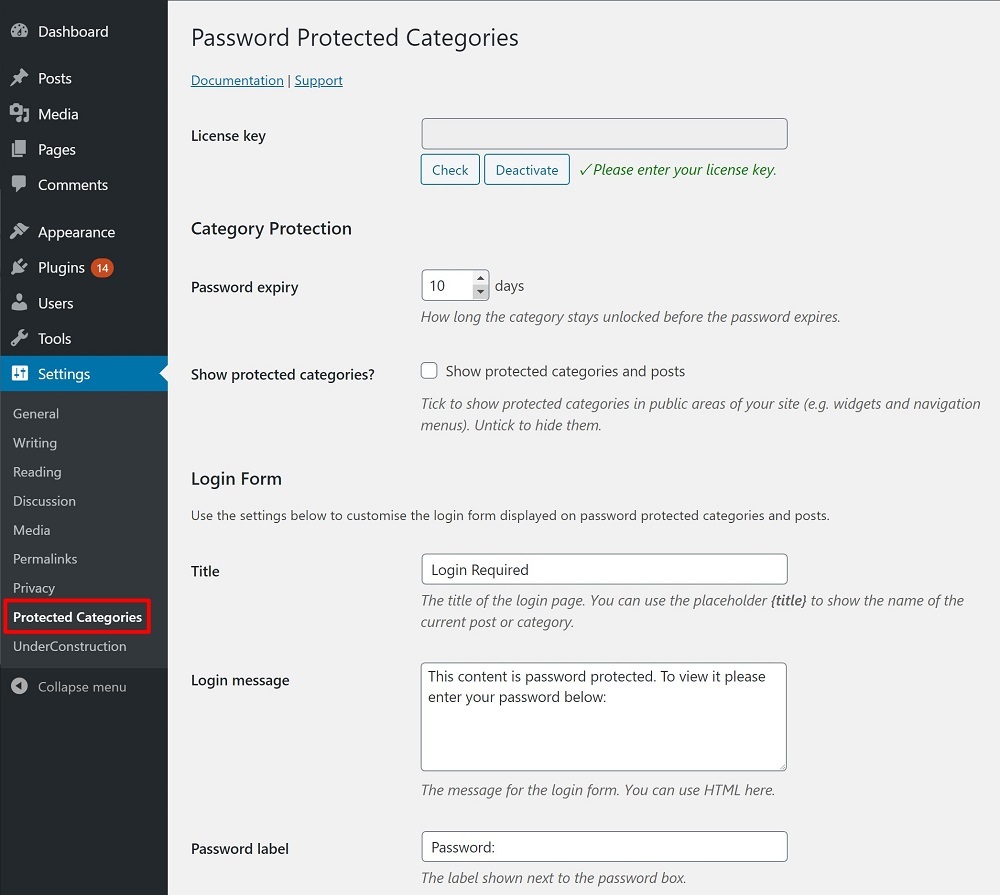
- Choose how long entering the password unlocks content for (before visitors need to enter it again).
You can access these settings by going to Settings > Protected Categories:
If you need to make categories of WooCommerce products private, you can also use the separate WooCommerce Password Protected Categories plugin from the same developer. It functions nearly identically – it’s just focused specifically on WooCommerce.
Free Plugin
If you need a free option, the free version of the WordPress Password Protect Page plugin also lets you password protect WordPress categories.
This plugin isn’t quite as flexible as the previous one because it only lets you use one password for all of the categories that you want to protect. Additionally, it only lets you use password protection – it doesn’t add the “private” method that the previous plugin does.
However, if that works for you, it gets the job done and it’s free.
To get started, install and activate the free plugin from WordPress.org. Then, go to Posts → Categories. There, you should see a new PPWP Lite: Category Protection option. Use the toggle to turn the feature on. Then, you can configure the password protection:
- Search for the categories that you want to password protect in the Select your private categories box.
- Enter the password that you want to unlock those categories in the Set a password box.
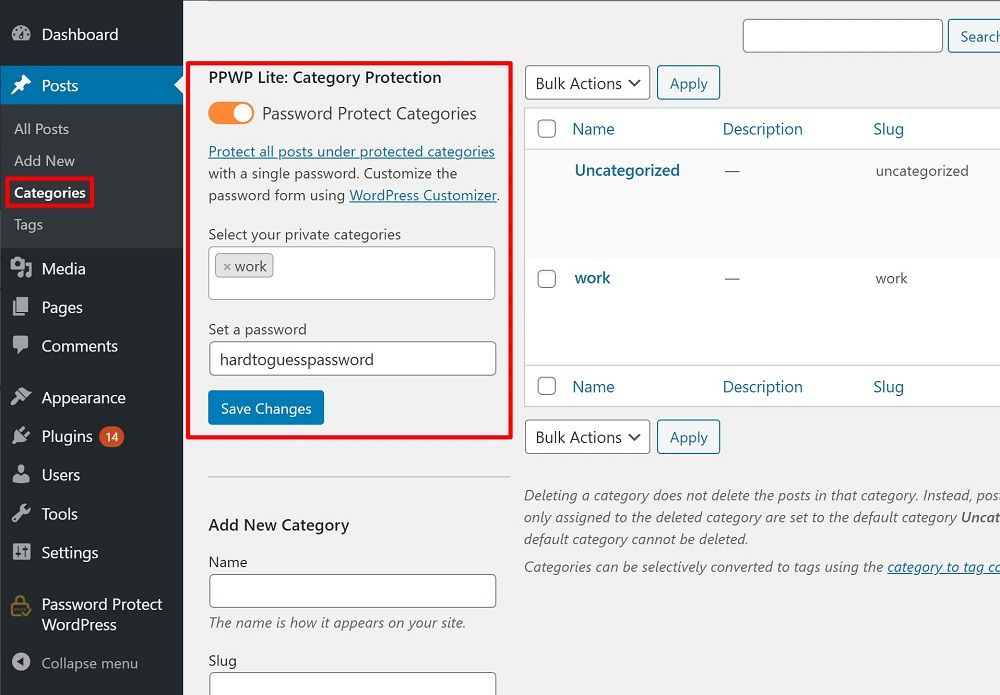
If you want to customize the password form, you can use the WordPress Customizer.
3. How To Make Your Entire WordPress Site Private
So making individual posts or categories private isn’t enough for you, eh? Let’s take things a bit further and make your entire WordPress site private.
For this, you’ll need a third-party plugin. But you can find plenty of free solutions that get the job done. Of these free solutions, the most popular option is Force Login.
As the name suggests, it forces users to log in before they can see your site’s content. You can then further choose between only manually creating accounts for authorized users or letting users register themselves.
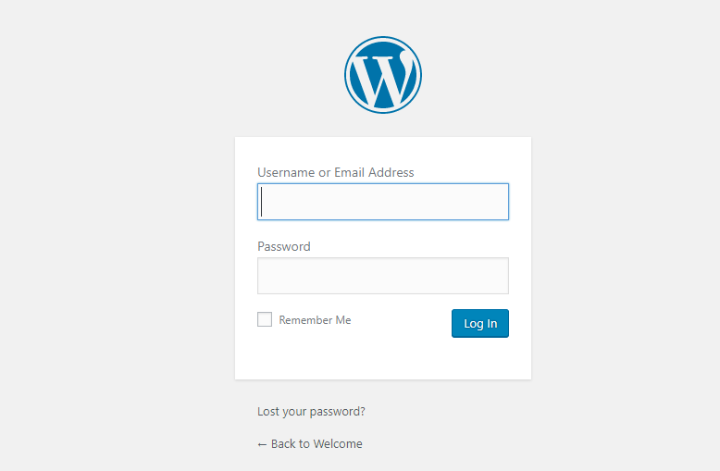
As soon as you install and activate it, it starts working right away. Anyone who tries to view your site and isn’t logged in will see the “standard” WordPress login page.
To control who can register for an account, you can use WordPress’ built-in features:
- If you want to let anyone register, you can enable public registration by going to Settings > General and checking the box for Anyone can register by Membership.
- If you don’t want to allow public registration, you can manually create accounts for the people you want to have access by going to Users > Add New.
And that’s it! Once people log in, they’ll be able to see your site. The plugin will even automatically send them back to the page they were originally trying to view.
Because the plugin uses the native WordPress login/register page, you can also customize the login page using any one of the many login customizer plugins. The free LoginPress plugin is a good option, but you can find plenty of other tools if you search at WordPress.org.
4. How To Make WordPress Private While Under Construction
Sometimes you only want to make WordPress private while you’re actively developing your site. Once you finish development, you want it to be public to the world. But until then, it makes sense to keep things private while you’re working.
In that case, you’ll be better off with a maintenance plugin. These plugins are designed to:
- Allow authorized users to see the site like normal
- Show everyone else a single landing page
You can find plenty of coming soon themes and plugins, but my personal favorite is Under Construction.
Once you’ve installed and activated the plugin, here’s how to use it:
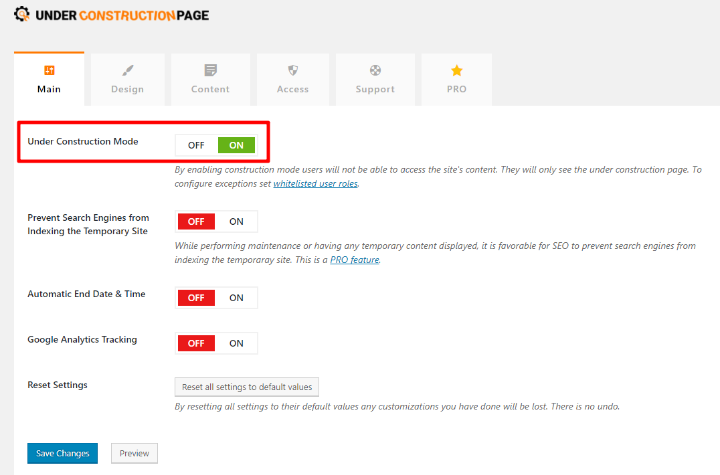
Step 1: Activate Under Construction Mode
To get started, go to Settings → UnderConstruction and toggle the Under Construction Mode setting to On:
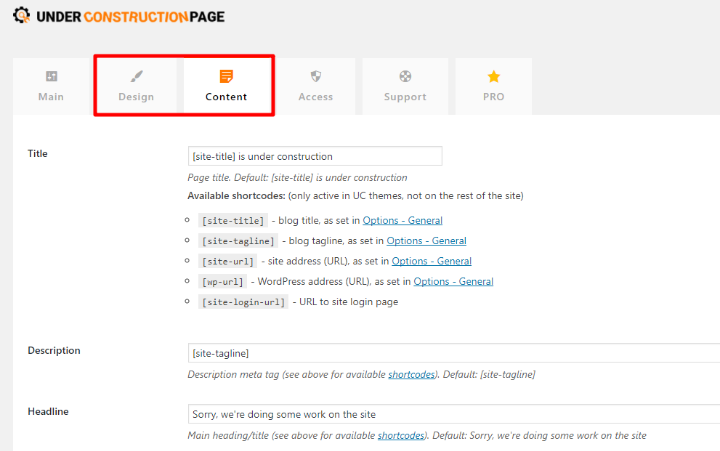
Step 2: Configure Design And Content
To configure how your under construction page looks, you can choose a template in the Design tab.
Then, you can edit the actual content on that template in the Content tab:
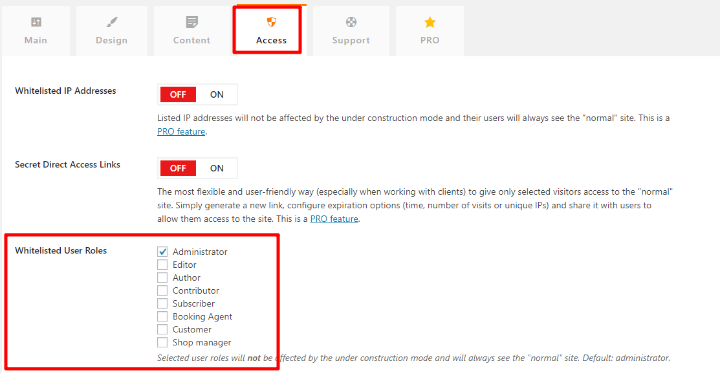
Step 3: Choose Who Has Access To Your Actual Site
By default, the plugin only gives access to users with the Admin user role. In the Access tab, you can give access to additional user roles:
If you’re willing to pay for the Pro version, you’ll also be able to:
- Give access to specific IP addresses
- Share a special link that lets anyone see your actual site
5. How To Make Your WordPress Site Private With A Membership Plugin
Depending on why you want to make WordPress private, you might be better off going with a more robust membership plugin instead of trying to do things yourself with the methods above.
A membership plugin is specifically designed to make parts of your content only accessible to authorized users.
Membership plugins will usually let you:
- Restrict partial content, single pieces of content, or entire categories
- Create multiple membership levels that each have access to different content
And depending on how much functionality you need, you might also be able to accept payments and do lots more.
If you just want something lightweight (and free!), give the WP-Members Membership Plugin a look.
For some more heavy-duty plugins, check out our full roundup of WordPress membership plugins.
Enjoy Your Private WordPress Site
And there you have it! Five different ways to make WordPress private.
Whether you want to make a single private page or create an entire private site or membership site, I hope one of these solutions helped you out.
If you’re interested in creating a specific type of private site, some good further reading is the previously mentioned list of membership plugins, as well as our list of learning management systems (LMS) plugins, that can help you create a private online course.
Leave a Reply