
The Ultimate Guide to WordPress Gzip Compression
Gzip compression is a popular technique to speed up your WordPress site by shrinking the size of the files that your WordPress site’s server sends to visitors’ browsers.
By making these files smaller, it takes less time for visitors’ browsers to download your site, which speeds up your page load times.
In this post, you’re going to learn everything you’d ever want to know about Gzip compression in WordPress. You’ll learn:
- More about Gzip compression and how it works
- Whether there are any issues or considerations regarding using Gzip compression
- How to set up WordPress Gzip compression (some of the methods will work for non-WordPress sites, too)
Let’s dig in so you can start speeding up your site.
What is Gzip Compression? Explained in More Detail
Gzip is a method for compressing your site’s files at the server level.
Whenever a visitor’s browser requests a file from your server, your server compresses that file with Gzip before delivering it to the visitor’s browser, as long as the visitor’s browser supports the Gzip compression method (which all modern browsers do).
This compression won’t have any effect on your site’s functionality, so no need to worry about it breaking things – it will just quietly speed up your site in the background.
What Are the Benefits?
By shrinking the size of your site’s files, visitors are able to download those files faster, which means your website loads faster.
When utilizing Gzip compression, you can reduce the size of your files by up to 70%, which is why pretty much every website performance testing tool recommends that you use Gzip compression.
It’s also one of the simpler WordPress performance tweaks to implement, so you can get these benefits with just a few minutes of work.
There Are Different “Levels”
Up until now, we’ve focused mainly on the compression side of Gzip, like how it can shrink your site’s files by up to 70%.
But there are actually two parts to the puzzle when it comes to Gzip compression:
- The file size reduction
- The time it takes for your server to compress files
Gzip compression comes with 9 different compression levels, each of which is a balancing act between how much your server is able to compress files and how long it takes to do so.
Level 1 takes the least amount of time to compress files but also has the lowest reduction in file size. Conversely, level 9 offers the largest file size reductions but also takes the longest to compress. Each level between 1 and 9 offers a different ratio of file size reduction to compression time.
By default, the level is 6, but it’s possible to adjust the compression level based on your preferences.
Who Should Use Gzip Compression? Is It Safe?
The simple answer is that everyone should use Gzip compression.
Gzip compression is a tried-and-true technique that won’t change your site’s functioning.
It’s been around since the 90s and is used by the vast majority of websites, so you don’t need to worry about it causing any issues on your site.
According to W3 Techs, 79.6% of websites use some type of compression. And of that 79.6% of websites, 99% use Gzip.
Additionally, because of its popularity, all modern browsers support Gzip compression.
There are some Gzip alternatives. For example, Brotli is another compression algorithm that’s picking up steam and can offer better compression ratios/time in some configurations, especially for static data.
However, Brotli is not nearly as widespread and Brotli is also harder to implement. So unless you’re a technical user who’s building your own hosting stack, you’re much better off with the tried-and-true option in Gzip.
How to Set Up WordPress Gzip Compression: 4 Methods
As I mentioned before, Gzip compression is pretty easy to implement, and you have a couple of methods for setting up Gzip compression on WordPress:
- Manually by adding some simple code snippets.
- With a plugin, either a dedicated Gzip plugin or a broader WordPress performance plugin.
Below, I’ll share four different methods, depending on your technical knowledge and server setup:
- Manual .htaccess method – use this if your host uses the Apache web server (most cheap hosts do) and you feel comfortable editing your .htaccess file.
- Dedicated WordPress Gzip compression plugin – use this if you’re not already using a comprehensive performance plugin (see the next point)
- Caching plugin – if you’re using a caching or performance plugin, check if it already supports WordPress Gzip compression.
- Manual Nginx config method – use this if your host uses the Nginx web server (some managed WordPress hosts do, but it’s not as popular as Apache).
How to Manually Enable Gzip Compression via .htaccess
To manually enable Gzip compression on WordPress, you can add a code snippet directly to your site’s .htaccess file.
To edit your site’s .htaccess file, you can either use…
- An FTP program (you can get your FTP credentials from your host)
- cPanel File Manager
Once you’re able to edit the files on your site’s server, edit the .htaccess file in the root folder of your site. This is the same folder that includes the wp-content and wp-admin folders.
Then, add the following code snippet to the top of the .htaccess file:
<IfModule mod_deflate.c>
  # Compress HTML, CSS, JavaScript, Text, XML and fonts
  AddOutputFilterByType DEFLATE application/javascript
  AddOutputFilterByType DEFLATE application/rss+xml
  AddOutputFilterByType DEFLATE application/vnd.ms-fontobject
  AddOutputFilterByType DEFLATE application/x-font
  AddOutputFilterByType DEFLATE application/x-font-opentype
  AddOutputFilterByType DEFLATE application/x-font-otf
  AddOutputFilterByType DEFLATE application/x-font-truetype
  AddOutputFilterByType DEFLATE application/x-font-ttf
  AddOutputFilterByType DEFLATE application/x-javascript
  AddOutputFilterByType DEFLATE application/xhtml+xml
  AddOutputFilterByType DEFLATE application/xml
  AddOutputFilterByType DEFLATE font/opentype
  AddOutputFilterByType DEFLATE font/otf
  AddOutputFilterByType DEFLATE font/ttf
  AddOutputFilterByType DEFLATE image/svg+xml
  AddOutputFilterByType DEFLATE image/x-icon
  AddOutputFilterByType DEFLATE text/css
  AddOutputFilterByType DEFLATE text/html
  AddOutputFilterByType DEFLATE text/javascript
  AddOutputFilterByType DEFLATE text/plain
  AddOutputFilterByType DEFLATE text/xml

  # Remove browser bugs (only needed for really old browsers)
  BrowserMatch ^Mozilla/4 gzip-only-text/html
  BrowserMatch ^Mozilla/4\.0[678] no-gzip
  BrowserMatch \bMSIE !no-gzip !gzip-only-text/html
  Header append Vary User-Agent
</IfModule>
Once you save your changes, your site should now be using Gzip compression.
How to Enable Gzip Compression With a Dedicated Plugin
If you feel comfortable editing your site’s .htaccess file, I’d recommend using the manual method above as the plugin just offers a slightly simpler route for adding the code snippet to your .htaccess file.
However, I totally understand if you’re worried about breaking something or struggle with how to connect to your server via FTP.
If that’s the case, you can use the free Enable Gzip Compression plugin at WordPress.org.
Once you install and activate the plugin, all you need to do is go to Settings → Gzip Compression in your WordPress dashboard and then click the button to Enable Gzip compression:
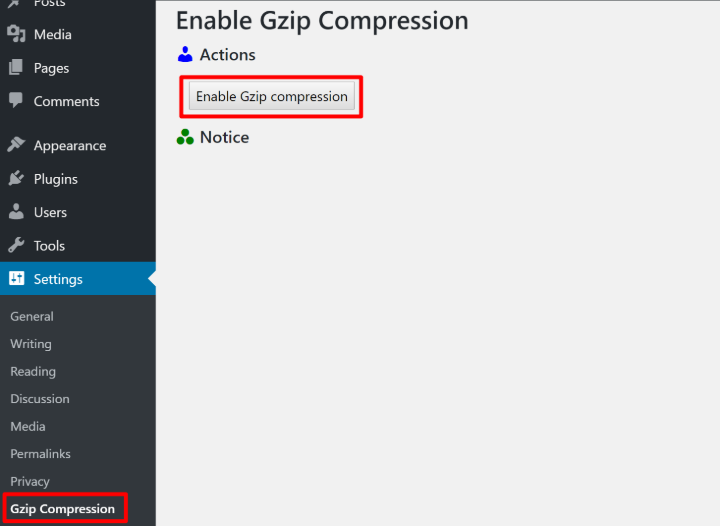
And that’s it! Once you click the button, your work is done and Gzip compression is active on your WordPress site.
How to Enable Gzip Compression With a Caching Plugin
Many WordPress caching plugins include a feature to enable WordPress Gzip compression. Here’s a quick rundown of how it works with some popular solutions:
- WP Rocket – WP Rocket enables Gzip compression by default. So if you have the WP Rocket plugin active, your site is already benefiting from Gzip compression.
- WP Super Cache – go to Settings → WP Super Cache → Advanced. Then, check the box for “Compress pages so they’re served more quickly to visitors”.
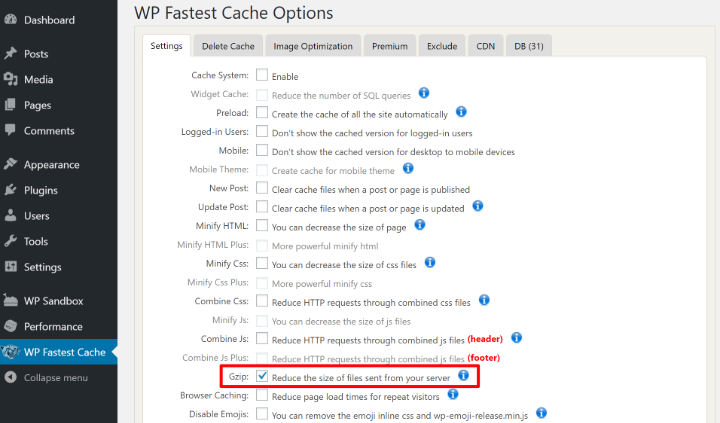
- WP Fastest Cache – go to the WP Fastest Cache tab and then check the box for “Gzip – Reduce the size of files sent from your server”.
- W3 Total Cache – go to Performance → Browser Cache. Then, check the box for “Enable HTTP (Gzip) compression”.
For example, here’s what it looks like in WP Fastest Cache:
How to Manually Enable Gzip Compression on Nginx
If your host uses the Nginx web server, rather than the more popular Apache web server, you can’t use the .htaccess method above because the Nginx web server doesn’t use .htaccess files.
To enable Gzip compression on Nginx, you’ll instead need to add the following code snippet to your Nginx config file:
gzip on;
gzip_comp_level 2;
gzip_http_version 1.0;
gzip_proxied any;
gzip_min_length 1100;
gzip_buffers 16 8k;
gzip_types text/plain text/html text/css application/x-javascript text/xml application/xml application/xml+rss text/javascript;

# Disable for IE < 6 because there are some known problems
gzip_disable "MSIE [1-6].(?!.*SV1)";

# Add a vary header for downstream proxies to avoid sending cached gzipped files to IE6
gzip_vary on;
If you want to change the Gzip compression level, you can do so using the “gzip_comp_level 2;” line, by replacing “2” with your desired compression level from 1-9.
Some managed WordPress hosts will not let you directly edit your Nginx config file – for example, Kinsta restricts access for security reasons. If that’s the case, you can still usually reach out to your host’s support and they should be willing to add it for you.
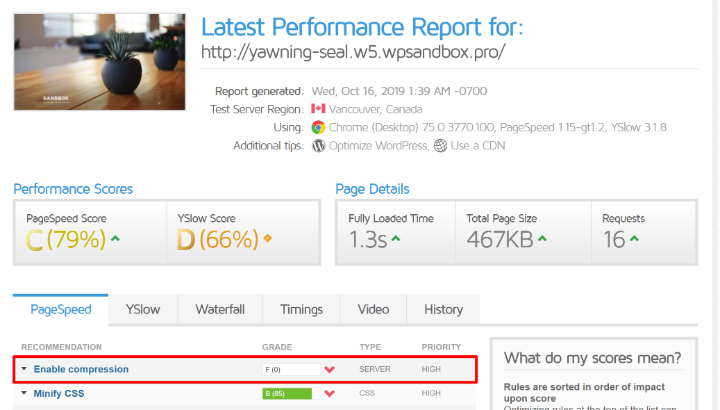
How to Test If Gzip Compression is Working
Once you’ve enabled WordPress Gzip compression via one of the methods above, you can test that its working using one of the many online Gzip compression testing tools.
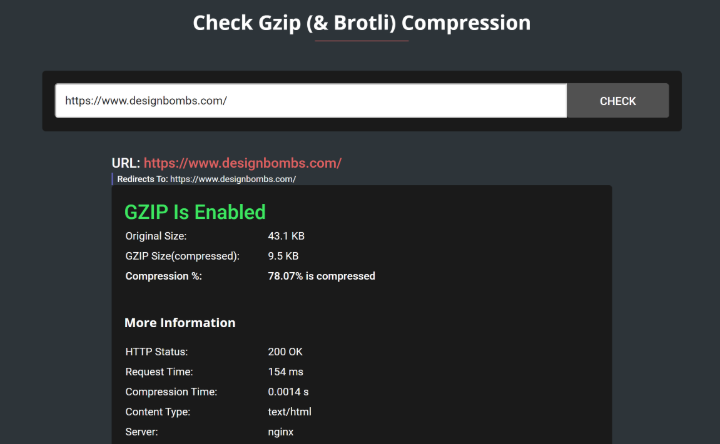
I like this one from GiftOfSpeed – all you do is enter your site’s URL and it will tell you whether or not Gzip is enabled and the file size reduction that you’re achieving.
For example, you can see that we’re able to reduce the size of the Design Bombs homepage by 78.07%, which is a big reduction:
Get Started With WordPress Gzip Compression Today!
To recap, Gzip compression is a way to reduce the size of your site’s files by up to 70-80%. To achieve these reductions, your server will compress files at the server level before delivering them to visitors’ browsers.
Gzip compression won’t negatively affect your site in any way and provides a simple way to speed up WordPress.
Many WordPress performance and caching plugins already enable Gzip compression for you. Or, you can also manually enable it or use a dedicated WordPress Gzip compression plugin.
Of course, there’s more to speeding up WordPress than just enabling Gzip compression. So once you’ve set up Gzip compression, keep reading about how to speed up WordPress with caching plugins, minification, and high-quality WordPress hosting.
Leave a Reply