Reusing Functionality for WordPress Plugins with Blocks
When creating a plugin shipping one or more blocks for the WordPress editor, what is the best way to organize the plugin as to make its different components reusable?
The block directory (launched in WordPress 5.5) enables to install a block while writing a post in the WordPress editor. This feature might persuade plugin developers to ship their blocks through single-block plugins, which can be installed through the block directory, instead of through multi-block plugins, which cannot.
However, there are many situations for which multi-block plugins shouldn’t be transformed to a series of single-block plugins, such as when:
- The blocks are similar, and share plenty of logic
- The plugin implements a custom post type (CPT), and we want to enhance it with its own set of blocks
- Shipping many blocks together makes the product better than shipping them separately
- We don’t need to publish our blocks to the block directory, as when an agency creates a blocks for its clients
I find the first item, when blocks share plenty of logic, of particular interest. Moreover, also single-block plugins could need to provide common logic, not to blocks, but to the different components within the block.
In this article, we will tackle two considerations:
- What is the best way to create and manage a multi-block plugin?
- What is the most effective way to reuse code within a (single or multi-block) plugin?
Repurposing @wordpress/create-block to create multi-block plugins
@wordpress/create-block, the official package to scaffold blocks created and maintained by the team developing Gutenberg, tackles most of the complexities associated with modern JavaScript projects, allowing us to focus on the block’s business logic.
For instance, @wordpress/create-block provides a default configuration fo webpack (the module bundler at the core of Gutenberg), designed to cover the majority of cases, and we can override the configuration whenever we need more control.
Currently, @wordpress/create-block can only tackle creating single-block plugins, not multi-block plugins (hopefully, in the not so distant future, it will be possible to generate any type of output through templates). However, with a bit of extra effort, we can already leverage @wordpress/create-block to create multi-block plugins too.
The goal is to create a folder blocks/ within the plugin, and then create there all the required blocks, all of them independent from each other. The structure of the plugin will be this one:
my-plugin/
│
├──blocks/
│ ├──block1/
│ ├──block2/
│ └──block3/
│
└── my-plugin.php
Using packages to share code among the blocks
Different blocks in the plugin may require some common functionality.
For instance, I have built a plugin which uses blocks to configure its several custom post types, one custom block per CPT. On their left side, the configuration blocks use a common component to select the elements to configure, which are shared across CPTs, and on the right side, each block displays the custom properties for that CPT:


That shared functionality on the left side, where should it live? On both blocks? On only one of them, and the other one access it from there? Or where else?
The best solution is to extract the shared logic out from the blocks, put it into packages, and have the blocks import the functionalities from the packages. We can create as many packages as needed, each of them containing all the functionality for some specific topic or category (eg: data access and storage, user interface, internationalization, etc).
We place all packages under a packages/ folder in the plugin. The plugin’s structure now becomes:
my-plugin/
│
├──blocks/
│ ├──block1/
│ ├──block2/
│ └──block3/
│
├──packages/
│ ├──package1/
│ └──package2/
│
└── my-plugin.php
There is a potential issue we must deal with. When running npm run build to compile the block, webpack will be loading code that involves more than one webpack configuration: the one from the block, and the configuration from each of the referenced packages. And this can create conflict.
To solve it, we need to create a custom webpack.config.js file for the block (if it doesn’t already exist):
my-plugin/
└──blocks/
  └──my-block/
     └──webpack.config.js
And, within this file, we must define a unique value for property config.output.jsonpFunction (otherwise, all blocks use the default name "webpackJsonp"):
const config = require( '@wordpress/scripts/config/webpack.config' );

config.output.jsonpFunction = "ADD_SOME_UNIQUE_NAME_HERE";

module.exports = config;
Creating and referencing a package
Similar to a block, a package is also a modern JavaScript project, so it is affected by the same complex underpinnings as blocks are.
Concerning blocks, these complexities are taken care of by the @wordpress/create-block block-scaffolding tool, through the structure of the block, and the dependency on @wordpress/scripts declared on the block’s package.json file.
So let’s copy these over to the package. The structure of the package is this one:
my-package/
├──src/
│ └──index.js
└── package.json
The contents of package.json are the same ones as when creating a new block, plus the addition of entry "module": "src/index.js", required to tell the blocks where to find the source code for the modules to import.
It is a good idea to group the plugin’s packages under the plugin namespace @my-plugin. Then, the package name becomes "@my-plugin/my-package":
{
  "name": "@my-plugin/my-package",
  "version": "0.1.0",
  "description": "Common components for the blocks in the plugin",
  "author": "Your name",
  "license": "Your license",
  "main": "build/index.js",
  "module": "src/index.js",
  "scripts": {
    "build": "wp-scripts build",
    "format:js": "wp-scripts format-js",
    "lint:css": "wp-scripts lint-style",
    "lint:js": "wp-scripts lint-js",
    "start": "wp-scripts start",
    "packages-update": "wp-scripts packages-update"
  },
  "devDependencies": {
    "@wordpress/scripts": "^12.1.0"
  }
}
In order to import modules from a package, the block needs to add the package as a dependency. Since blocks and packages live in the same plugin, the dependency can point to a local folder.
To do this, in a terminal window browse to the block folder:
cd path-to-my-plugin/blocks/my-block
And then execute:
npm install --save-dev ../../packages/my-package
As a result, we can observe that the block’s package.json will contain a local dependency to the package, like this:
{
  "devDependencies": {
    "@my-plugin/my-package": "file:../../packages/my-package"
  }
}
And in the block’s node_modules/ folder, there will be a new symlink @my-plugin/my-package pointing to the package’s source folder.
If we decide to, a package can also be published to the npm directory, as to make it accessible for other parties too, not just to be used within our plugin. Then, these other parties can install it as any other dependency:
npm install --save-dev @my-plugin/my-package
Within the same plugin, though, it makes sense to install the package as a local dependency, because it allows the block to access the code from the package directly from its source, without needing to publish a new version to the registry first, making development much faster.
Importing modules from the package
Let’s say that a component <CustomSelect> stored under block1 is then also required by block2. To make it accessible by all blocks, we extract the component out from the block, and move it to package @my-plugin/components:
components/
└──src/
  ├──custom-select.js
  └──index.js
Then, we export the component from the package’s index.js:
export { CustomSelect } from './custom-select';
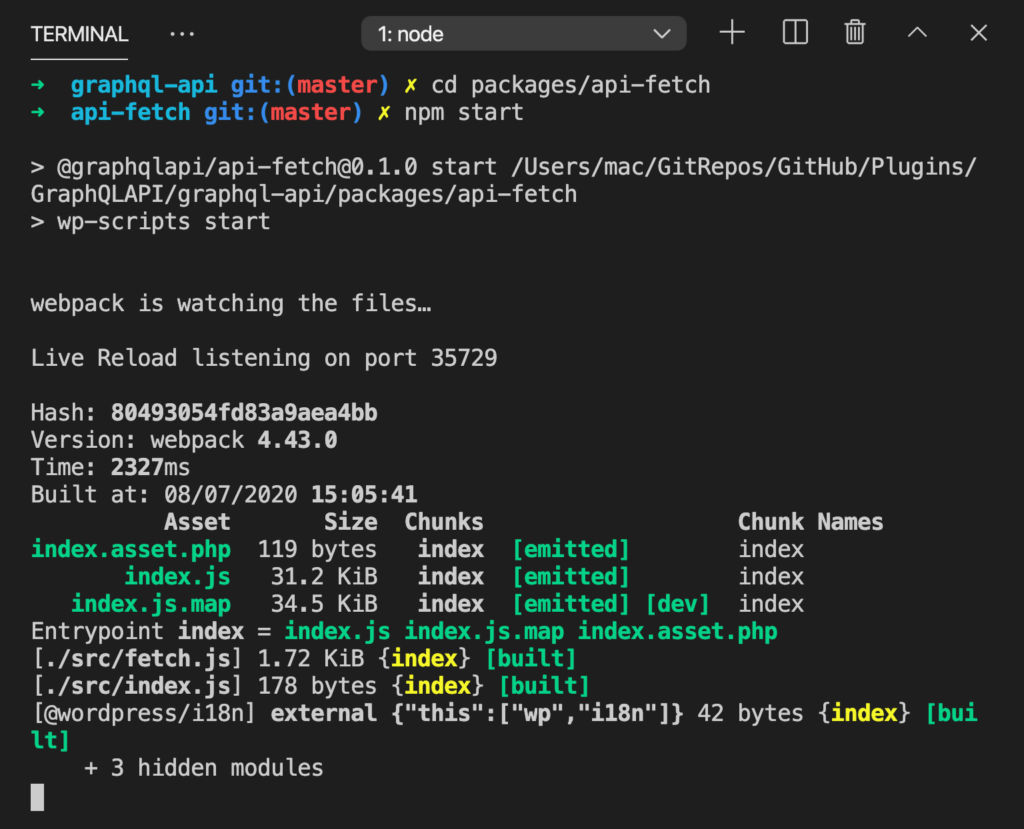
To make sure that the package compiles well, and that the component is being exported, we step on the package folder in the terminal, and execute:
npm start
(Before then, we must have downloaded all the JavaScript dependencies in the node_modules/ folder, done by running npm install.)
The output in the console will indicate if there is any error in the code, and what files were included:

The package is compiled under file build/index.js, which is not referenced by the block, so we can delete it safely if we decide to. The package’s structure now looks like this:
components/
├──src/
│ ├──custom-select.js
│ └──index.js
└──build/
  └──index.js
Finally, we can import and use the component in our block:
import { CustomSelect } from '@my-plugin/components';

const BlockCustomSelect = () => (
  <CustomSelect
    options={ ["red", "green", "blue"] }
  />
)
Managing the node_modules oversize
All blocks and packages in the plugin are independent from each other, which means that each of them has its own package.json file, and will require its own node_modules/ folder for storing its JavaScript dependencies.
This is a problem, because the node_modules/ folder can demand an incredibly big amount of space, as this famous image makes clear:

Then, if our plugin has 10 blocks, it will require 10 node_modules/ folders for development, which can make our computers quickly run out of space.
A solution to this problem is to keep a single node_modules/ folder containing all the dependencies used by all blocks, and then create a symlink (which is a pointer to some file or folder) under every block’s directory, pointing to this single node_modules/ folder (the symlink must have name node_modules).
For this strategy to work, all blocks must have the same version of their dependencies. For instance, if a block depends on the latest version of @wordpress/scripts, which is 12.1.0, then all blocks depending on @wordpress/scripts must also use this same version.
Forcing blocks to use the same version for dependencies takes some independence away from the blocks. However, it also provides the plugin with integrity, since it removes the chance of some error arising from interacting with different versions of the same dependency.
Let’s put this solution into practice. Since the node_modules/ folder is required only when developing the plugin, we can create a folder development/ in the root of the plugin (at the same level of blocks/ and packages/), with a package.json file containing all the dependencies from all the blocks:
my-plugin/
│
├──blocks/
│ ├──block1/
│ │ └──package.json
│ ├──block2/
│ │ └──package.json
│ └──block3/
│   └──package.json
│
├──development/
│ └──package.json
│
├──packages/
│ ├──package1/
│ │ └──package.json
│ └──package2/
│   └──package.json
│
└── my-plugin.php
Then, we download install all JavaScript dependencies, by executing in the terminal:
$ cd path-to-my-plugin/development
$ npm install
All the dependencies are now stored under the single folder development/node_modules/:
my-plugin/
└──development/
  ├──node_modules/
  │  ├──dependency1/
  │  ├──dependency2/
  │  └──dependency3/
  └──package.json
Next, let’s have each block use this single node_modules/ folder by symlinking to it. For this, we step on each block directory, and execute:
ln -snf ../../development/node_modules .
Creating the symlinks for all blocks can be automated. The following bash script, stored as development/create-symlinks.sh, iterates through all the directories under blocks/, and executes the ln command to create the symlink on each of them:
#!/bin/bash
# Create the symlinks for all blocks in the plugin to the single node_modules/ folder
# Make sure package.json contains ALL dependencies needed for all blocks

# Directory of the bash script
DIR=$(cd $(dirname ${BASH_SOURCE[0]}) && pwd)

# Single node_modules/ folder
NODE_MODULES_DIR="$DIR/node_modules/"

# Function `createSymlinks` will create a 'node_modules/' symlink under every subfolder in the current directory
createSymlinks(){
  # Iterate all subdirectories (which are the blocks)
  for file in ./*
  do
    if [ -d "$file" ]; then
      # Create symlink
      ln -snf "$NODE_MODULES_DIR" "$file"
    fi
  done
}

# Step on the root folder where all blocks are located
cd "$DIR/../blocks/"

# Create the symlinks for all the blocks
createSymlinks
The bash script is executed like this:
bash -x path-to-my-plugin/development/create-symlinks.sh
This script creates symlinks for blocks, but not for packages. This is because, for some reason unknown to me (possibly a bug with Node.js, or maybe some incompatibility with Gutenberg’s dependencies), the block is not built correctly when it references packages which symlink to the node_modules/ folder.
Automating building blocks
Once development is ready, we need to build the block for production. This is done by browsing to the block directory in the terminal, and then executing:
npm run build
This command will produce the optimized script file build/index.js, and generate the sylesheets build/index.css and build/style-index.css.
If we have many blocks in the plugin, this can become tedious. However, this task can also be automated with a bash script, stored as development/build-all-blocks.sh:
#!/bin/bash
# This bash script builds all the blocks

# Directory of the bash script
DIR=$(cd $( dirname ${BASH_SOURCE[0]}) && pwd)

# Function `buildScripts` will run `npm run build` on all subfolders in the current directory
buildScripts(){
  for file in ./*
  do
    if [ -d "$file" ]; then
      cd "$file"
      npm run build
      cd ..
    fi
  done
}

# Step on the root folder where all blocks are located
cd "$DIR/../blocks/"

# Build all blocks
buildScripts
Automating publishing packages
If we have many packages in our plugin, and we decide to expose them to 3rd parties through the npm registry, we can use a specialized tool for this.
Lerna is a tool that optimizes the workflow around managing multi-package repositories. It enables to publish many packages together, running a single command:
lerna publish
Conclusion
The recently launched block directory works with single-block plugins only. However, it doesn’t always make sense to ship all our functionality through a series of single-block plugins, and using a multi-block plugin is still more suitable.
In addition, on both multi-block and single-block plugins we may find shared code, reused across blocks and components. Distributing this code through packages, available not just to our plugin but also to 3rd parties, is a sensible approach.
In this article we learnt how to create a multi-block plugin, how to extract shared code into packages, and how to manage the complexity of dealing with many blocks and packages.


Since quite recently the @wordpress/create-block supports multiple blocks. Could you update your article with regards to those changes?